> ## Documentation Index
> Fetch the complete documentation index at: https://docs.runconverge.com/llms.txt
> Use this file to discover all available pages before exploring further.

# BigQuery

> Setting up a destination with BigQuery

export const IconText = ({name, text, iconSource = "mintlify", iconLocation = "before", iconType = "solid"}) => {
  const sourceUrl = iconSource === 'local' ? `url('/images/icons/${name}.svg')` : `url('https://mintlify.b-cdn.net/v6.5.1/${iconType}/${name}.svg')`;
  return <>
            <div className="inline-block pl-2">
                {iconLocation === 'before' && <div className="h-3.5 w-3.5 fill-gray-800 dark:fill-gray-100 text-gray-800 dark:text-gray-100 inline-block align-middle mr-2">
                        <svg className="w-4 h-4 bg-gray-800 dark:bg-gray-100 " style={{
    maskImage: sourceUrl,
    maskRepeat: "no-repeat",
    maskPosition: "center center"
  }} />
                    </div>}
                <span className="inline-block align-middle font-semibold fill-gray-800 dark:fill-gray-100 text-gray-800 dark:text-gray-100 pl-1 pr-2">{text}</span>
                {iconLocation === 'after' && <div className="h-3.5 w-3.5 fill-gray-800 dark:fill-gray-100 text-gray-800 dark:text-gray-100 inline-block align-middle mr-2">
                        <svg className="w-4 h-4 bg-gray-800 dark:bg-gray-100 pr-3" style={{
    maskImage: sourceUrl,
    maskRepeat: "no-repeat",
    maskPosition: "center center"
  }} />
                    </div>}
            </div>
        </>;
};

export const Icon = ({name}) => {
  return <div className="h-4 w-4 fill-gray-800 dark:fill-gray-100 text-gray-800 dark:text-gray-100 inline-block align-middle">
            <svg className="w-4 h-4 bg-gray-800 dark:bg-gray-100" style={{
    maskImage: `url('https://mintlify.b-cdn.net/v6.5.1/solid/${name}.svg')`,
    maskRepeat: "no-repeat",
    maskPosition: "center center"
  }} />
        </div>;
};

## Overview

Destination Type:  <IconText text="Server-side" name="server" iconType="duotone" iconLocation="after" />

***

## Installation instructions

<Steps>
  <Step icon="table" title="1. Create a BigQuery Table for your Converge Data">
    1. Log into your Google Cloud console at `console.cloud.google.com`

    2. Choose your relevant Google Cloud Project from the top bar. If you do not have a Google Cloud Project yet, you can create one following the instructions [here](https://developers.google.com/workspace/guides/create-project).

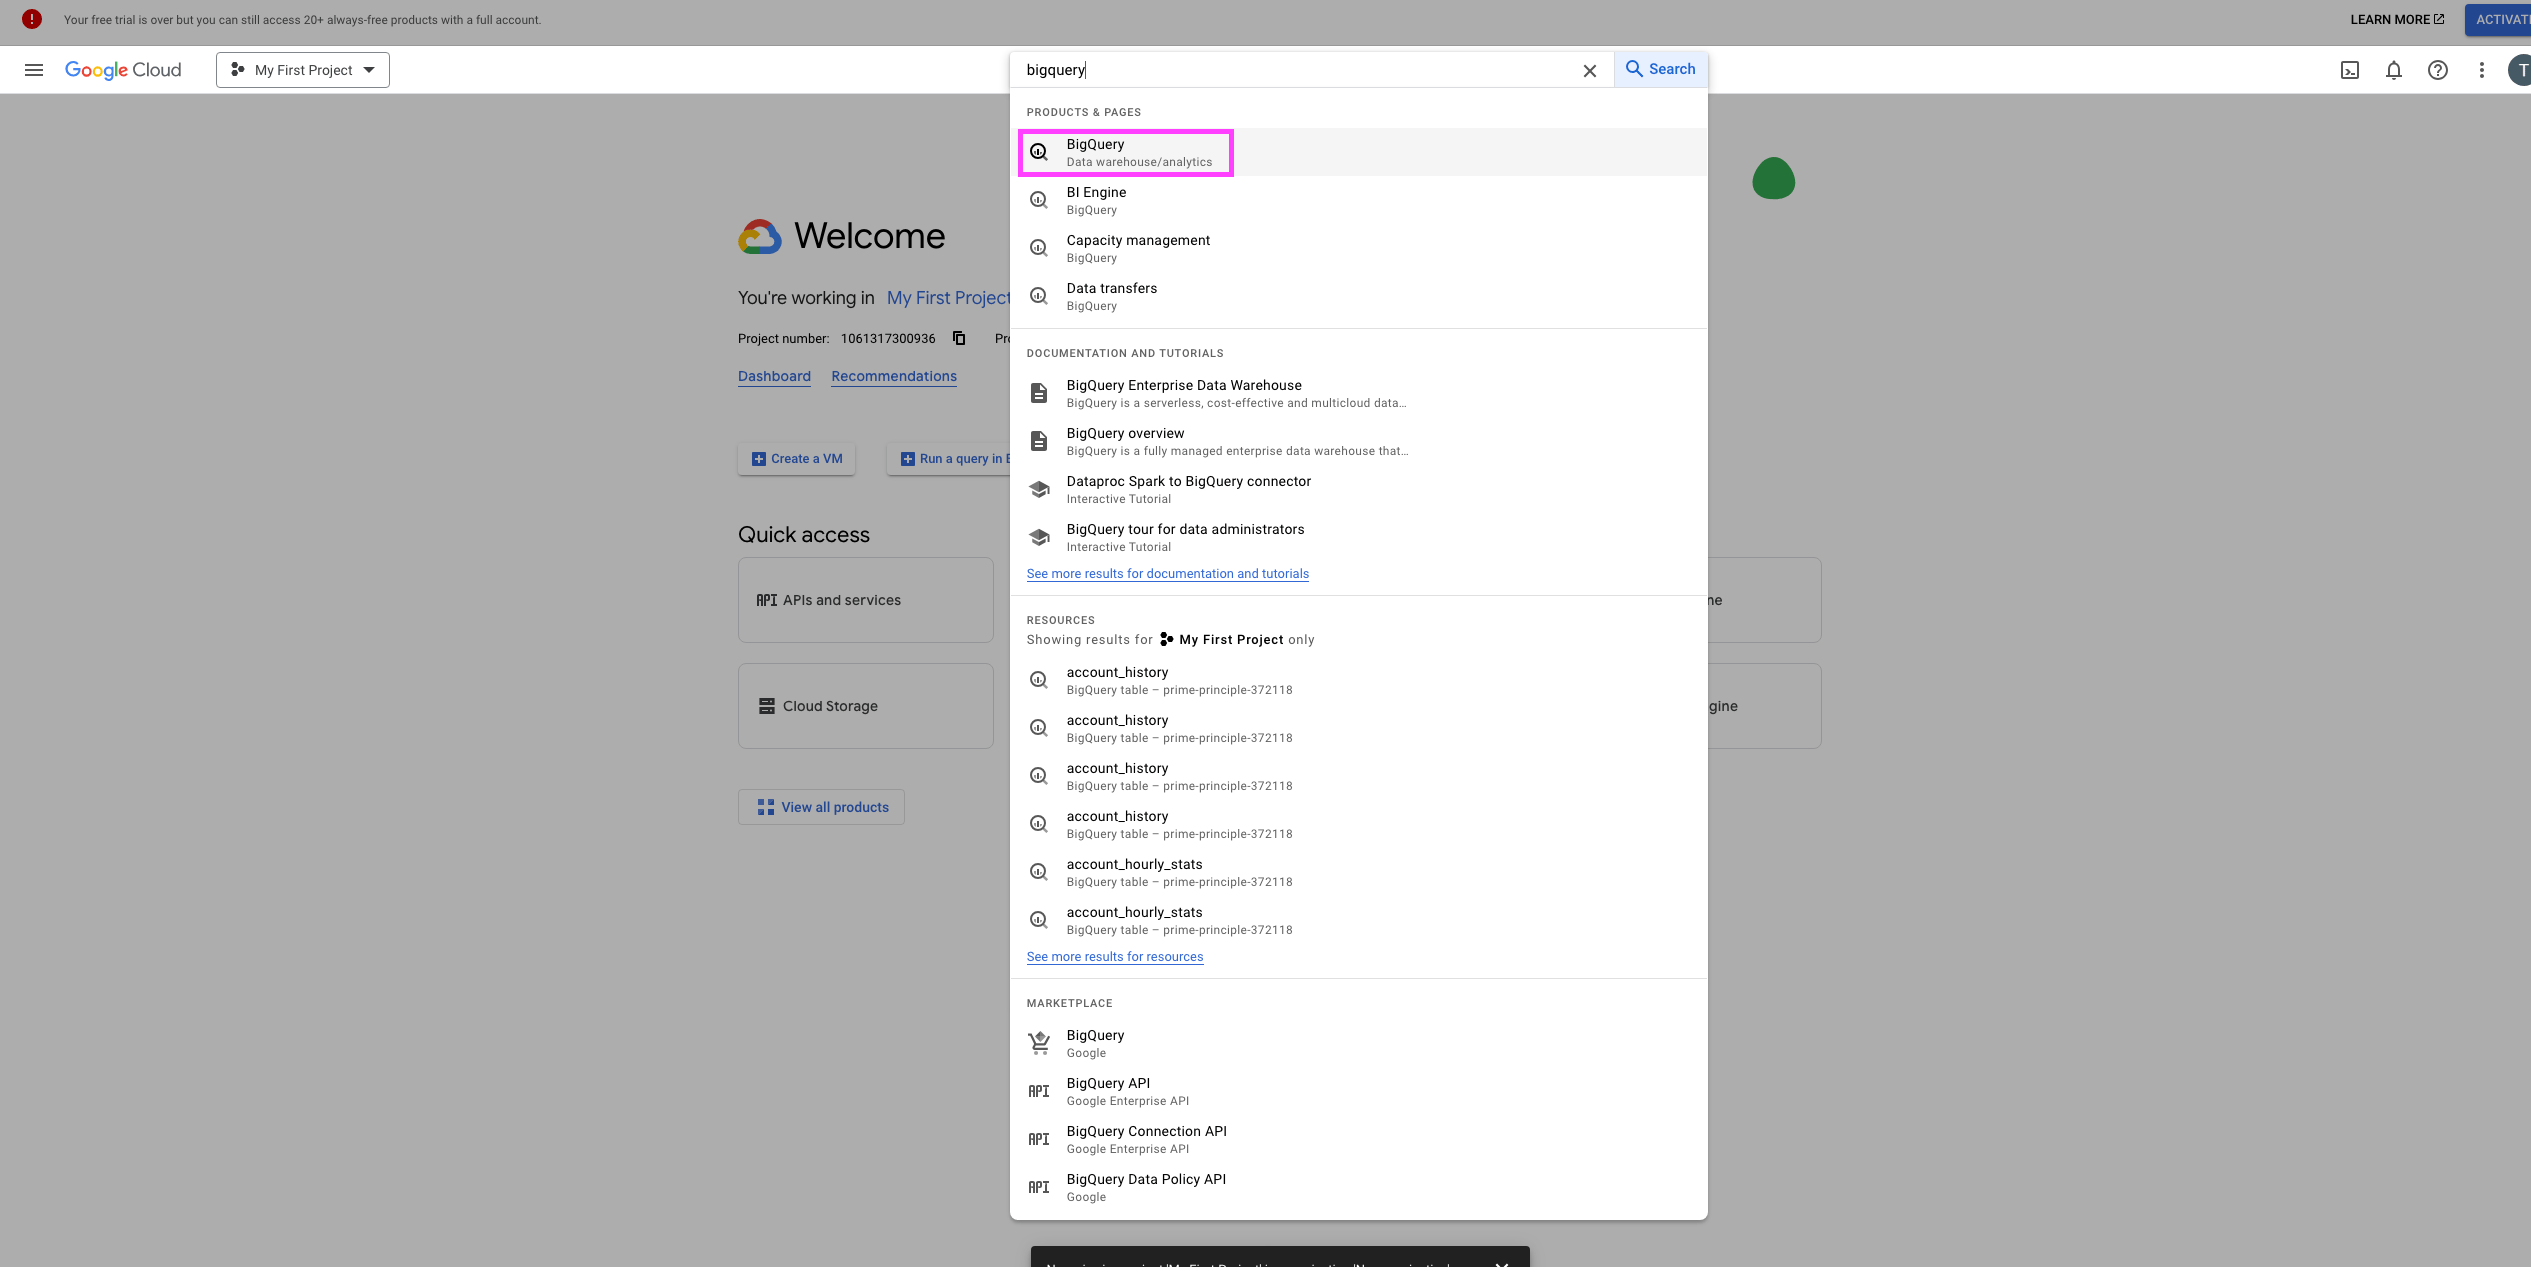
    3. From the top search bar, search for `bigquery` and pick the **BigQuery** service.
        
           <Frame>
             <img src="https://mintcdn.com/converge/dh0K_Fgr0_qazJsh/images/destinations/bigquery/create_bigq_table_1.png?fit=max&auto=format&n=dh0K_Fgr0_qazJsh&q=85&s=9bc56567282e95e5b97466c62450df9b" alt="bq-1" width="2531" height="1267" data-path="images/destinations/bigquery/create_bigq_table_1.png" />
           </Frame>

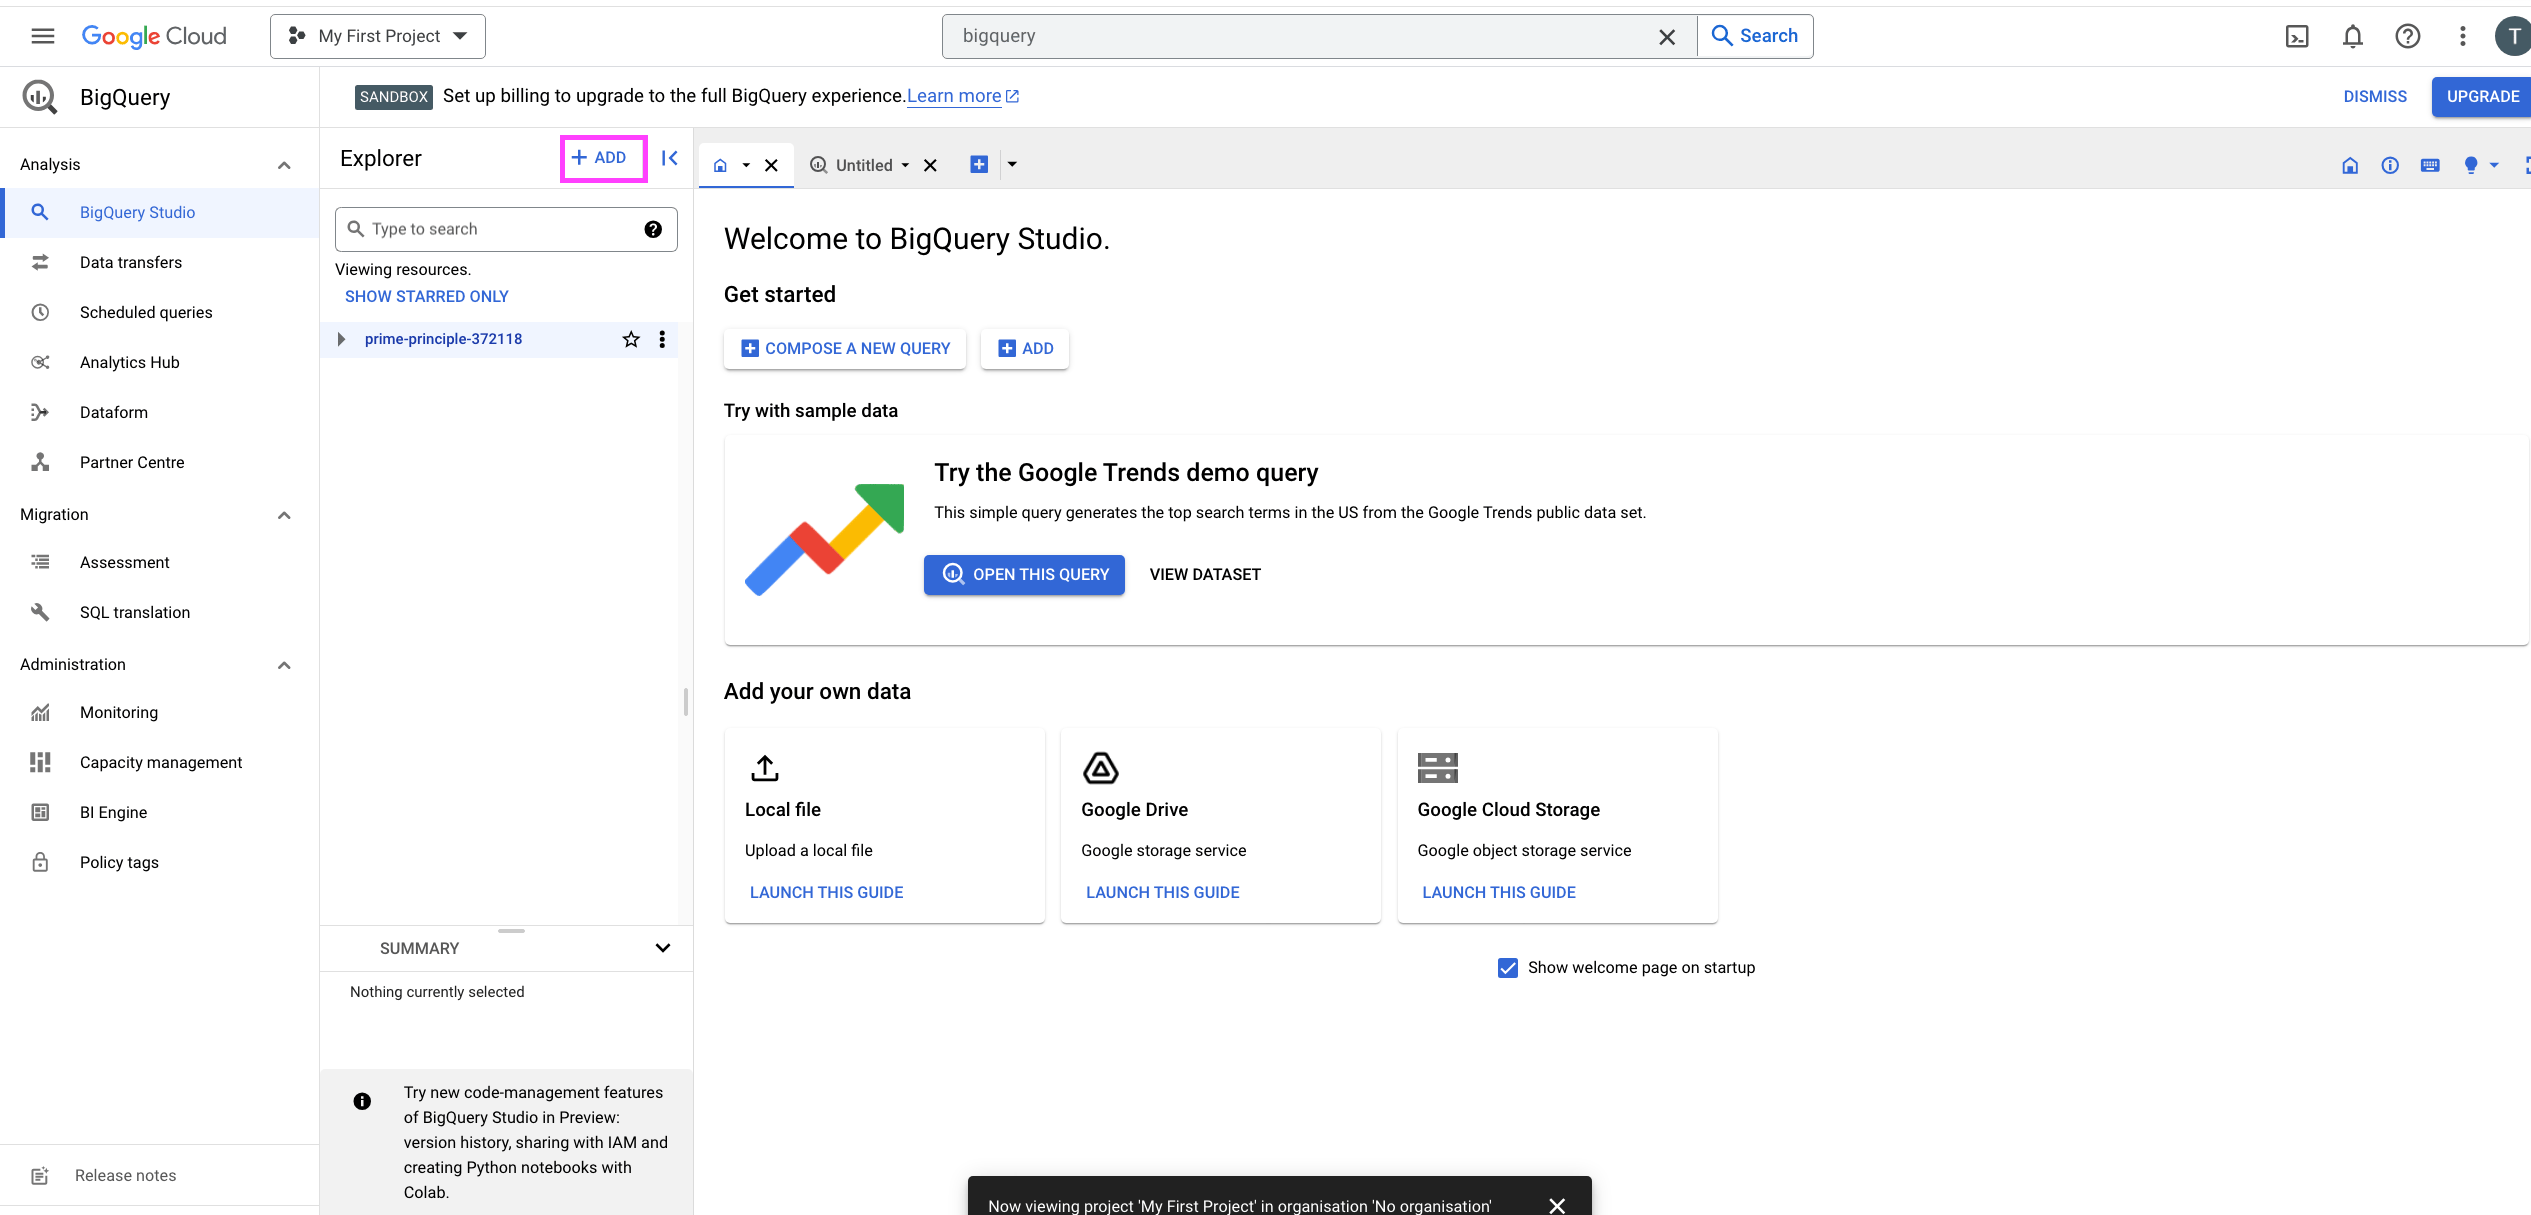
    4. In the BigQuery Explorer, click on **Add**.
        
           <Frame>
             <img src="https://mintcdn.com/converge/dh0K_Fgr0_qazJsh/images/destinations/bigquery/create_bigq_table_2.png?fit=max&auto=format&n=dh0K_Fgr0_qazJsh&q=85&s=4965739f38da4664f0e1bb0a24e3aefc" alt="bq-2" width="2531" height="1215" data-path="images/destinations/bigquery/create_bigq_table_2.png" />
           </Frame>

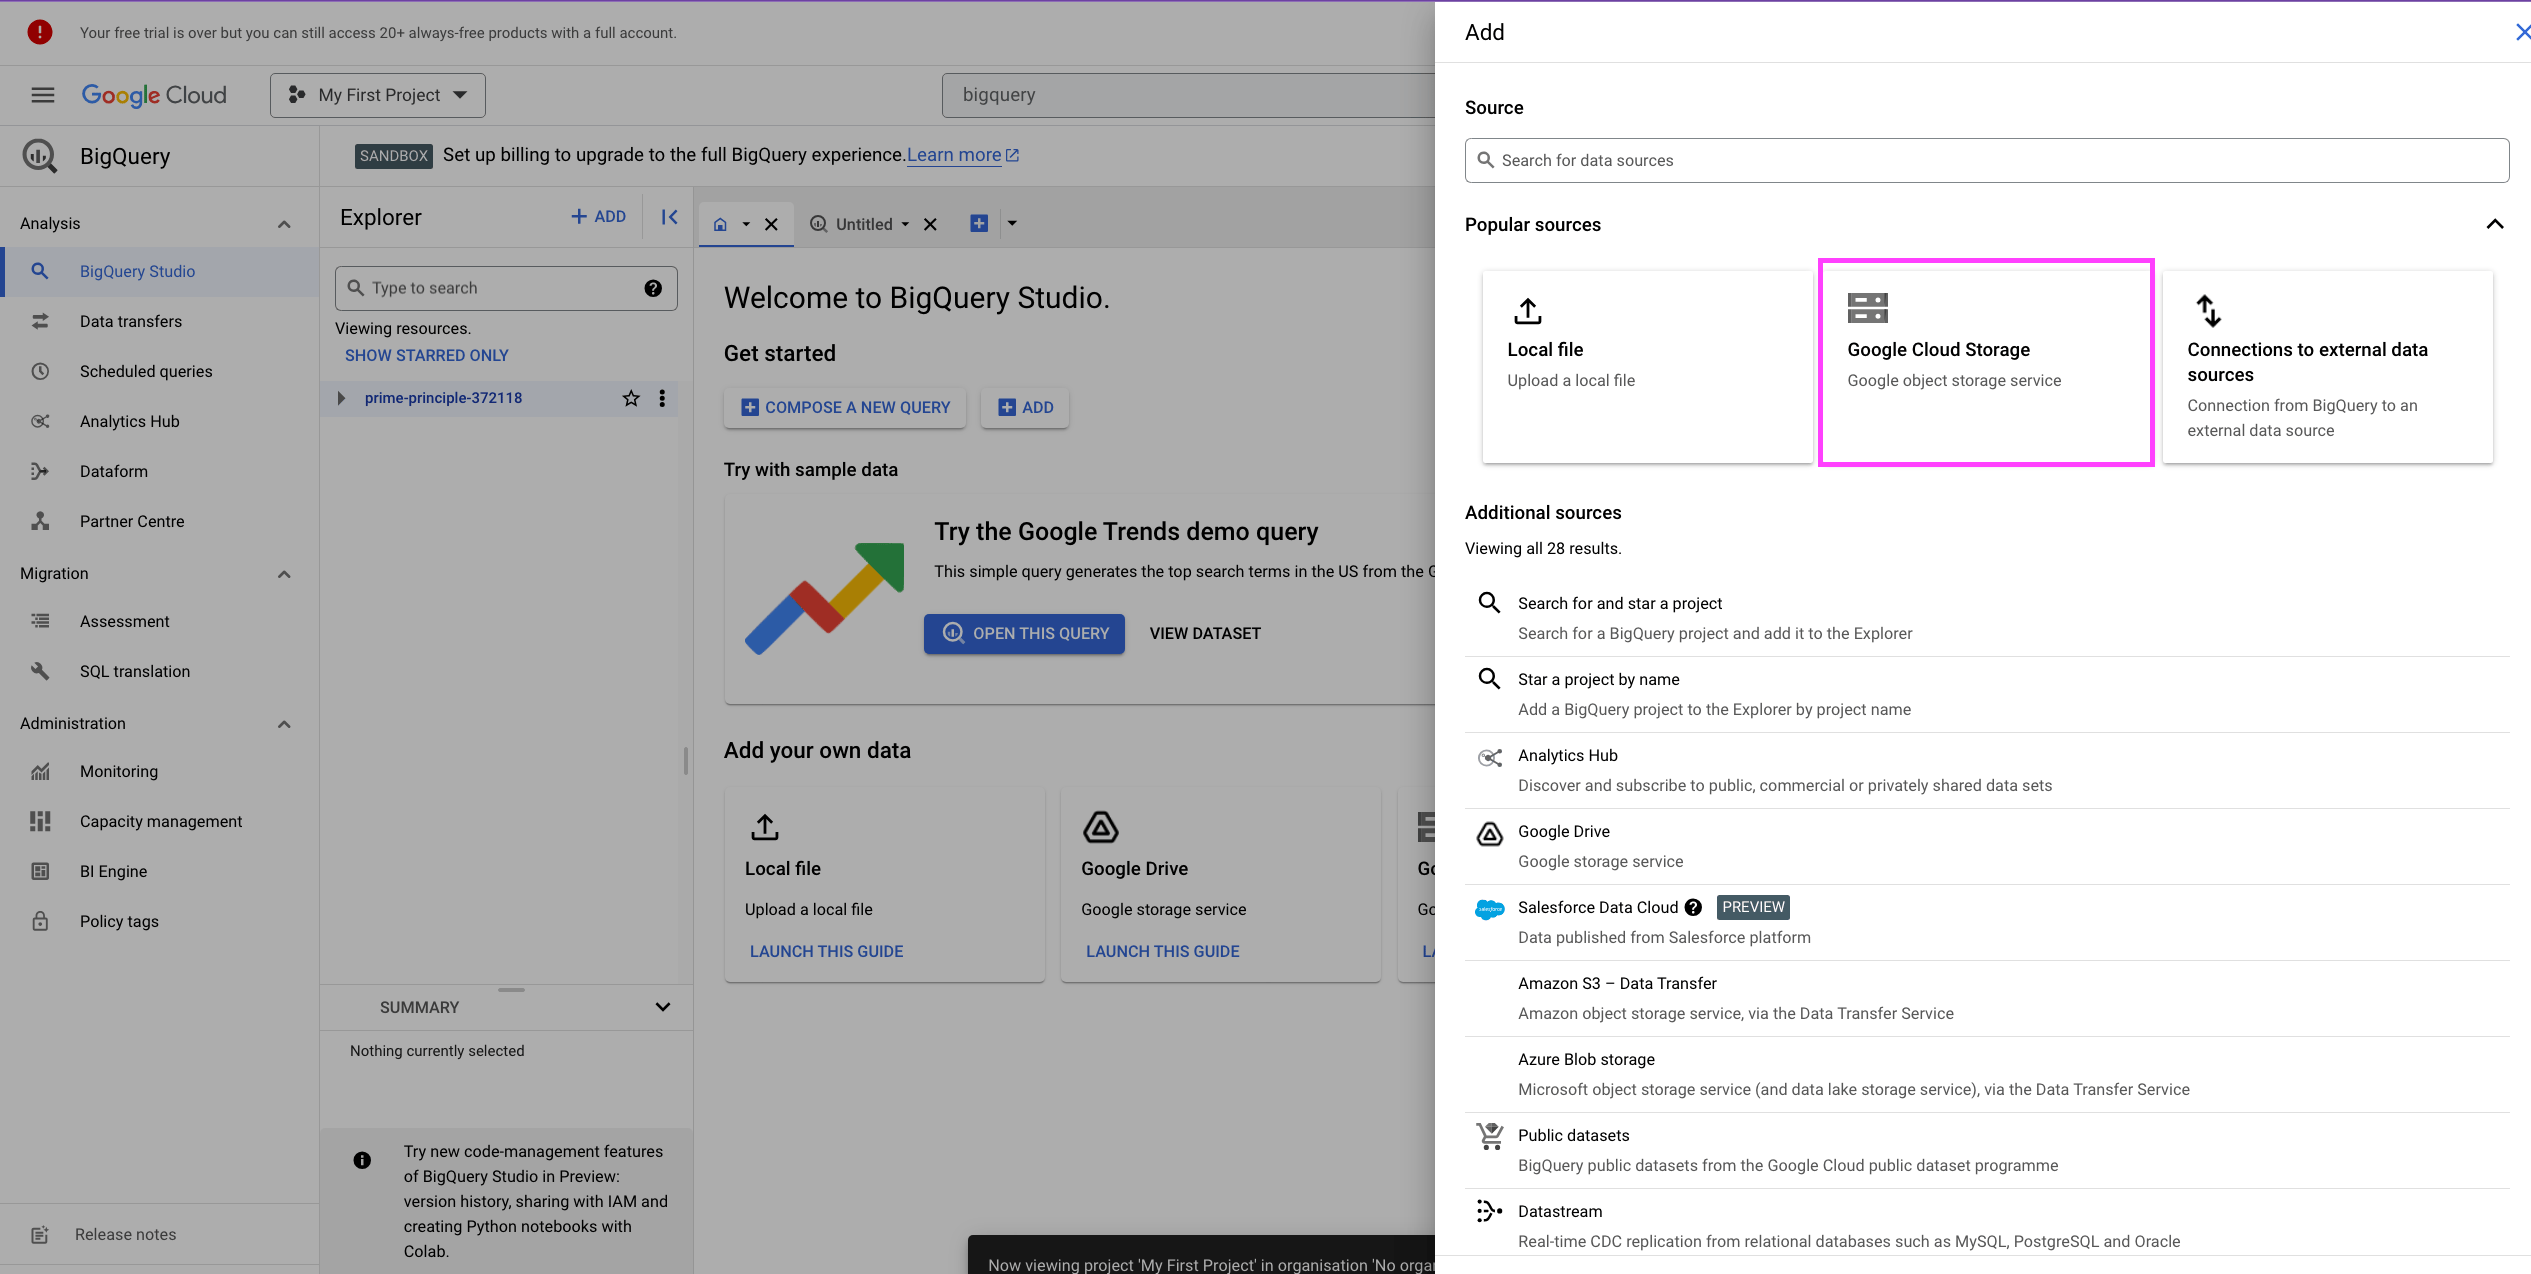
    5. From the side-pane, choose **Google Cloud Storage**, this will open the *Create table* modal.
        
           <Frame>
             <img src="https://mintcdn.com/converge/dh0K_Fgr0_qazJsh/images/destinations/bigquery/create_bigq_table_3.png?fit=max&auto=format&n=dh0K_Fgr0_qazJsh&q=85&s=a7d292700dd656f73409a3b995795680" alt="bq-3" width="2531" height="1274" data-path="images/destinations/bigquery/create_bigq_table_3.png" />
           </Frame>

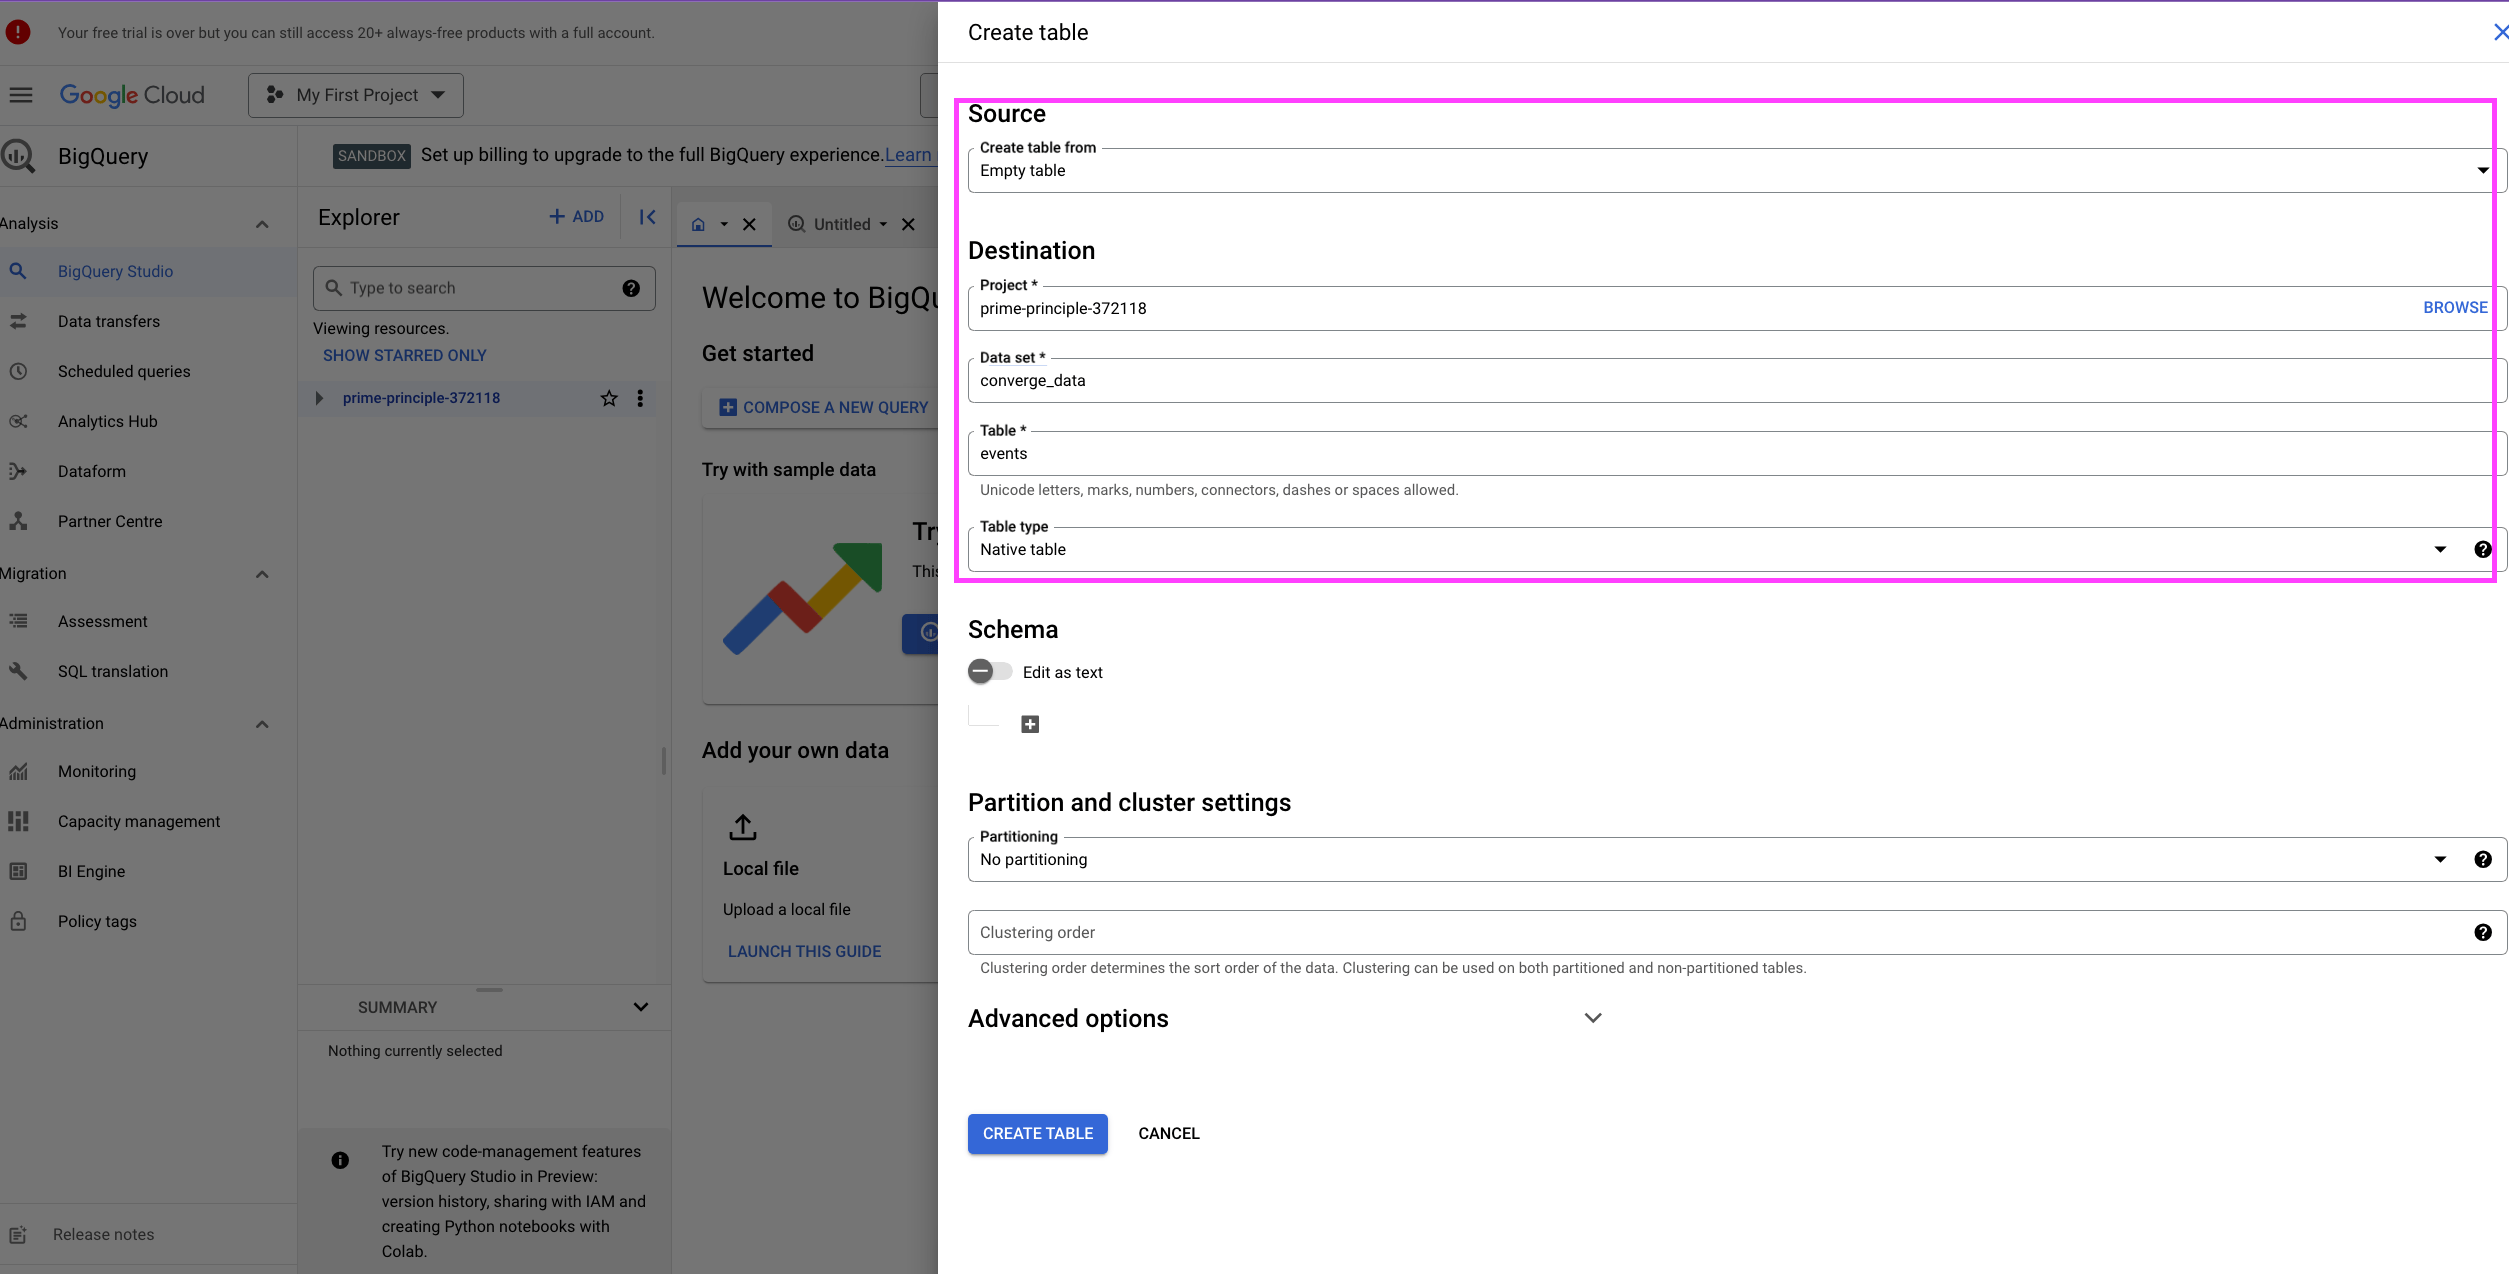
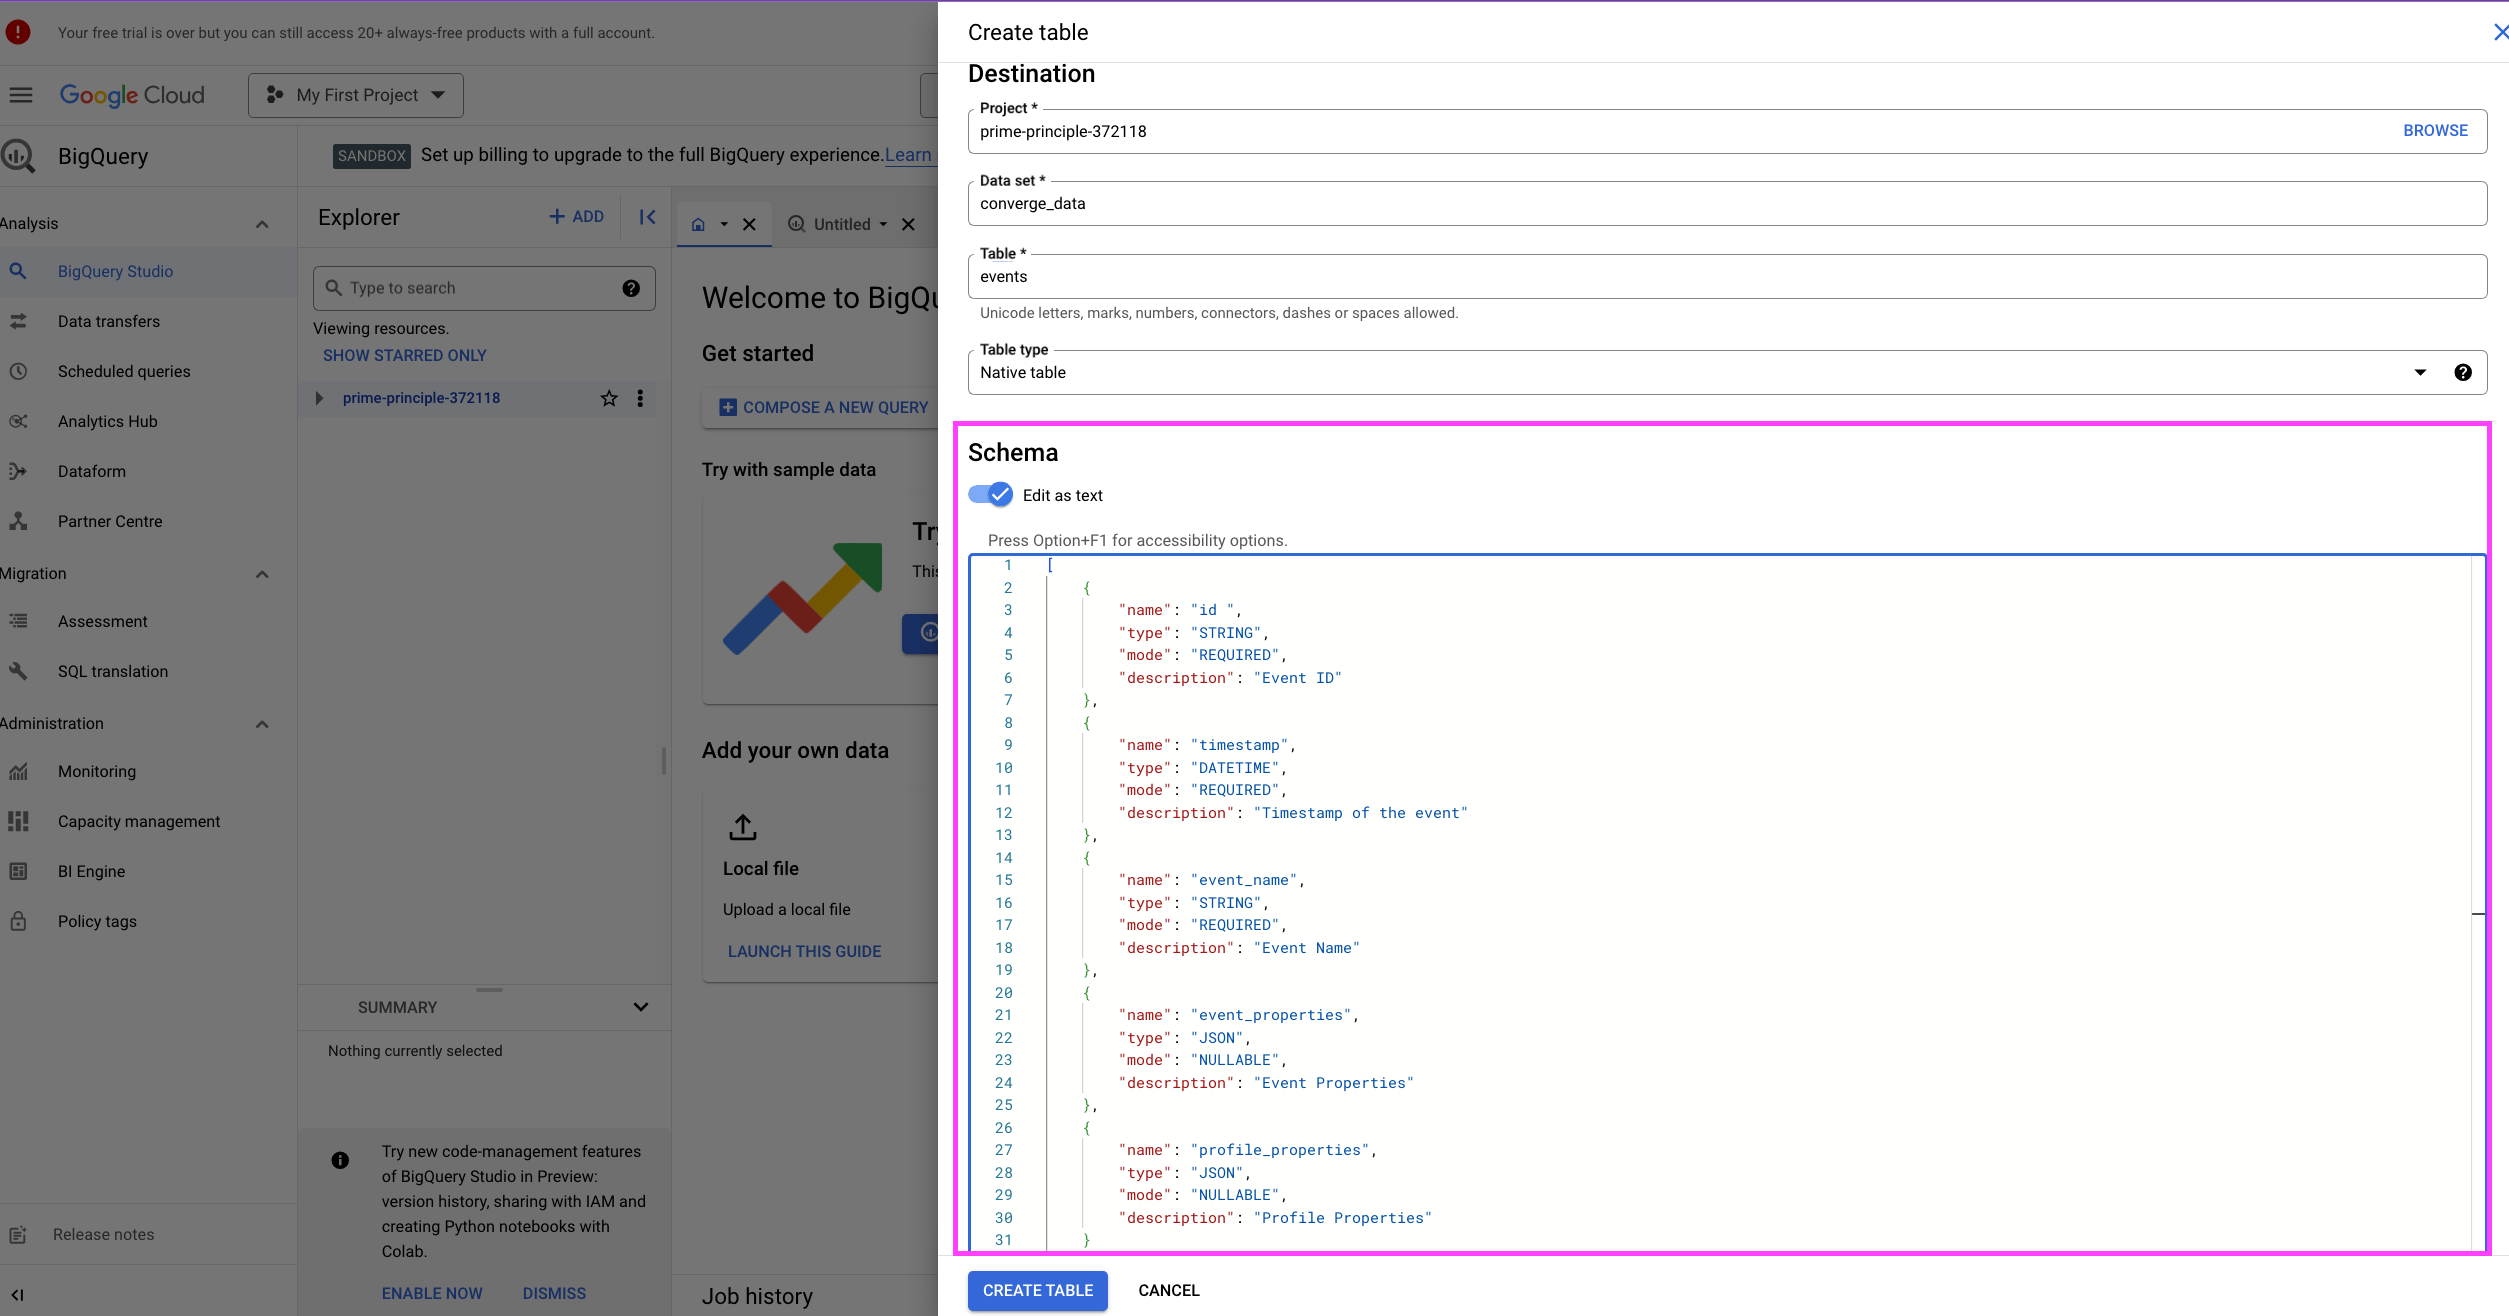
    6. In the *Create table* modal, choose `Empty table` as a Source. Create a new *Data set* and call it `converge_data`, in the *Table*-field choose a name for your table, e.g. `events`.
        
           <Frame>
             <img src="https://mintcdn.com/converge/dh0K_Fgr0_qazJsh/images/destinations/bigquery/create_bigq_table_4.png?fit=max&auto=format&n=dh0K_Fgr0_qazJsh&q=85&s=974dd3630dc94f3a65c6e498981b8aee" alt="bq-4" width="2509" height="1274" data-path="images/destinations/bigquery/create_bigq_table_4.png" />
           </Frame>

    7. In the Schema section, flip the switch to **Edit as text** and paste the schema below. Click on **Create Table** after.
           <Frame>
             <img src="https://mintcdn.com/converge/dh0K_Fgr0_qazJsh/images/destinations/bigquery/create_bigq_table_5.png?fit=max&auto=format&n=dh0K_Fgr0_qazJsh&q=85&s=5742cf33b9f61c58e34318067b2d6101" alt="bq-5" width="2509" height="1316" data-path="images/destinations/bigquery/create_bigq_table_5.png" />
           </Frame>

           <Accordion icon="code" title="Schema">
             ```json JSON theme={null}
             [
               {
                 "name": "id",
                 "type": "STRING",
                 "mode": "REQUIRED",
                 "description": "Event ID"
               },
               {
                 "name": "timestamp",
                 "type": "DATETIME",
                 "mode": "REQUIRED",
                 "description": "Timestamp when the event occurred"
               },
               {
                 "name": "event_name",
                 "type": "STRING",
                 "mode": "REQUIRED"
               },
               {
                 "name": "profile_id",
                 "type": "INTEGER",
                 "mode": "REQUIRED",
                 "description": "Profile ID"
               },
               {
                 "name": "event_properties",
                 "type": "JSON",
                 "mode": "NULLABLE",
                 "description": "Properties of the event"
               },
               {
                 "name": "profile_properties",
                 "type": "JSON",
                 "mode": "NULLABLE",
                 "description": "Properties of the profile this event belongs to"
               },
               {
                 "name": "session_id",
                 "type": "STRING",
                 "mode": "NULLABLE",
                 "description": "Session Id of the session this event belongs to"
               },
               {
                 "name": "session_properties",
                 "type": "JSON",
                 "mode": "NULLABLE",
                 "description": "Properties of the session this event belongs to"
               },
               {
                 "name": "source_id",
                 "type": "STRING",
                 "mode": "NULLABLE",
                 "description": "ID of the source that generated this event prefixed with 'datasource_' or 'pixel_' depending on the source type"
               },
               {
                 "name": "source_name",
                 "type": "STRING",
                 "mode": "NULLABLE",
                 "description": "Name of the source that generated this event"
               }
             ]
             ```
           </Accordion>

    Great, now you have a table for your Converge Events, follow the guide below to set up a destination that streams Converge events into this BigQuery Table
  </Step>

  <Step icon="bars-staggered" title="2. Stream Converge Data into your BigQuery table">
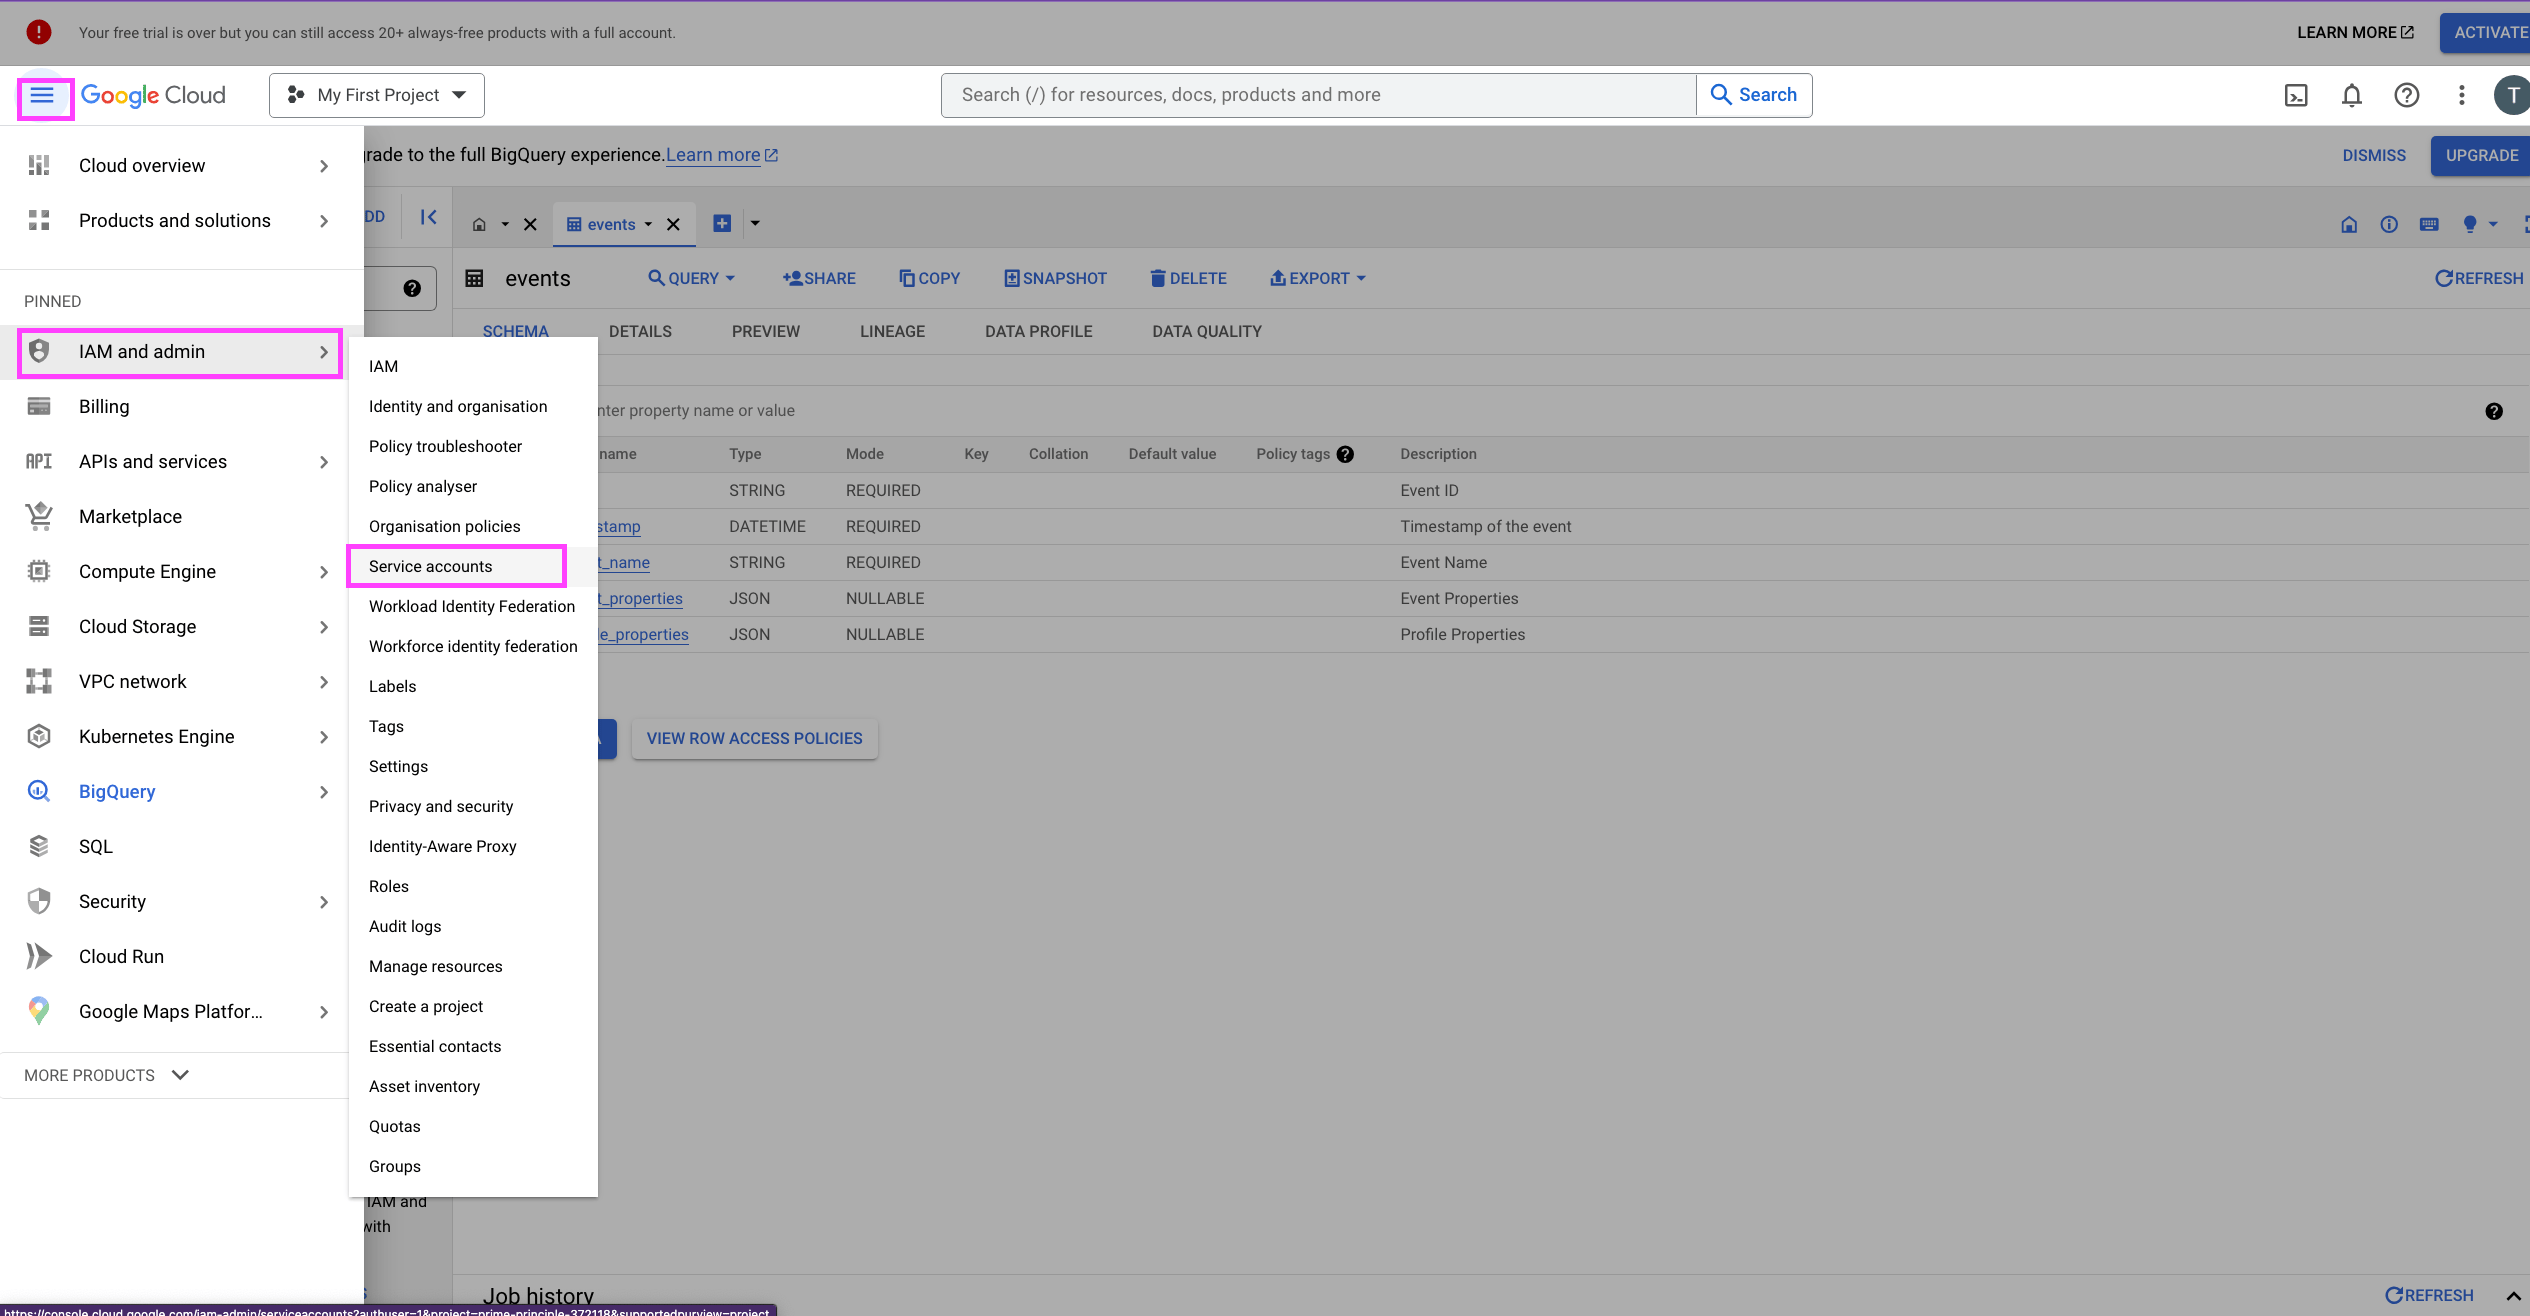
    8. The first thing we need to do in Google Cloud is set up a service account. Start by going to the sidebar menu and choosing *IAM and admin* > *Service accounts*.
        
           <Frame>
             <img src="https://mintcdn.com/converge/jqdxrbHdidXe9kgB/images/destinations/bigquery/bigq_service_1.png?fit=max&auto=format&n=jqdxrbHdidXe9kgB&q=85&s=ee88cdf5754537dfa9ec077e86cbeb9f" alt="bq-s-1" width="2530" height="1316" data-path="images/destinations/bigquery/bigq_service_1.png" />
           </Frame>

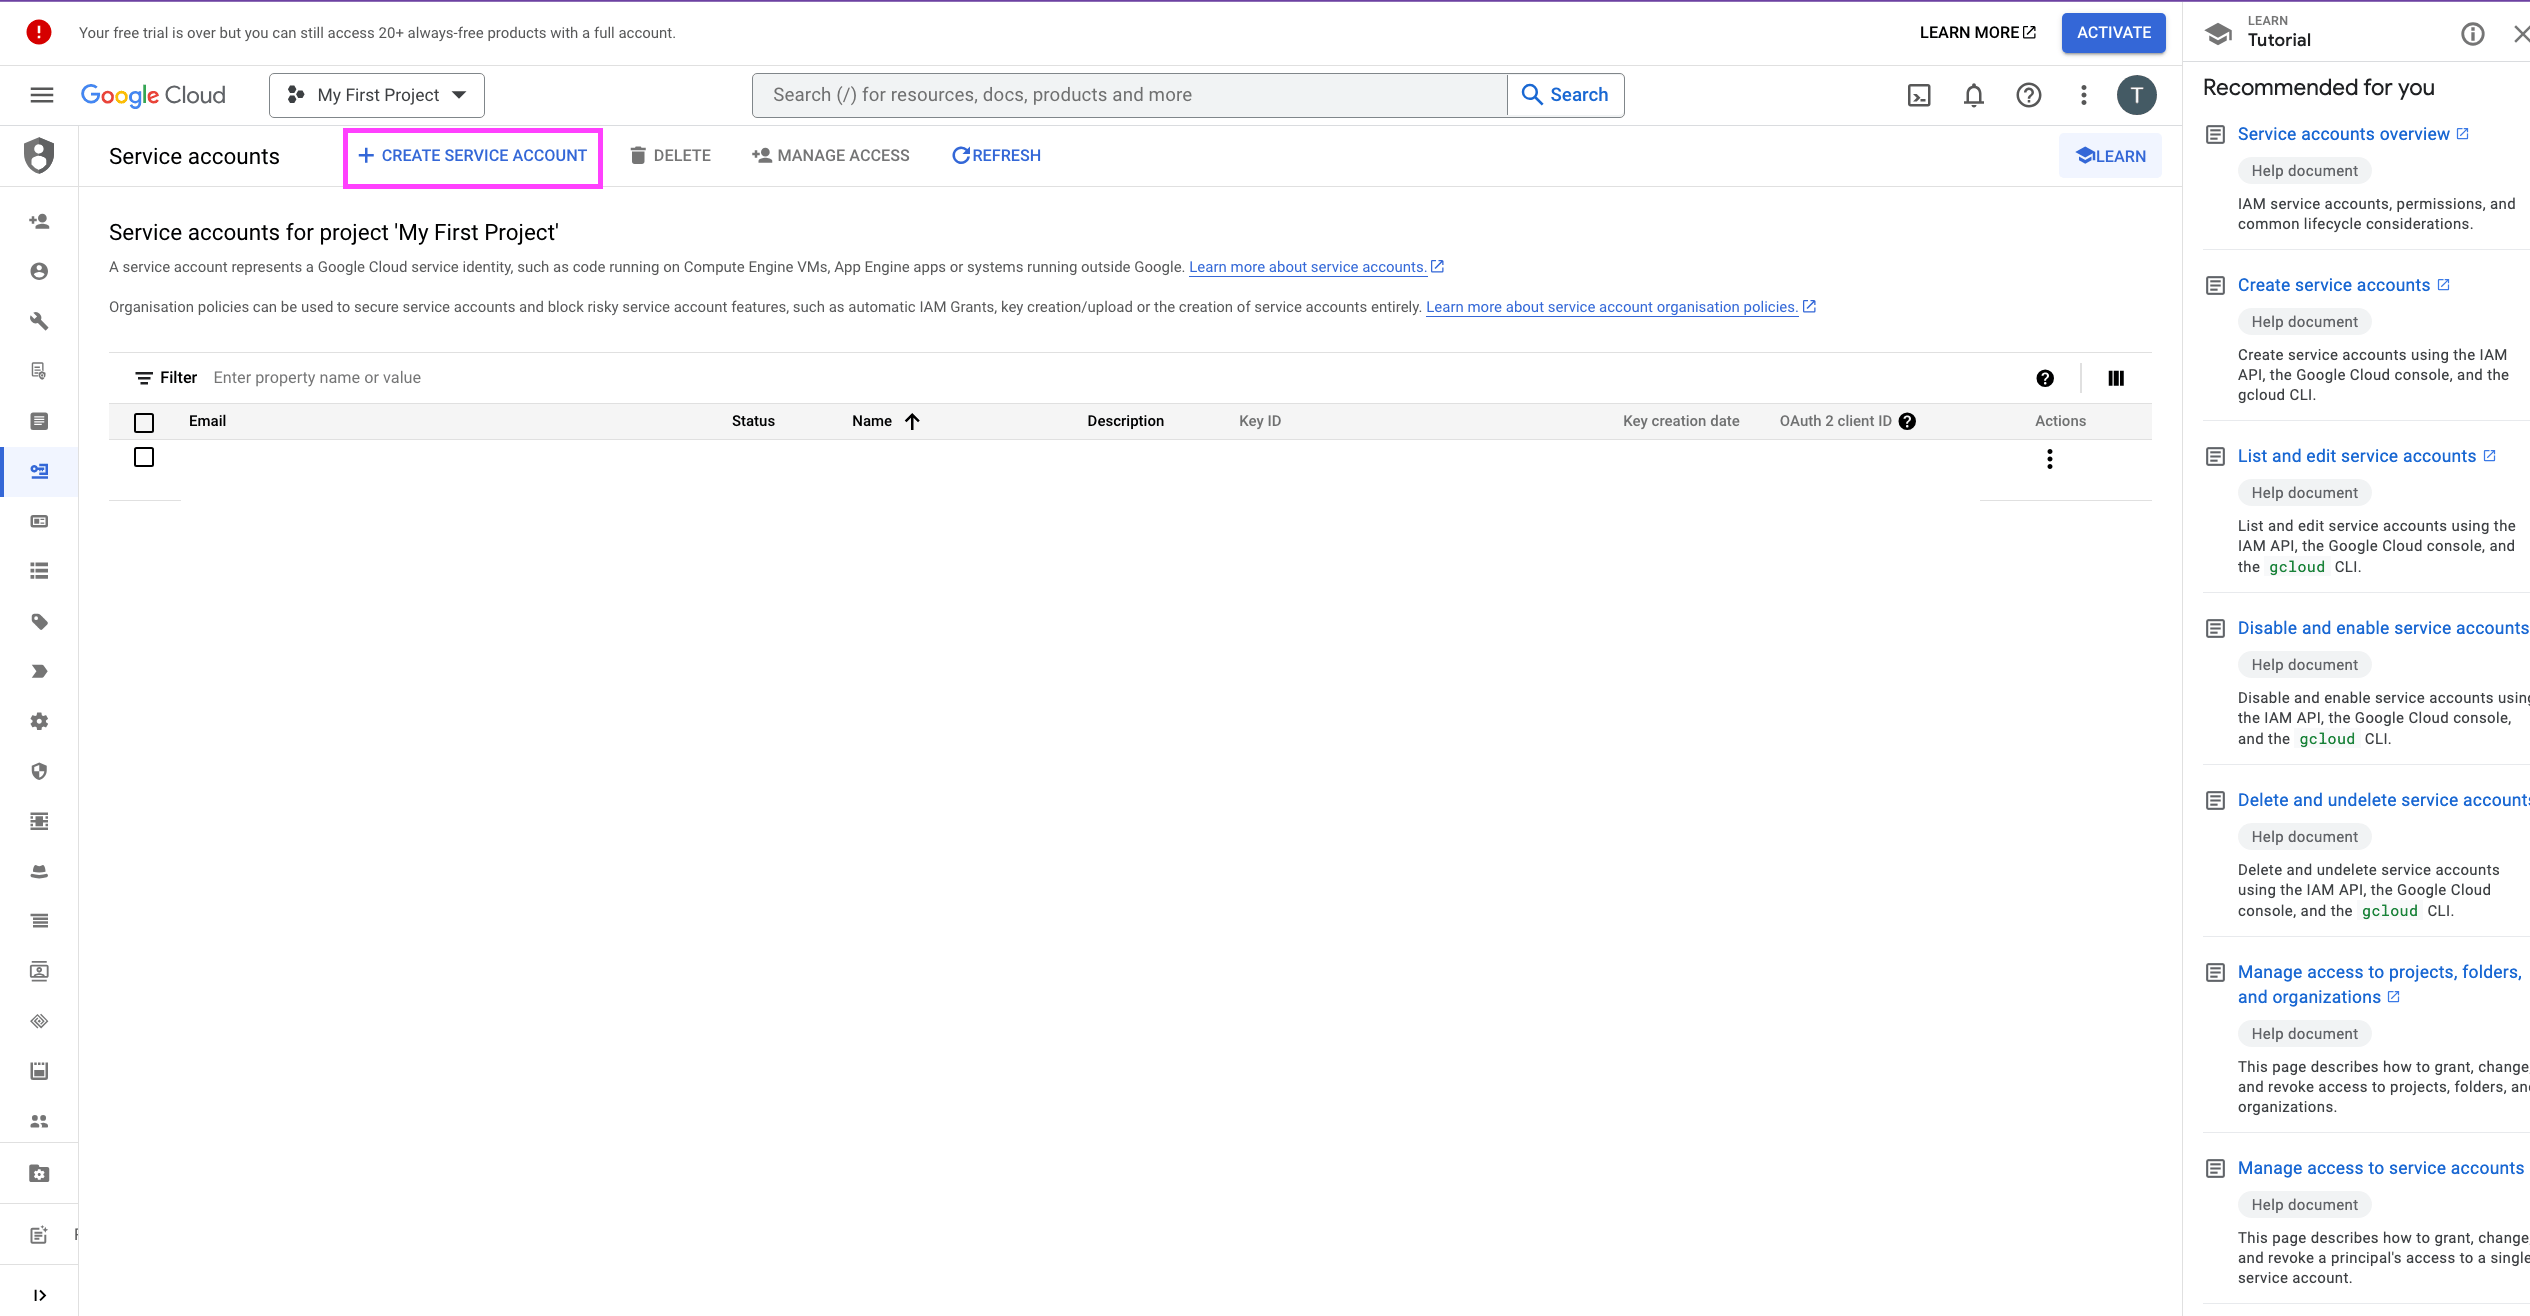
    9. Click on **Create Service Account**.
        
           <Frame>
             <img src="https://mintcdn.com/converge/jqdxrbHdidXe9kgB/images/destinations/bigquery/bigq_service_2.png?fit=max&auto=format&n=jqdxrbHdidXe9kgB&q=85&s=ae124e8aca73eaea937f3152d0729018" alt="bq-s-2" width="2530" height="1316" data-path="images/destinations/bigquery/bigq_service_2.png" />
           </Frame>

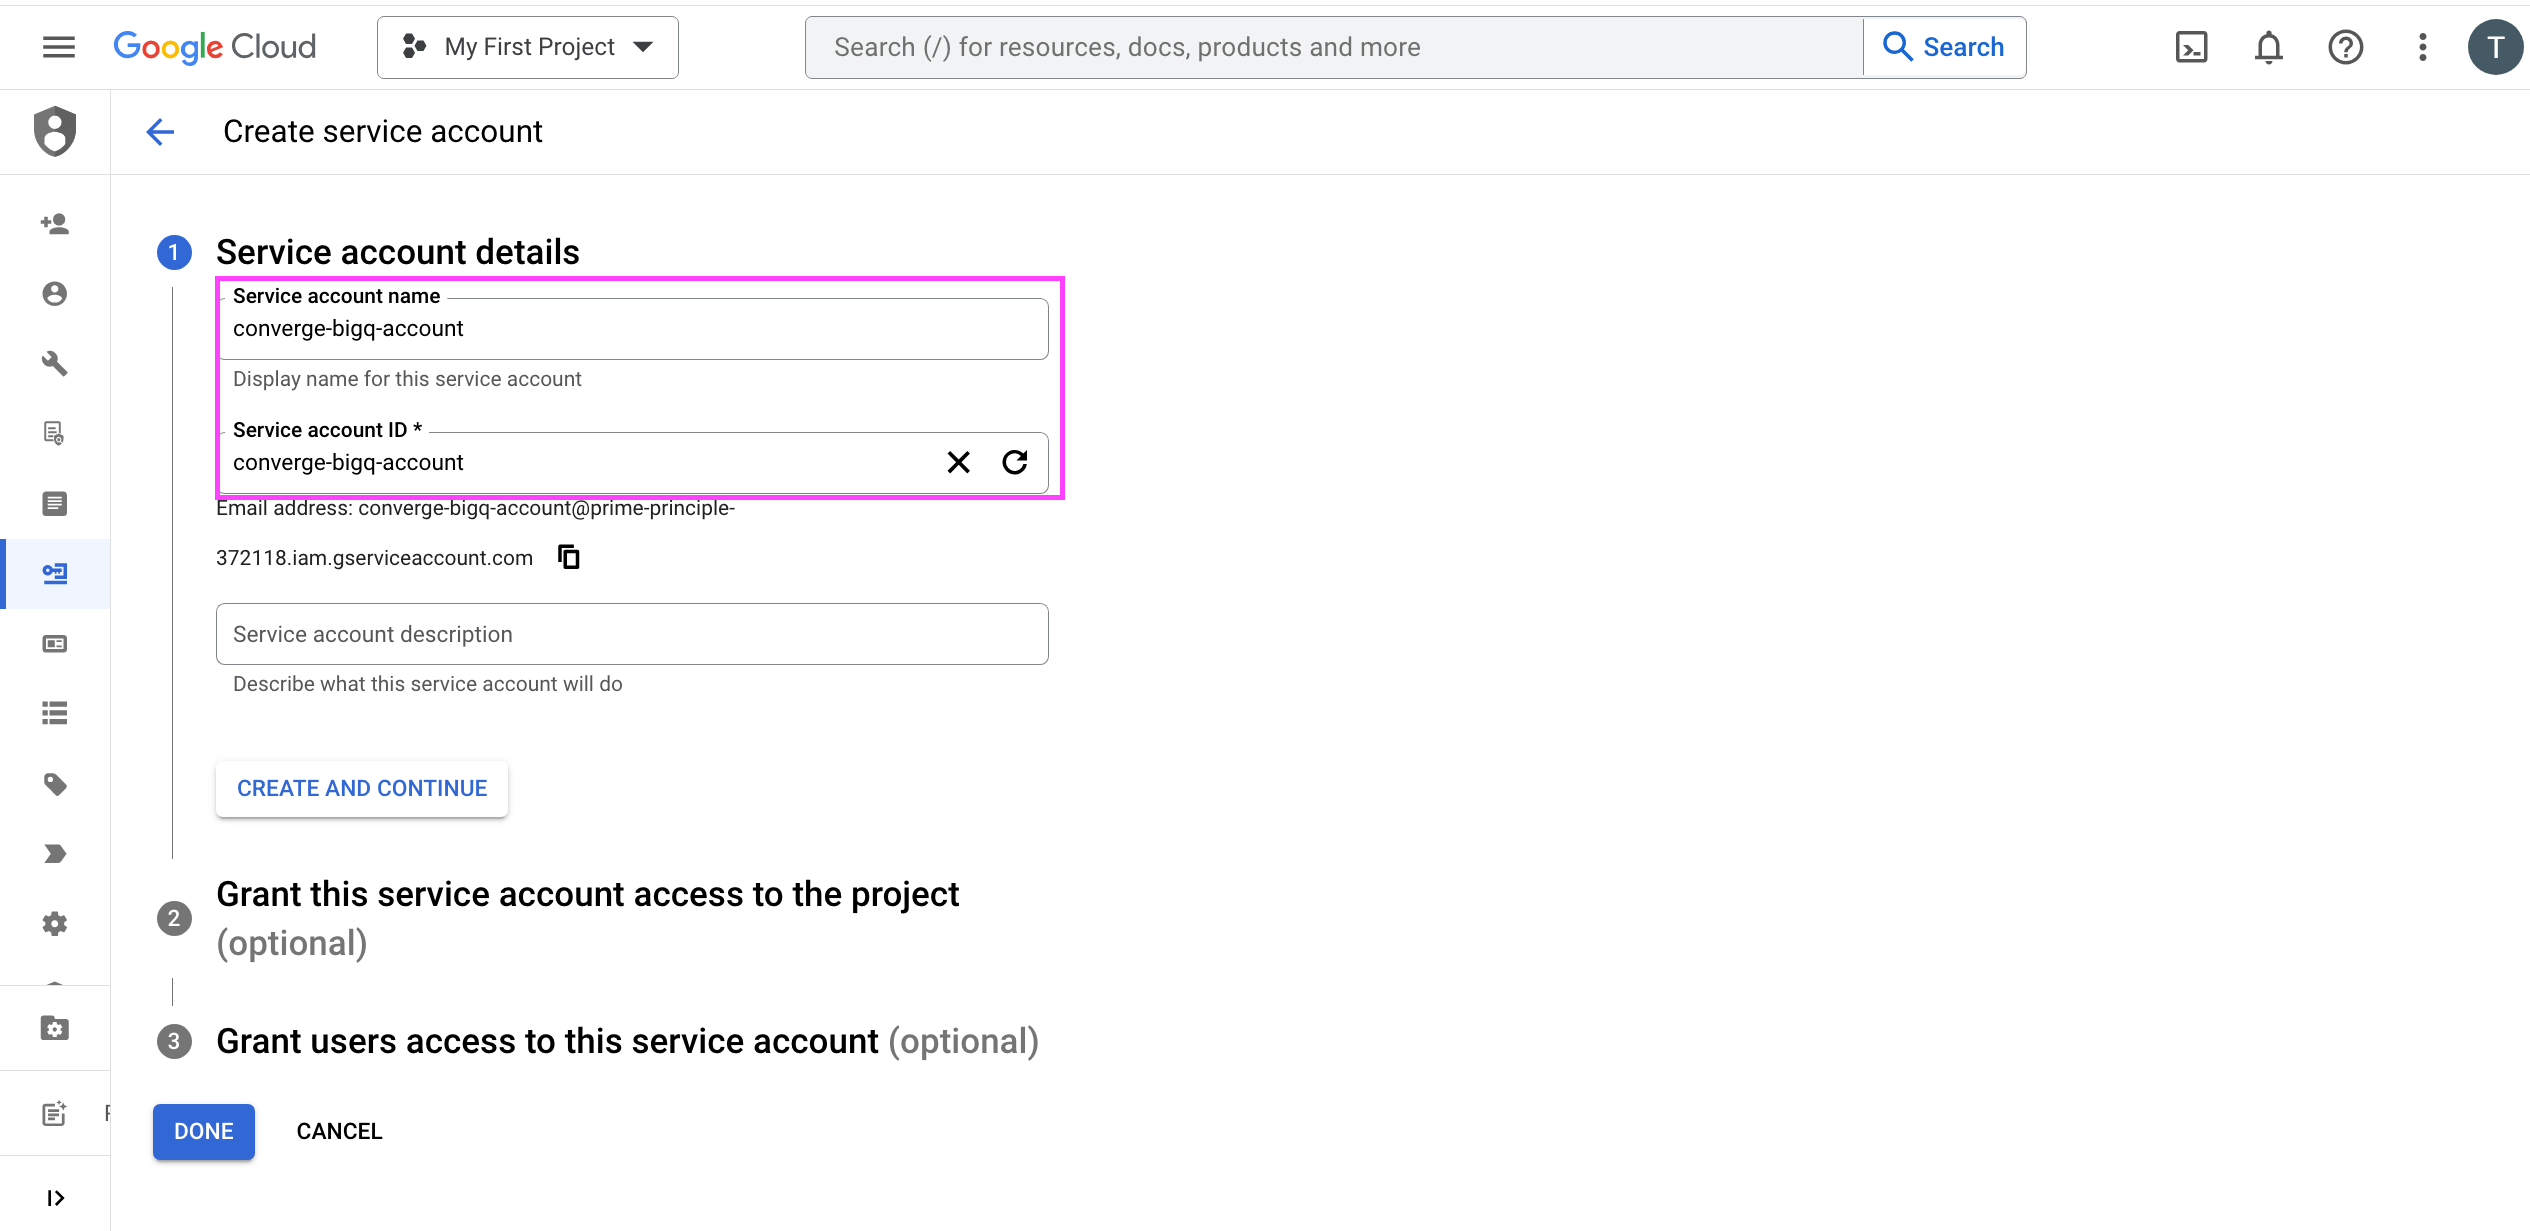
    10. Fill in service account name, e.g. `converge-bigq-account` and click on **Create and continue**.
         

    <Frame>
      <img src="https://mintcdn.com/converge/jqdxrbHdidXe9kgB/images/destinations/bigquery/bigq_service_3.png?fit=max&auto=format&n=jqdxrbHdidXe9kgB&q=85&s=8f0d8c18e5cf1a87c0dd034a41fba59f" alt="bq-s-3" width="2530" height="1231" data-path="images/destinations/bigquery/bigq_service_3.png" />
    </Frame>

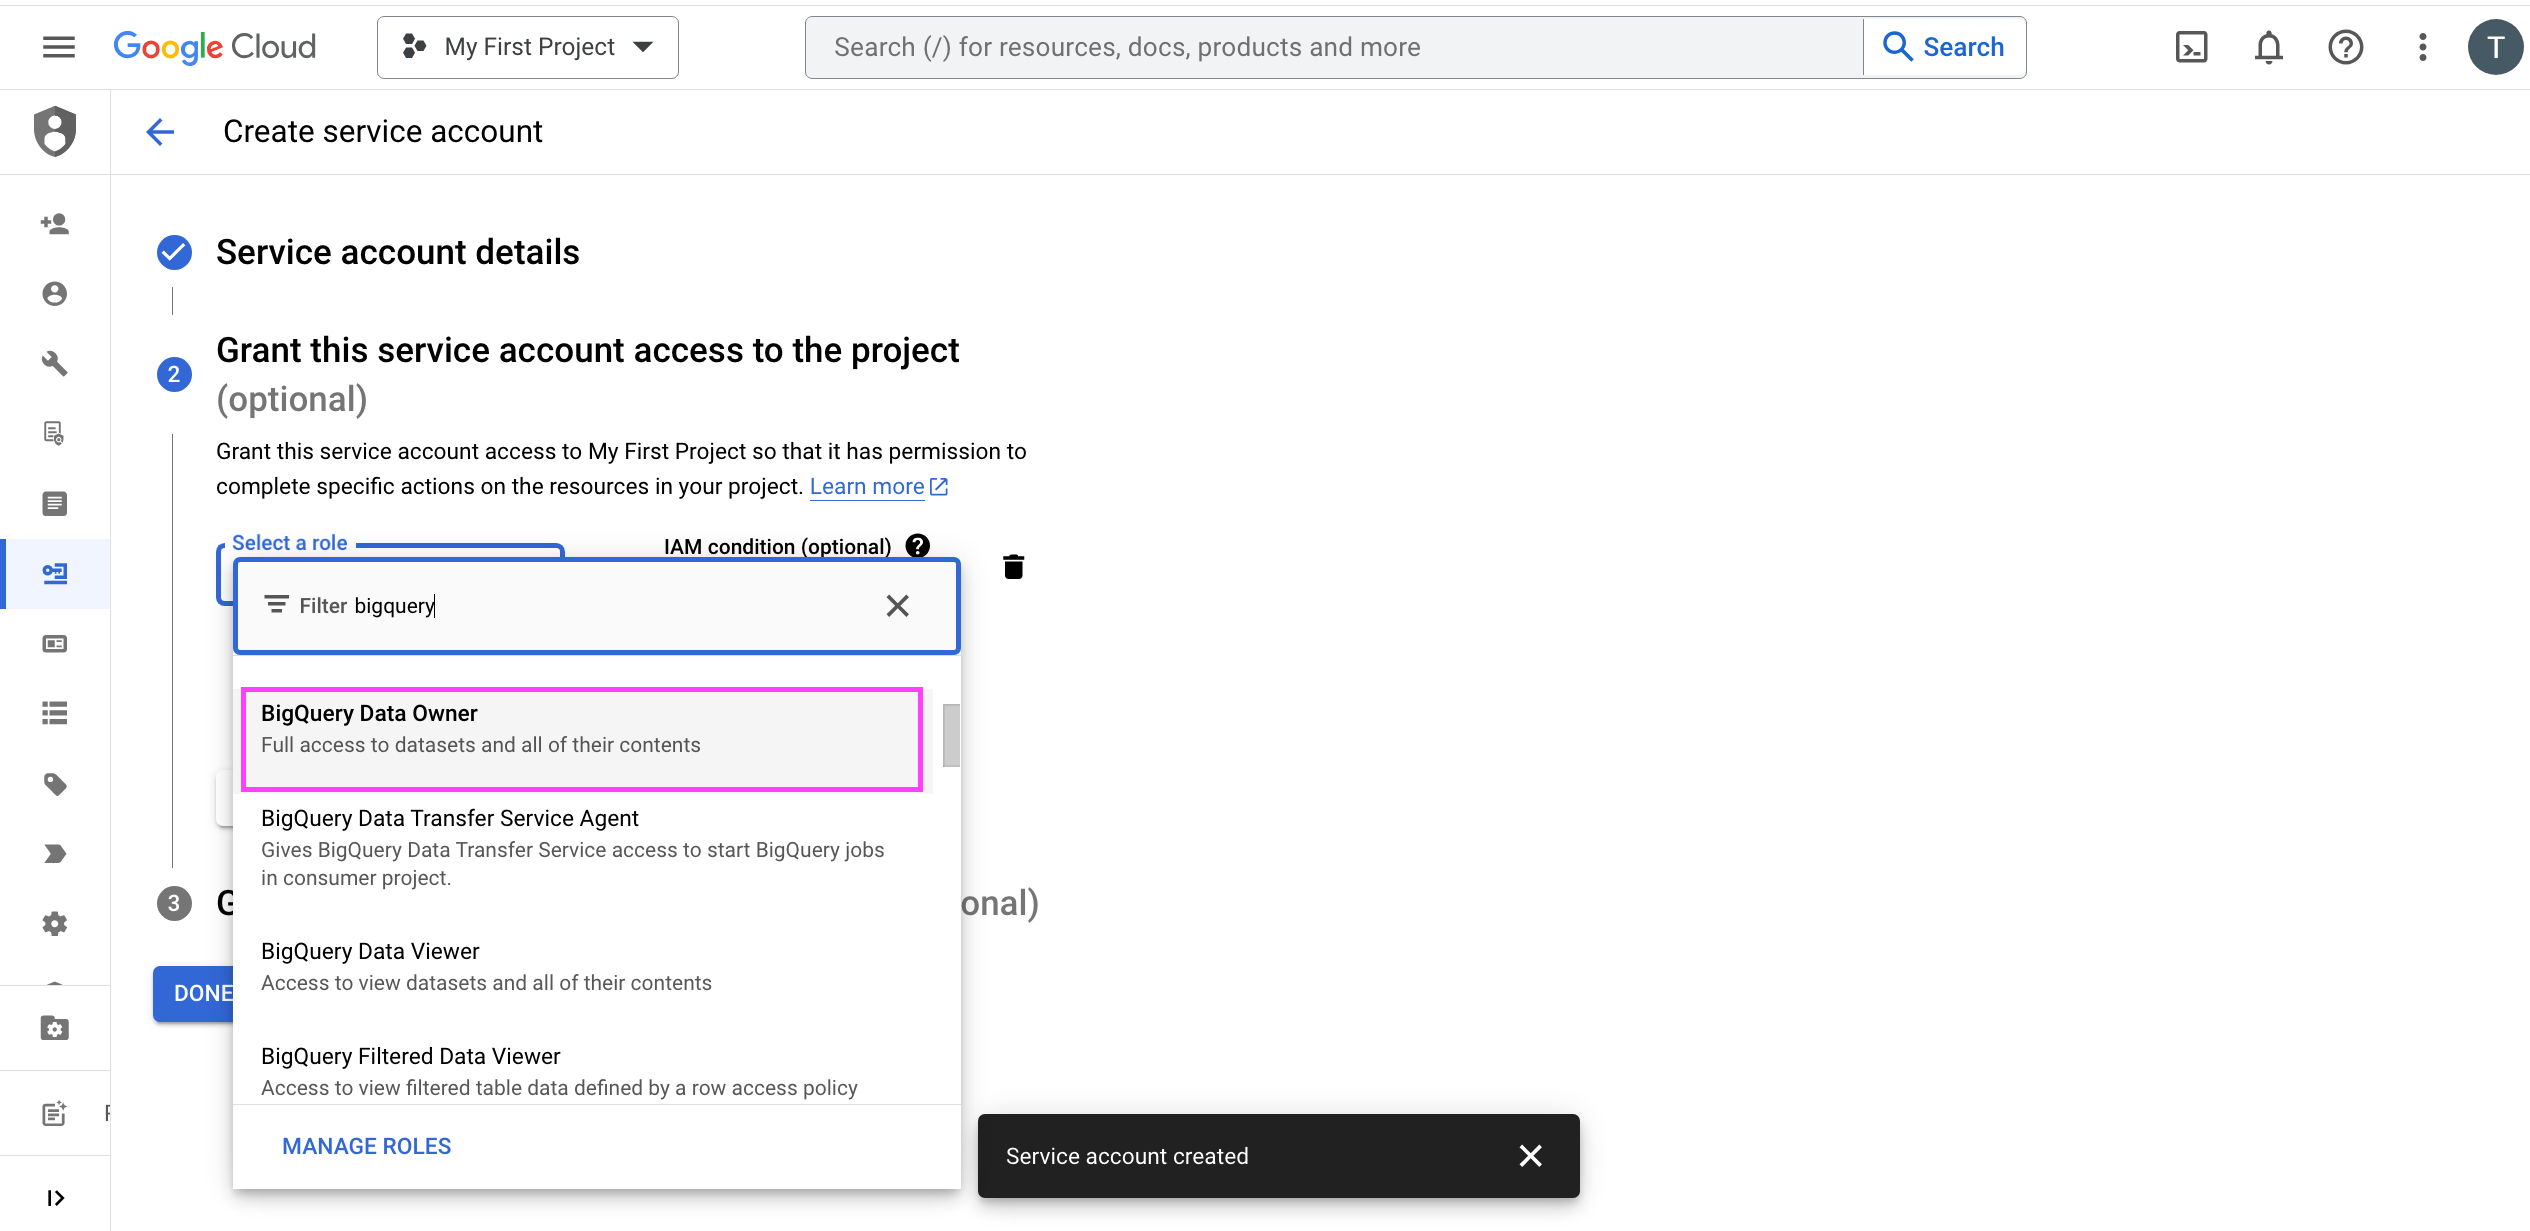
    11. Under *Grant this service account access to the project*, choose the **BigQuery Data Owner** scope and click on **Done**.
         

    <Frame>
      <img src="https://mintcdn.com/converge/dh0K_Fgr0_qazJsh/images/destinations/bigquery/bigq_service_4.png?fit=max&auto=format&n=dh0K_Fgr0_qazJsh&q=85&s=f32747714b9aef590dd9bbad83c90615" alt="bq-s-4" width="2530" height="1231" data-path="images/destinations/bigquery/bigq_service_4.png" />
    </Frame>

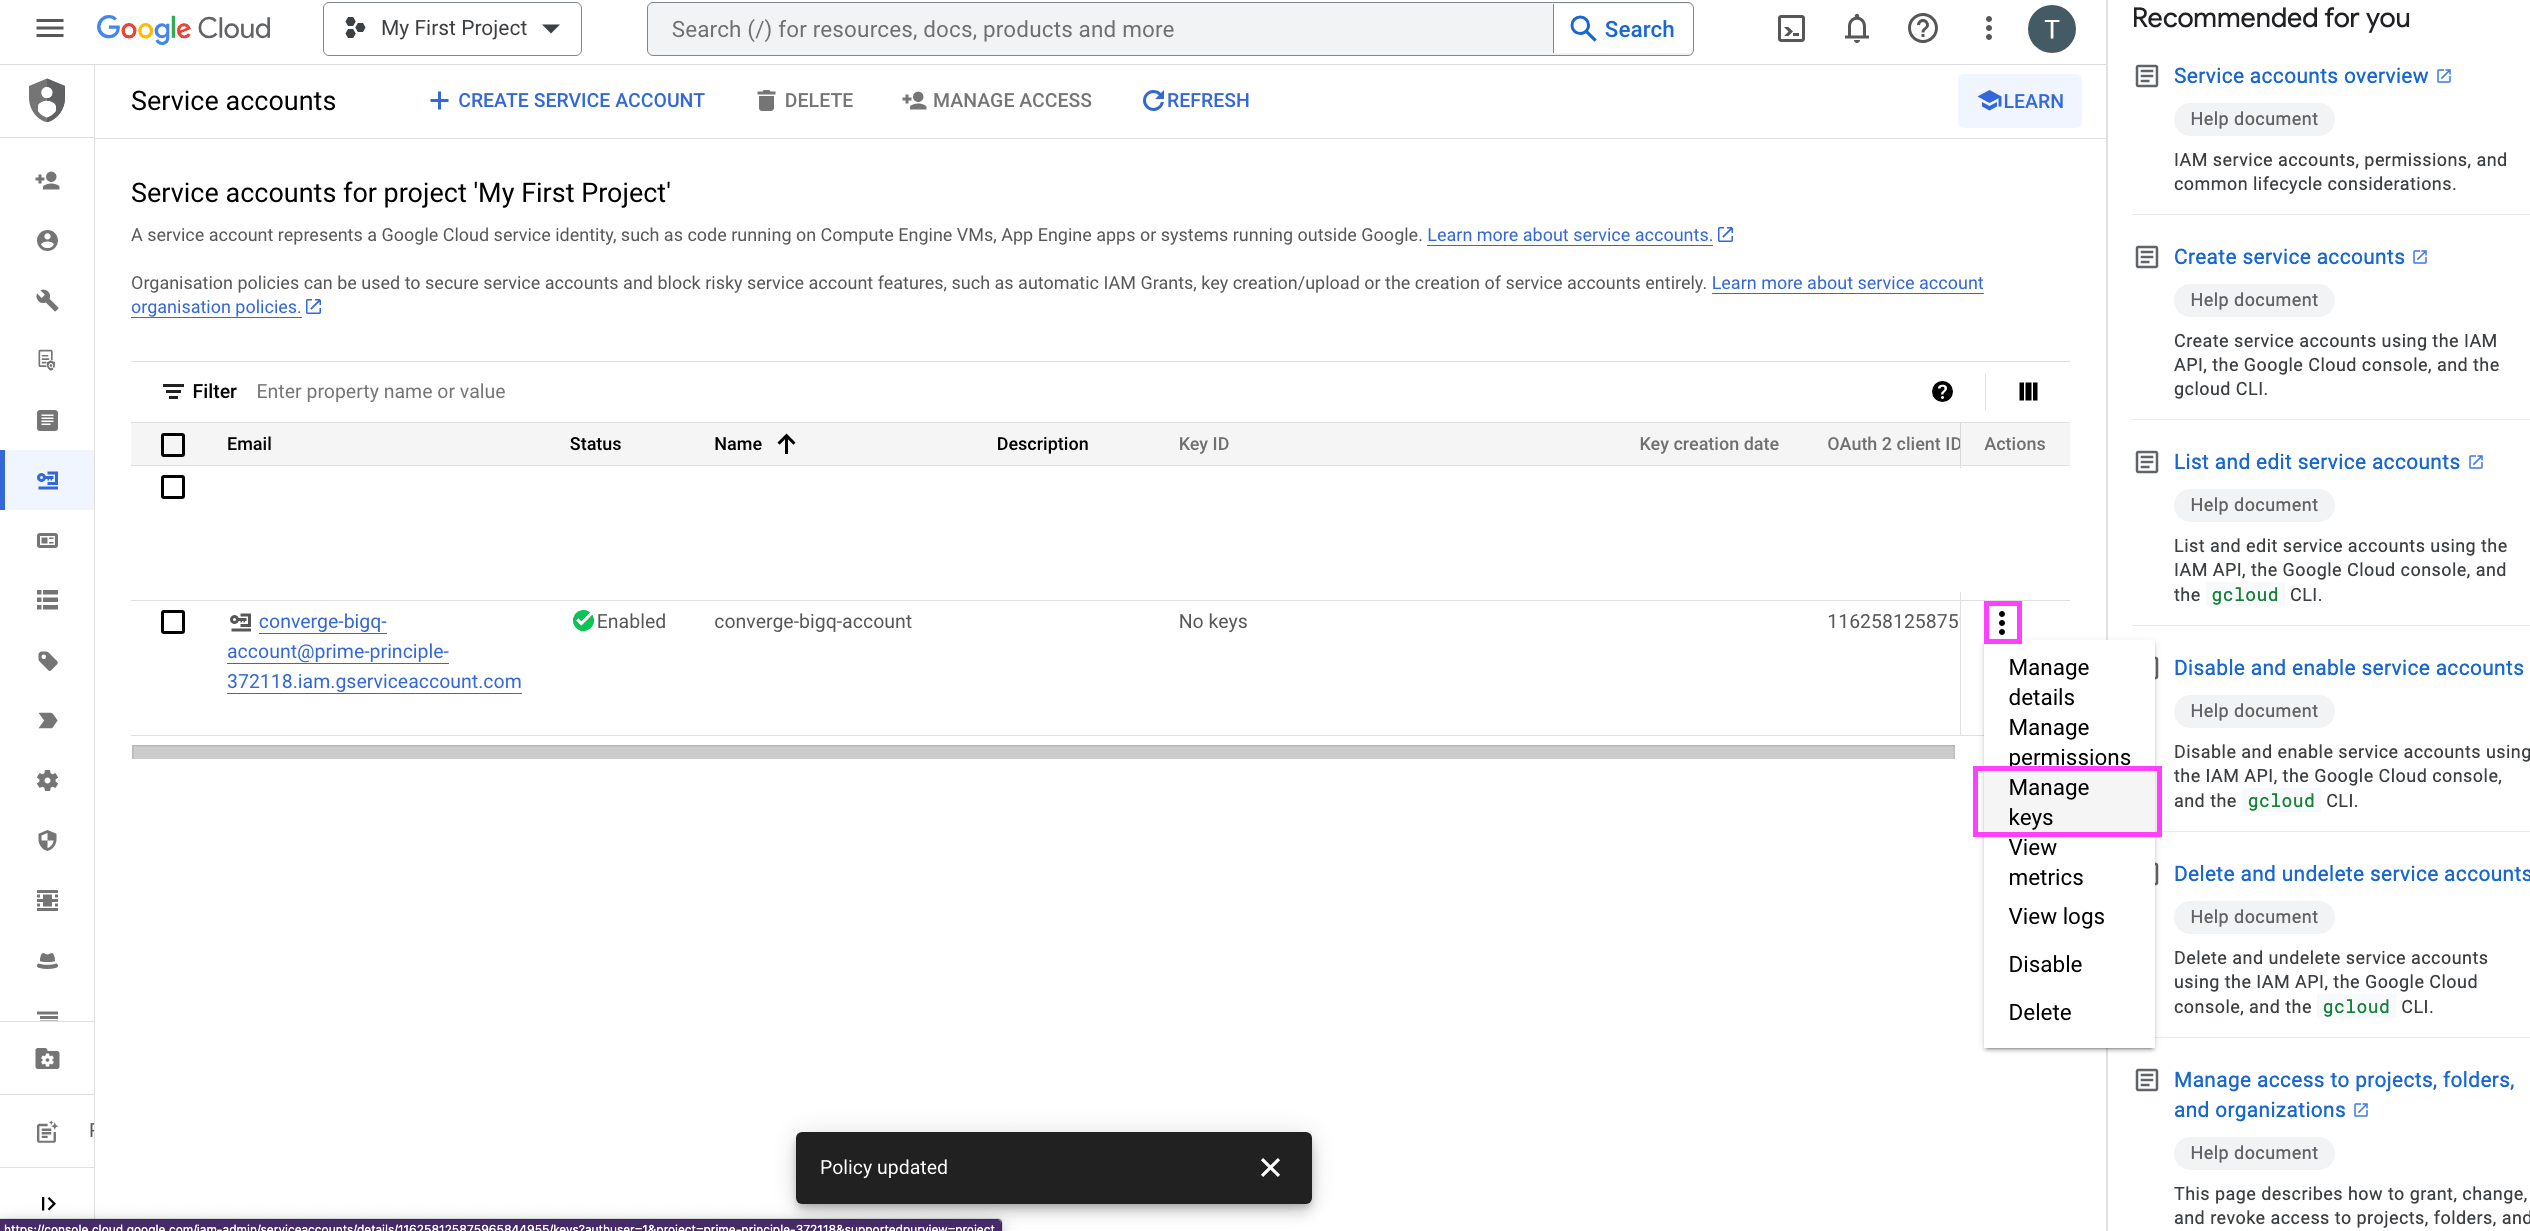
    12. Pick your newly created service account from the list of Service Accounts and choose **Manage keys**.
         

    <Frame>
      <img src="https://mintcdn.com/converge/dh0K_Fgr0_qazJsh/images/destinations/bigquery/bigq_service_5.png?fit=max&auto=format&n=dh0K_Fgr0_qazJsh&q=85&s=0db39b324e701534c2a561490f56ddf1" alt="bq-s-5" width="2530" height="1231" data-path="images/destinations/bigquery/bigq_service_5.png" />
    </Frame>

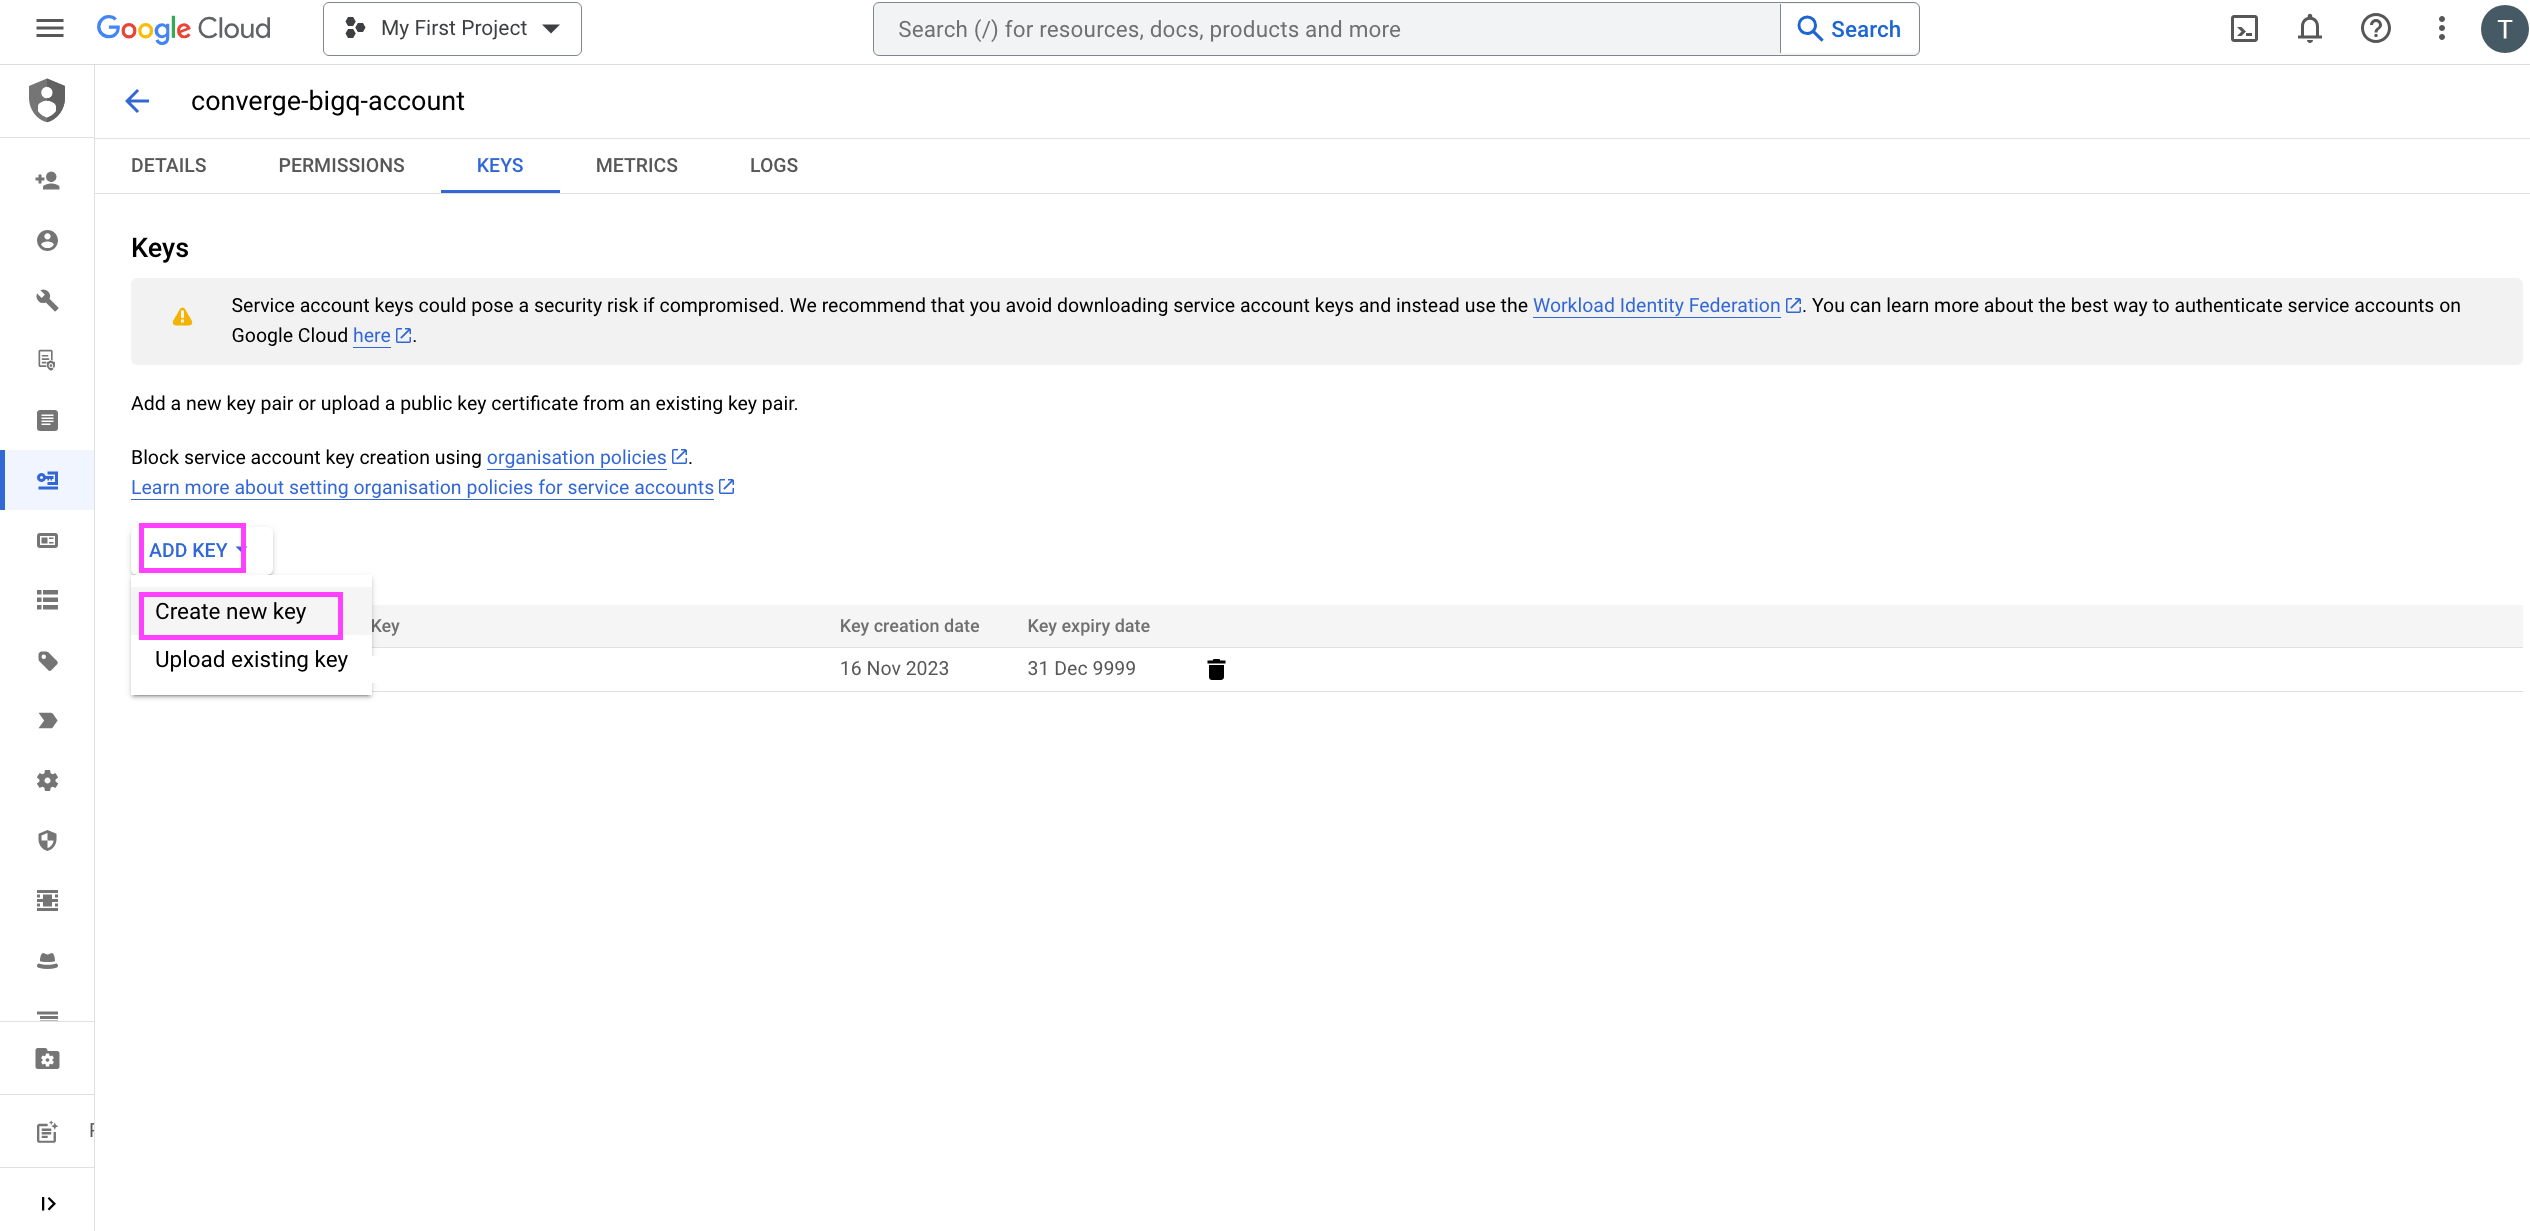
    13. Click on **Add Key** and **Create new key**. In the popup choose **JSON** and click on **Create**. This will download a file that ends with `.json`.
         

    <Frame>
      <img src="https://mintcdn.com/converge/dh0K_Fgr0_qazJsh/images/destinations/bigquery/bigq_service_6.png?fit=max&auto=format&n=dh0K_Fgr0_qazJsh&q=85&s=266270516cb1c7310bb1c4f50409db8c" alt="bq-s-6" width="2530" height="1231" data-path="images/destinations/bigquery/bigq_service_6.png" />
    </Frame>

    14. In the Converge sidebar, click on <IconText name="arrow-right-from-line" text="Event streams" /> and then click **Create new Destination**.
    15. Select the **BigQuery** destination and click **Next**.
    16. Give your destination a **name** (e.g. BigQuery Destination) and click **Next**.
    17. Fill in the **Credentials** from your service account, **Dataset ID** and **Table ID** you copied from **Google Cloud** and click **Next**.

    <Info>You can also stream profile merges to BigQuery. This is optional, but recommended for constructing accurate profile journeys. Enter a **Merged Profiles Table ID** to enable it.</Info>

    18. Select the sources you want to forward events from, then click **Next**.
    19. Review any issues and click **Submit**.

    <Note>Converge automatically sends all implemented events from the Converge event spec and any custom events to BigQuery.</Note>
  </Step>
</Steps>

***

## Multi-touch attribution support

Converge preprocesses all events and enriches them with all available **profile** and **session** information to make your attribution data warehouse queries as simple as possible.

### Profile Information

Every event that is forwarded includes all available information Converge has on that profile until that moment, ranging from `$ip_address` all the way to `$email`.

Events that typically do not have an `$email` property associated with them (e.g. `$page_load`) will *still* contain this property if we were able to identify this profile before the `$page_load` happened.

<Accordion title="Profile Information Overview" icon="address-card">
  <ParamField body="profile_id" type="int" required>
    A unique profile ID
  </ParamField>

  <ParamField body="profile_properties" type="Profile Properties Object" required>
    Properties related to the profile of the forwarded event.

    <Expandable title="properties">
      <ParamField body="$ip" type="string">
        IP address of the user.
      </ParamField>

      <ParamField body="cookie_id" type="string">
        Converge cookie ID.
      </ParamField>

      <ParamField body="$user_agent" type="string">
        User Agent of the last browser session of the user.
      </ParamField>

      <ParamField body="$email" type="string">
        Email Address of the subscriber.
      </ParamField>

      <ParamField body="$phone_number" type="string">
        Phone Number of the subscriber including the `+` sign and country code. For example: `"+1 (917) 123-4567"` or `"+3295123456"`.
      </ParamField>

      <ParamField body="$city" type="string">
        City of the subscriber's address.
      </ParamField>

      <ParamField body="$country_code" type="string">
        Country code of the subscriber's address according to [ISO 3166](https://en.wikipedia.org/wiki/List_of_ISO_3166_country_codes).
      </ParamField>

      <ParamField body="$state" type="string">
        State of the subscriber's address.
      </ParamField>

      <ParamField body="$zip_code" type="string">
        Zip code of the subscriber's address.
      </ParamField>
    </Expandable>
  </ParamField>
</Accordion>

### Profile Merging

Converge may combine multiple profiles into one if there is an overlap in aliases.
This means that the `profile_id` field in your events table may become out of date.
Under the 'Advanced' tab of the BigQuery destination configuration, you can configure a table to stream these profile merges to.
You can create this table as follows:

* Under your Converge dataset (`converge_data`), create a new table, e.g. `profile_merges`.
* In the Schema section, flip the switch to **Edit as text** and paste the schema below. Click on **Create Table** after.
  <Accordion icon="code" title="Schema">
    ```json JSON theme={null}
    [
      {
        "name": "timestamp",
        "type": "DATETIME",
        "mode": "REQUIRED",
        "description": "Timestamp when the event occurred"
      },
      {
       "name": "old_profile_id",
       "type": "INTEGER",
       "mode": "REQUIRED",
       "description": "Old Profile ID that was merged"
      },
      {
        "name": "new_profile_id",
        "type": "INTEGER",
        "mode": "REQUIRED",
        "description": "New Profile ID resulting from the merge"
      }
    ]
    ```
  </Accordion>

To use this table, it's important to note that profiles maybe merged multiple times. For example profile A and B could be mapped to C as follows:

* `(A, C)`
* `(B, C)`
  Later on, profile C could be merged into profile D:
* `(C, D)`
  In this case, profiles A, B, and C, would all be mapped to D. To deal with this, we recommend creating a (materialized) view that recursively resolves these mappings. Here's an example query to achieve this:

```sql SQL theme={null}
WITH RECURSIVE profile_merges AS (
  SELECT 
    timestamp, 
    old_profile_id, 
    new_profile_id, 
    ARRAY[old_profile_id] AS visited_profiles,
    1 AS depth,
    FALSE AS is_circular_reference
  FROM 
    `your-project-name.your-dataset-name.profile_merges`
  UNION ALL
  SELECT 
    pmr.timestamp, 
    pm.old_profile_id,
    pmr.new_profile_id, 
    ARRAY_CONCAT(pm.visited_profiles, [pmr.new_profile_id]) AS visited_profiles,
    pm.depth + 1 AS depth,
    IF(pmr.new_profile_id IN UNNEST(pm.visited_profiles), TRUE, pm.is_circular_reference) AS is_circular_reference
  FROM 
    profile_merges pm
  JOIN 
    `your-project-name.your-dataset-name.profile_merges` pmr
  ON 
    pm.new_profile_id = pmr.old_profile_id
  WHERE
    pmr.timestamp > pm.timestamp
    AND NOT pm.is_circular_reference
)
SELECT 
  old_profile_id, 
  MAX_BY(new_profile_id, depth) AS new_profile_id
FROM 
  profile_merges
GROUP BY 
  old_profile_id;
```

### Querying attribution data

<Warning>
  The attributed `first_touch_properties` etc. columns are deprecated and are no longer being filled, see [here](#deprecation-of-pre-processed-attribution-columns).
</Warning>

The events table contains all the data you need to build custom attribution models.
You can easily construct the customer's touchpoints through the `session_id` and `session_properties` columns.

A multi-touch model can be broken down into the following steps:

1. Selecting conversion events
2. Selecting touchpoints
3. Joining touchpoints with conversion events according to the attribution window
4. Applying the attribution model
5. Aggregating conversion metrics by touchpoint

This model can be adapted to 100% flexibly build attribution insights.
The examples below show how to build basic first-touch and last-touch models and count the number of orders in BigQuery.

<Accordion title="First Touch" icon="backward">
  For example, the following query represents a 28-day first-touch model.

  ```sql theme={null}
    WITH _events AS (SELECT * FROM `your-project-name.your-dataset-name.your-table-name`),
    _1_conversions AS (
      SELECT
          id,
          profile_id,
          timestamp
      FROM _events
      WHERE
          timestamp > CURRENT_DATETIME() - INTERVAL 7 day
          AND event_name = 'Placed Order'
    ), 
    _2_touchpoints AS (
      SELECT
          profile_id,
          session_id,
          MIN_BY(session_properties, timestamp) AS session_properties,
          MIN(timestamp) AS timestamp
      FROM _events
      WHERE
          timestamp > CURRENT_DATETIME() - INTERVAL 7 day - INTERVAL 28 day
          AND event_name = '$page_load'
      GROUP BY profile_id, session_id
    ),
    _3_conversions_touchpoints AS (
      SELECT
        c.id AS id,
        t.timestamp AS touchpoint_timestamp,
        t.session_properties AS touchpoint_properties
      FROM _1_conversions AS c
      LEFT JOIN _2_touchpoints AS t
      ON c.profile_id = t.profile_id
          AND t.timestamp BETWEEN c.timestamp - INTERVAL 28 day AND c.timestamp
    ),
    _4_attributed_conversions AS (
      SELECT
          id,
          MIN_BY(touchpoint_properties, touchpoint_timestamp) AS touchpoint_properties,
          MIN(touchpoint_timestamp) AS touchpoint_timestamp
      FROM _3_conversions_touchpoints
      GROUP BY id
    )
    SELECT
        JSON_VALUE(touchpoint_properties, '$.utm_source') AS first_touch_utm_source,
        JSON_VALUE(touchpoint_properties, '$.utm_medium') AS first_touch_utm_medium,
        COUNT(*) AS conversions
    FROM _4_attributed_conversions
    GROUP BY first_touch_utm_source, first_touch_utm_medium
  ```
</Accordion>

<Accordion title="Last Touch" icon="forward">
  For example, the following query represents a 7-day last-touch model.

  ```sql theme={null}
    WITH _events AS (SELECT * FROM `your-project-name.your-dataset-name.your-table-name`),
    _1_conversions AS (
      SELECT
          id,
          profile_id,
          timestamp
      FROM _events
      WHERE
          timestamp > CURRENT_DATETIME() - INTERVAL 7 day
          AND event_name = 'Placed Order'
    ), 
    _2_touchpoints AS (
      SELECT
          profile_id,
          session_id,
          MIN_BY(session_properties, timestamp) AS session_properties,
          MIN(timestamp) AS timestamp
      FROM _events
      WHERE
          timestamp > CURRENT_DATETIME() - INTERVAL 7 day - INTERVAL 28 day
          AND event_name = '$page_load'
      GROUP BY profile_id, session_id
    ),
    _3_conversions_touchpoints AS (
      SELECT
        c.id AS id,
        t.timestamp AS touchpoint_timestamp,
        t.session_properties AS touchpoint_properties
      FROM _1_conversions AS c
      LEFT JOIN _2_touchpoints AS t
      ON c.profile_id = t.profile_id
          AND t.timestamp BETWEEN c.timestamp - INTERVAL 28 day AND c.timestamp
      ),
    _4_attributed_conversions AS (
      SELECT
          id,
          MAX_BY(touchpoint_properties, touchpoint_timestamp) AS touchpoint_properties,
          MAX(touchpoint_timestamp) AS touchpoint_timestamp
      FROM _3_conversions_touchpoints
      GROUP BY id
    )
    SELECT
        JSON_VALUE(touchpoint_properties, '$.utm_source') AS last_touch_utm_source,
        JSON_VALUE(touchpoint_properties, '$.utm_medium') AS last_touch_utm_medium,
        COUNT(*) AS conversions
    FROM _4_attributed_conversions
    GROUP BY last_touch_utm_source, last_touch_utm_medium
  ```
</Accordion>

The session columns have the following structure:

<ParamField body="session_id" type="string" required>
  Session ID of the event
</ParamField>

<ParamField body="session_properties" type="Session Properties Object" required>
  Properties containing information about the session of the forwarded event

  <Expandable title="properties">
    <ParamField body="landing_url" type="string">
      The landing URL of the session.
    </ParamField>

    <ParamField body="referrer" type="string">
      Referrer information for the session.
    </ParamField>

    <ParamField body="utm_source" type="string">
      UTM source information for the session.
    </ParamField>

    <ParamField body="utm_medium" type="string">
      UTM medium information for the session.
    </ParamField>

    <ParamField body="utm_campaign" type="string">
      UTM campaign information for the session.
    </ParamField>

    <ParamField body="utm_content" type="string">
      UTM content information for the session.
    </ParamField>

    <ParamField body="utm_term" type="string">
      UTM term information for the session.
    </ParamField>
  </Expandable>
</ParamField>

#### Deprecation of pre-processed attribution columns

Converge previously supported the following columns:

* `first_touch_properties` and `first_touch_session_id`
* `last_touch_properties` and `last_touch_session_id`
* `first_touch_paid_properties` and `first_touch_paid_session_id`
* `last_touch_paid_properties` and `last_touch_paid_session_id`

These columns are deprecated and are no longer being filled.
The recommended way to build multi-touch attribution models is to use the `session_id` and `session_properties` columns in the Converge data.
These allow full flexibility in building custom attribution models while maintaining correctness.

***

## An example query

As an example, the following query on top of the Converge Table gives you the number of times an SKU was ordered:

```sql SQL theme={null}
SELECT
  string(item.sku) sku, count(*) order_count
FROM `your-project-name.your-dataset-name.your-table-name`
LEFT JOIN unnest(json_extract_array(event_properties.items,'$')) item
WHERE event_name = 'Placed Order'
GROUP BY sku
ORDER BY order_count DESC
```

<Note> Make sure you replace `your-project-name`, `your-dataset-name` and `your-table-name` with your appropriate values. </Note>

***

## Converge functionality

This integration supports the following Converge destination functionality.

| Converge Feature        |       Supported       |
| ----------------------- | :-------------------: |
| Custom Events           | <Icon name="check" /> |
| Filters                 | <Icon name="check" /> |
| Server-side Conversions | <Icon name="check" /> |

***

## Event mapping

Converge automatically sends all implemented events from the [Converge Spec](/sources/converge-spec) and any custom events to BigQuery.
