> ## Documentation Index
> Fetch the complete documentation index at: https://docs.runconverge.com/llms.txt
> Use this file to discover all available pages before exploring further.

# Google Ads - Conversion tracking (Server)

> An introduction to the Google Ads server-side conversion tracking destination

export const OutboundLink = ({linkText, linkTarget}) => {
  return <a target="_blank" href={linkTarget}> {linkText} 
    <div className="inline h-3 w-3 fill-gray-500 dark:fill-gray-100 text-gray-500 dark:text-gray-300 ml-1 mr-1">
      <svg className="inline w-2.5 h-2.5 bg-gray-500 dark:bg-gray-300" style={{
    maskImage: `url('https://mintlify.b-cdn.net/v6.5.1/solid/up-right-from-square.svg')`,
    maskRepeat: "no-repeat",
    maskPosition: "center center"
  }}></svg> 
    </div>
    </a>;
};

export const IconText = ({name, text, iconSource = "mintlify", iconLocation = "before", iconType = "solid"}) => {
  const sourceUrl = iconSource === 'local' ? `url('/images/icons/${name}.svg')` : `url('https://mintlify.b-cdn.net/v6.5.1/${iconType}/${name}.svg')`;
  return <>
            <div className="inline-block pl-2">
                {iconLocation === 'before' && <div className="h-3.5 w-3.5 fill-gray-800 dark:fill-gray-100 text-gray-800 dark:text-gray-100 inline-block align-middle mr-2">
                        <svg className="w-4 h-4 bg-gray-800 dark:bg-gray-100 " style={{
    maskImage: sourceUrl,
    maskRepeat: "no-repeat",
    maskPosition: "center center"
  }} />
                    </div>}
                <span className="inline-block align-middle font-semibold fill-gray-800 dark:fill-gray-100 text-gray-800 dark:text-gray-100 pl-1 pr-2">{text}</span>
                {iconLocation === 'after' && <div className="h-3.5 w-3.5 fill-gray-800 dark:fill-gray-100 text-gray-800 dark:text-gray-100 inline-block align-middle mr-2">
                        <svg className="w-4 h-4 bg-gray-800 dark:bg-gray-100 pr-3" style={{
    maskImage: sourceUrl,
    maskRepeat: "no-repeat",
    maskPosition: "center center"
  }} />
                    </div>}
            </div>
        </>;
};

export const Icon = ({name}) => {
  return <div className="h-4 w-4 fill-gray-800 dark:fill-gray-100 text-gray-800 dark:text-gray-100 inline-block align-middle">
            <svg className="w-4 h-4 bg-gray-800 dark:bg-gray-100" style={{
    maskImage: `url('https://mintlify.b-cdn.net/v6.5.1/solid/${name}.svg')`,
    maskRepeat: "no-repeat",
    maskPosition: "center center"
  }} />
        </div>;
};

## Overview

Destination Type: <IconText text="Server-side" name="server" iconType="duotone" iconLocation="after" />

* Includes support for <OutboundLink linkText="Google Enhanced Conversions for Leads" linkTarget="https://support.google.com/google-ads/answer/11021502" />
* Includes support for <OutboundLink linkText="Consent Mode V2" linkTarget="https://developers.google.com/tag-platform/security/guides/consent?sjid=5329592855679349930-EU&consentmode=advanced#upgrade-consent-v2" />
* Tags conversions for <OutboundLink linkText="New customer acquisition goals" linkTarget="https://support.google.com/google-ads/answer/12080169" />

***

## Installation instructions

<Note>
  This is a server-side destination, meaning that conversions are sent directly from Converge's servers to Google Ads. This is ideal for tracking events that happen on your backend, like subscription renewals or offline conversions.
</Note>

<Steps>
  <Step icon="list" title="Create a conversion action">
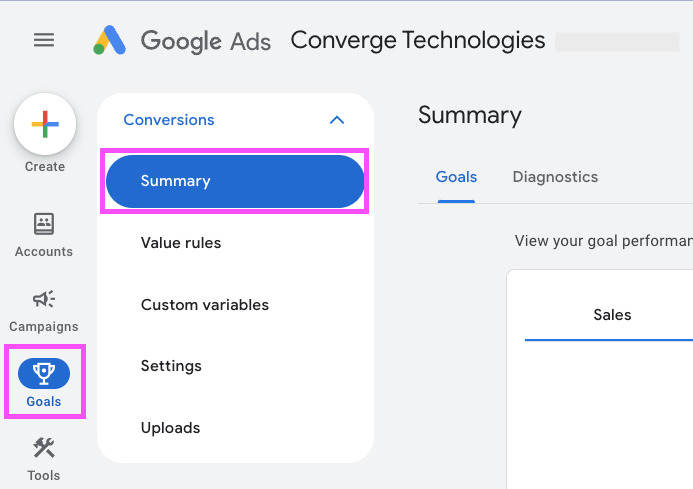
    1. Navigate to your Google Ads Dashboards and choose **Goals > Summary**.
           <Frame>
             <img src="https://mintcdn.com/converge/L45wyZk0Nu0wVlB6/images/destinations/google-ads/google-ads-destination-new-1.png?fit=max&auto=format&n=L45wyZk0Nu0wVlB6&q=85&s=2a949e088d7f25776639b854b1556434" alt="gads-1" width="693" height="489" data-path="images/destinations/google-ads/google-ads-destination-new-1.png" />
           </Frame>
        

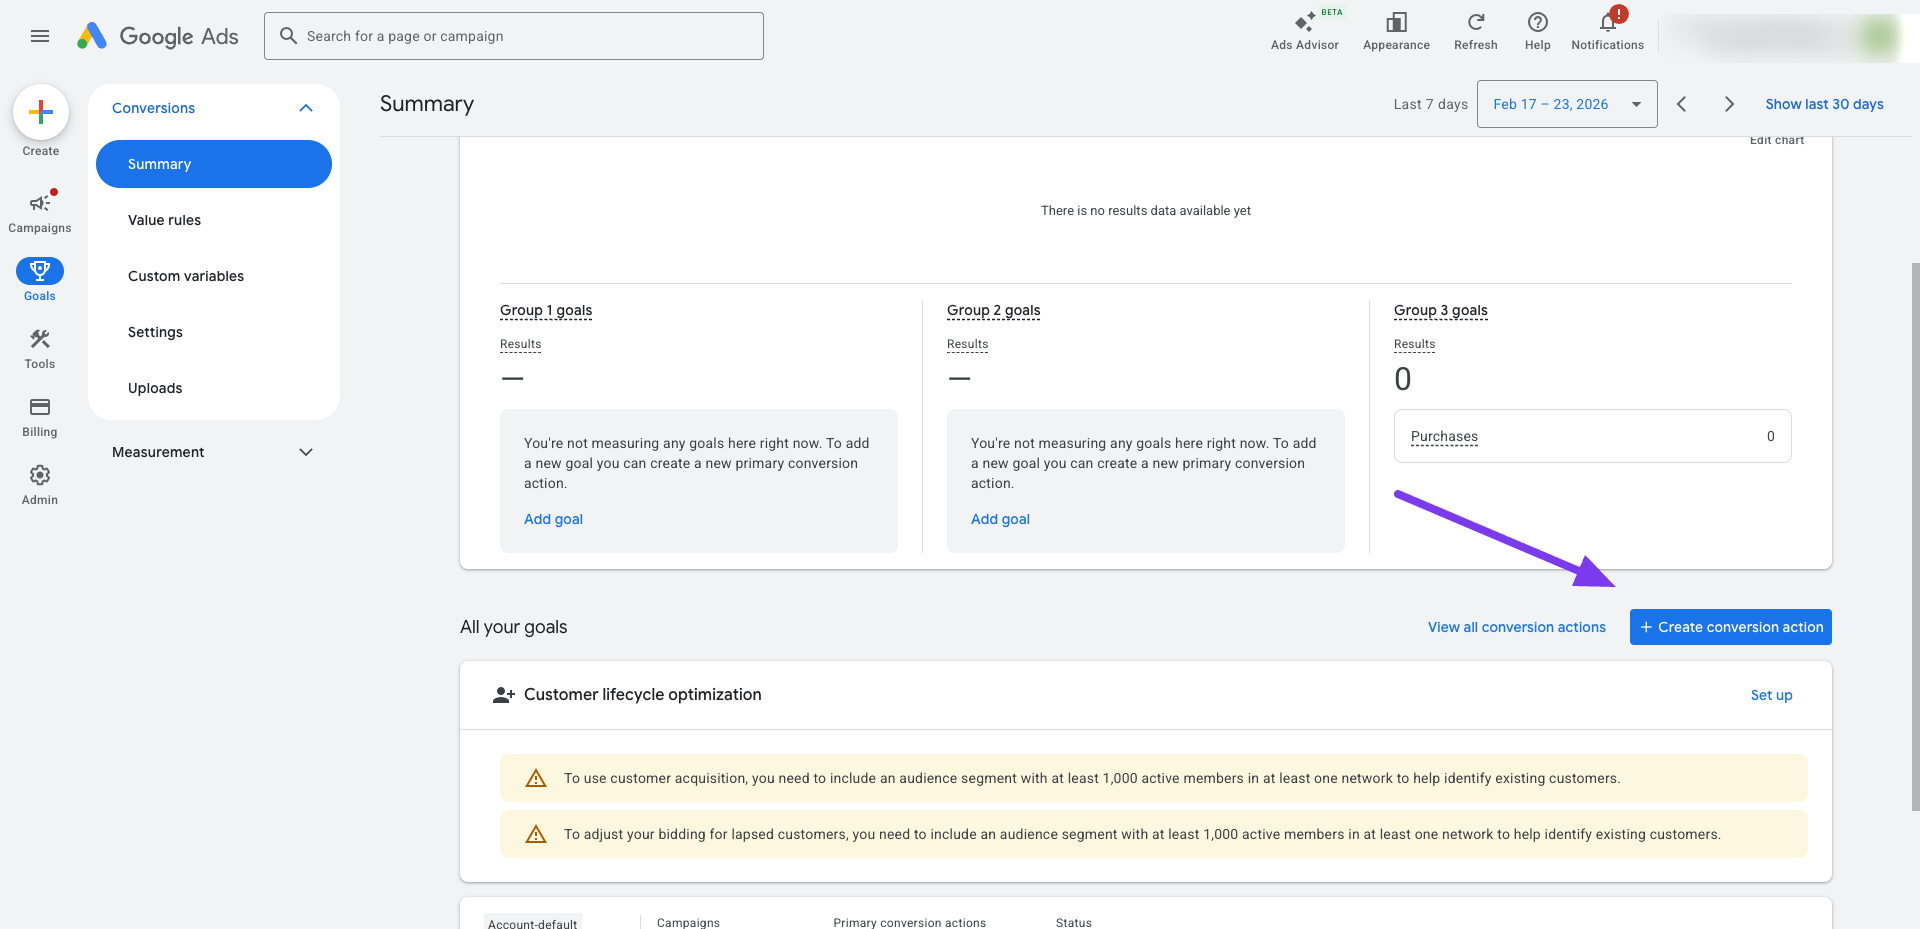
    2. Choose <IconText name="plus" text="Create conversion action" />
           <Frame>
             <img src="https://mintcdn.com/converge/B83QLetjEh5go507/images/destinations/google-ads/google_ads_create_conversion_action.png?fit=max&auto=format&n=B83QLetjEh5go507&q=85&s=4a3a7239a0599c089812582ff64a186c" alt="gads-2" width="1920" height="929" data-path="images/destinations/google-ads/google_ads_create_conversion_action.png" />
           </Frame>
        

    3. Choose **Conversions offline**.
           <Frame>
             <img src="https://mintcdn.com/converge/8SkewnxW69PQtrlX/images/destinations/google-ads-conversions-server-side/google_ads_conversions_offline.png?fit=max&auto=format&n=8SkewnxW69PQtrlX&q=85&s=947ea6732d3f17e0d50c900aa2ecb52a" alt="gads-3" width="867" height="154" data-path="images/destinations/google-ads-conversions-server-side/google_ads_conversions_offline.png" />
           </Frame>

    <Note>
      Google Ads sometimes skips this step and goes directly to step 2. In this case, click **Back** at the bottom of the page.

      <Frame>
        <img src="https://mintcdn.com/converge/lhx1moAURDDNfuH-/images/destinations/google-ads/google-ads-conversion-skipped.png?fit=max&auto=format&n=lhx1moAURDDNfuH-&q=85&s=baa3b1d8d3aa4bff039b4d033ee51e9e" alt="gads-warning" width="683" height="102" data-path="images/destinations/google-ads/google-ads-conversion-skipped.png" />
      </Frame>
    </Note>

    4. Click **Edit data sources**, select **Skip this step and set up a data source later**, enable the checkbox under **Customer data** and click **Done**.

    <Note>
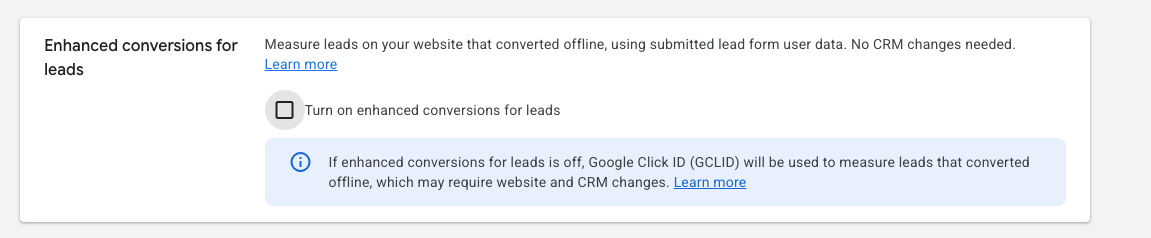
      If enhanced conversions for leads is disabled, also select **Turn on enhanced conversions for leads** and select **Google tag** as the method.

      <Frame>
        <img src="https://mintcdn.com/converge/8SkewnxW69PQtrlX/images/destinations/google-ads-conversions-server-side/google_ads_enhanced_conversions_for_leads.png?fit=max&auto=format&n=8SkewnxW69PQtrlX&q=85&s=36bce379bfe8152d6c35cd04db9d2898" alt="gads-warning" width="1151" height="238" data-path="images/destinations/google-ads-conversions-server-side/google_ads_enhanced_conversions_for_leads.png" />
      </Frame>
    </Note>

    5. Click **Save and continue**.

    6. Select a conversion category, click **Create conversion** and select the offline datasource if Google Ads hasn't created one already.

    7. Give your conversion a name (e.g., `[Converge] Server Purchase`) and configure the conversion settings.

    8. Click **Create and continue**.
  </Step>

  <Step icon="list" title="Set up the destination in Converge">
    1. In the Converge sidebar, click on <IconText name="arrow-right-from-line" text="Event streams" /> and then click **Create new Destination**.

    2. Select the **Google Ads API - Conversion tracking (Server)** destination and click **Next**.

    3. Give your **destination** a name (e.g., Google Ads - Server Conversion Destination) and optional **description** and click **Next**.

    4. Sign in with Google Ads and select the Google Ads account.

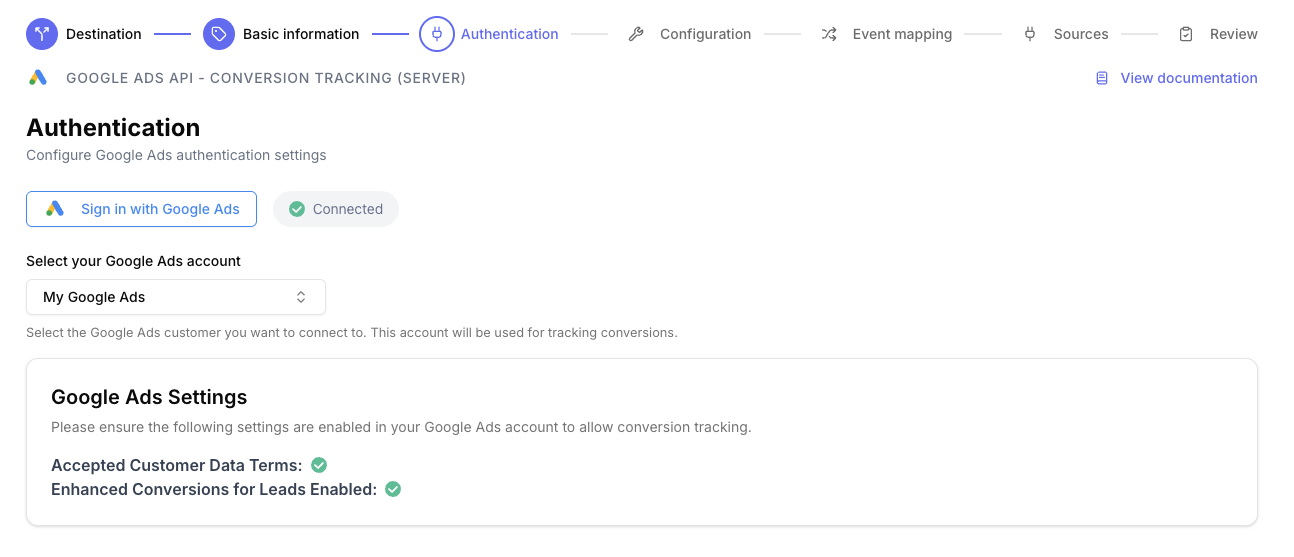
       a. Server-side conversion tracking requires customer data terms and enhanced conversions for leads to be enabled.
       If a setting is not approved, you'll see an error with a link to update your settings. Update the settings and come back to check.

           <Frame>
             <img src="https://mintcdn.com/converge/O_apRTDz_ldMalKt/images/destinations/google-ads-conversions-server-side/authentication-invalid-settings.png?fit=max&auto=format&n=O_apRTDz_ldMalKt&q=85&s=af39439311e4422a317a6a1996382086" alt="Google Ads server-side authentication error" width="1270" height="556" data-path="images/destinations/google-ads-conversions-server-side/authentication-invalid-settings.png" />
           </Frame>

           <Note>
             If you see an error like this, check that you've granted the correct permissions and selected the right Google Ads account during authentication.
           </Note>

       b. If both settings are enabled, click **Next**.

           <Frame>
             <img src="https://mintcdn.com/converge/O_apRTDz_ldMalKt/images/destinations/google-ads-conversions-server-side/authentication-valid-settings.png?fit=max&auto=format&n=O_apRTDz_ldMalKt&q=85&s=349f5d658be876e18ea3c30e7dde43cc" alt="Google Ads server-side authentication valid settings" width="1294" height="557" data-path="images/destinations/google-ads-conversions-server-side/authentication-valid-settings.png" />
           </Frame>

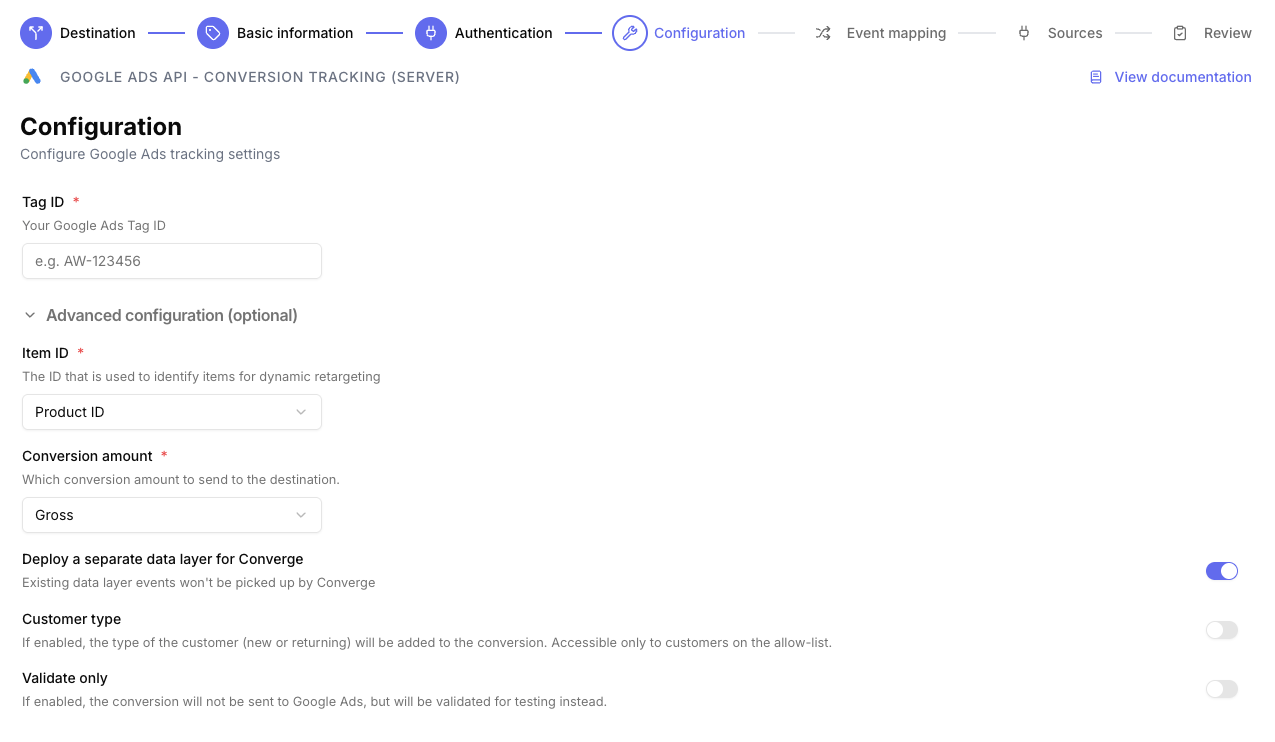
    5. Configure your Google Ads tag ID. Additional settings are available in the advanced configuration. By default, the connection uses the product ID field and gross conversion amount.
           <Frame>
             <img src="https://mintcdn.com/converge/O_apRTDz_ldMalKt/images/destinations/google-ads-conversions-server-side/configuration.png?fit=max&auto=format&n=O_apRTDz_ldMalKt&q=85&s=395bc086aac6205d7b4b2a54a63b39a4" alt="Google Ads server-side conversion configuration" width="1275" height="742" data-path="images/destinations/google-ads-conversions-server-side/configuration.png" />
           </Frame>

    6. Configure your event mappings.

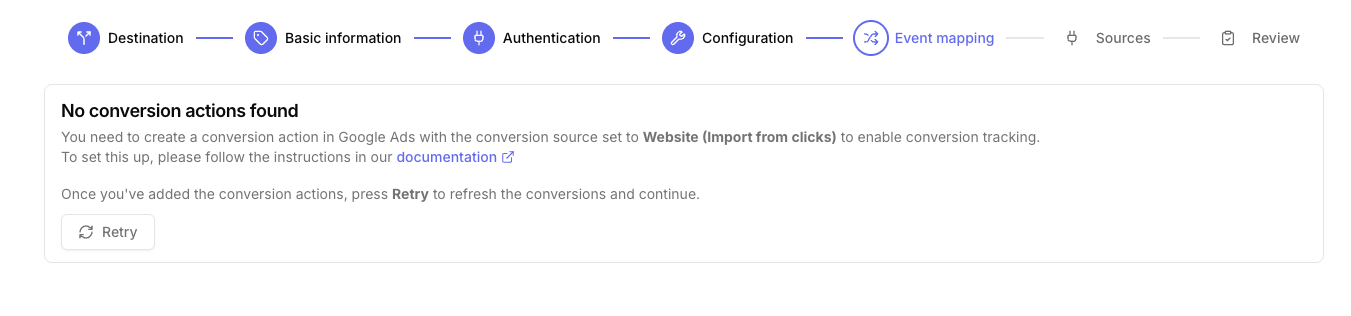
       a. If you see "No conversion actions found," no conversion actions exist in Google Ads yet. Follow the installation instructions above to create conversion actions, then click **Retry** to load them.
           <Frame>
             <img src="https://mintcdn.com/converge/O_apRTDz_ldMalKt/images/destinations/google-ads-conversions-server-side/event-mapping-no-conversion-actions.png?fit=max&auto=format&n=O_apRTDz_ldMalKt&q=85&s=cb683f612906f46fd0e2575972d13726" alt="Google Ads server-side no conversion actions" width="1351" height="316" data-path="images/destinations/google-ads-conversions-server-side/event-mapping-no-conversion-actions.png" />
           </Frame>

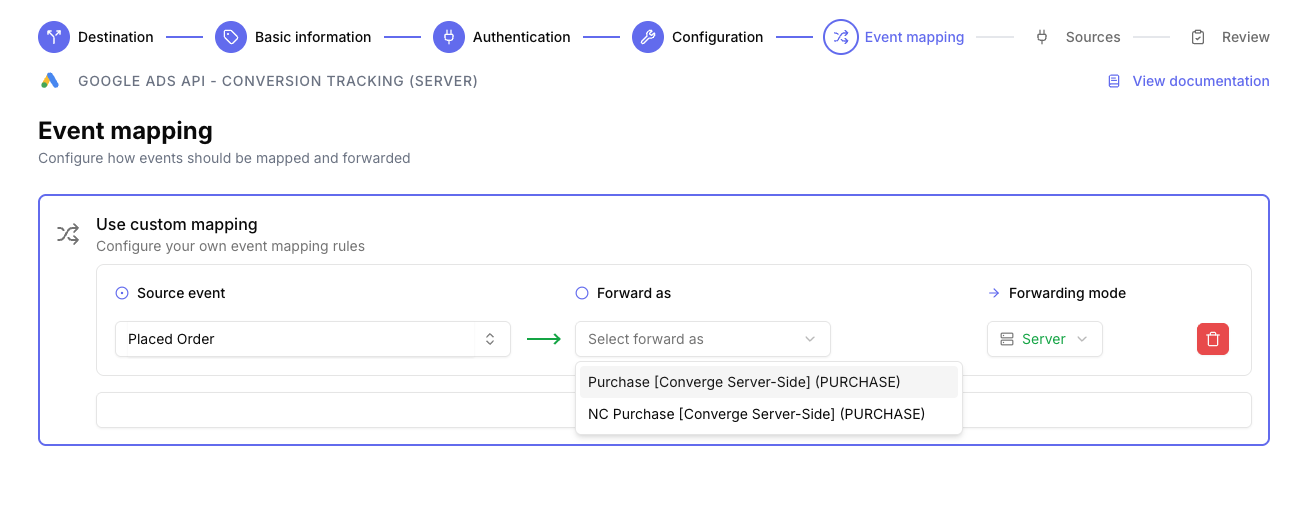
       b. If conversion actions exist, map your events to them using the dropdown. Only conversion actions labeled Import from clicks can be forwarded.
           <Frame>
             <img src="https://mintcdn.com/converge/O_apRTDz_ldMalKt/images/destinations/google-ads-conversions-server-side/event-mapping-with-conversion-actions.png?fit=max&auto=format&n=O_apRTDz_ldMalKt&q=85&s=5c4dd13b2e4029a590952337760eed33" alt="Google Ads server-side with conversion actions" width="1304" height="512" data-path="images/destinations/google-ads-conversions-server-side/event-mapping-with-conversion-actions.png" />
           </Frame>

    7. Select the sources you want to forward events from, then click **Next**.

    8. Review if there are any issues found in your setup and click **Submit**.
  </Step>
</Steps>

<Warning>
  Set this destination to **Deactivated** while you remove your existing Google Ads tracking setup. Running both in parallel leads to duplicate conversion data. Follow the **Turn off your old Google Ads tracking** instructions below, then set the destination to **Active** when you're ready.
</Warning>

<Warning>If you're also using the client-side Google Ads destination, make sure you don't track the same conversions in both destinations to avoid duplicate tracking.</Warning>

***

## Turn off your old Google Ads tracking

### Turning off the Shopify Google Sales Channel data sharing

1. Navigate to your <OutboundLink linkText="Shopify Admin Dashboard" linkTarget="https://admin.shopify.com/" />.

2. Click on **Sales channels** and choose **Google & YouTube** from the *Installed sales channels* menu.

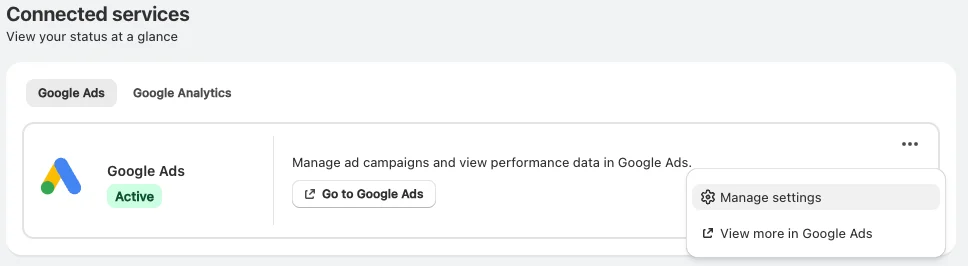
3. Click the **Google Ads** tab. Then click the **...** menu and select **Manage settings**.

   <Frame>
     <img src="https://mintcdn.com/converge/N3CX8aG3MgYzuML-/images/guides/turn-off-tracking/shopify-googleads-sales-channel/shopify-googleads-sales-channel-0-2026.png?fit=max&auto=format&n=N3CX8aG3MgYzuML-&q=85&s=fe40386c7e8db983370332b0f36a716b" alt="settings-googleads-0" width="968" height="266" data-path="images/guides/turn-off-tracking/shopify-googleads-sales-channel/shopify-googleads-sales-channel-0-2026.png" />
   </Frame>

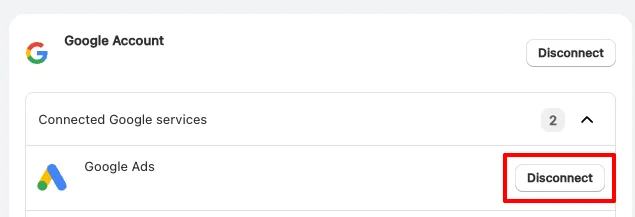
4. Click **Disconnect** next to **Google Ads**.
   <Frame>
     <img src="https://mintcdn.com/converge/N3CX8aG3MgYzuML-/images/guides/turn-off-tracking/shopify-googleads-sales-channel/shopify-googleads-sales-channel-1-2026.png?fit=max&auto=format&n=N3CX8aG3MgYzuML-&q=85&s=01fff290aabbfafbc40cd55da60c1e22" alt="settings-googleads-1" width="635" height="217" data-path="images/guides/turn-off-tracking/shopify-googleads-sales-channel/shopify-googleads-sales-channel-1-2026.png" />
   </Frame>

***

## New customer acquisition

Converge automatically tags each `Placed Order` conversion with Google's `customer_type` field so you can bid differently on new and returning customers with <OutboundLink linkText="Google's new customer acquisition goal" linkTarget="https://support.google.com/google-ads/answer/12080169" />.

* `NEW` when the order's [`$is_new_customer`](/sources/converge-spec#placed-order) property is `true`.
* `RETURNING` when it's `false`.

Converge sets `$is_new_customer` automatically for orders from supported shop platforms, so no extra configuration is needed.

<Note>
  Only the server-side Google Ads destination forwards `customer_type`. The client-side Google Ads destination doesn't support this.
</Note>

***

## Converge functionality

This integration supports the following Converge destination functionality.

| Converge Feature                                     |       Supported       |
| ---------------------------------------------------- | :-------------------: |
| Custom Events                                        | <Icon name="check" /> |
| Filters                                              | <Icon name="check" /> |
| Server-side Conversions                              | <Icon name="check" /> |
| [Conversion amount](/destinations/conversion-amount) | <Icon name="check" /> |

***

## FAQ

<AccordionGroup>
  <Accordion title="Why are my server-side conversions not showing in Google Ads?">
    Server-side conversions can take up to 24 hours to appear in Google Ads reporting. If you don't see your conversions after 24 hours:

    1. Verify your Customer ID is correct
    2. Check that the Conversion ID and Label are properly formatted
    3. Review the destination logs in Converge for any errors
    4. Ensure the conversion action is set to "Active" in Google Ads
  </Accordion>
</AccordionGroup>