> ## Documentation Index
> Fetch the complete documentation index at: https://docs.runconverge.com/llms.txt
> Use this file to discover all available pages before exploring further.

# Google Ads - Conversion tracking (Browser)

> An introduction to the Google Ads client-side conversion tracking destination

export const OutboundLink = ({linkText, linkTarget}) => {
  return <a target="_blank" href={linkTarget}> {linkText} 
    <div className="inline h-3 w-3 fill-gray-500 dark:fill-gray-100 text-gray-500 dark:text-gray-300 ml-1 mr-1">
      <svg className="inline w-2.5 h-2.5 bg-gray-500 dark:bg-gray-300" style={{
    maskImage: `url('https://mintlify.b-cdn.net/v6.5.1/solid/up-right-from-square.svg')`,
    maskRepeat: "no-repeat",
    maskPosition: "center center"
  }}></svg> 
    </div>
    </a>;
};

export const IconText = ({name, text, iconSource = "mintlify", iconLocation = "before", iconType = "solid"}) => {
  const sourceUrl = iconSource === 'local' ? `url('/images/icons/${name}.svg')` : `url('https://mintlify.b-cdn.net/v6.5.1/${iconType}/${name}.svg')`;
  return <>
            <div className="inline-block pl-2">
                {iconLocation === 'before' && <div className="h-3.5 w-3.5 fill-gray-800 dark:fill-gray-100 text-gray-800 dark:text-gray-100 inline-block align-middle mr-2">
                        <svg className="w-4 h-4 bg-gray-800 dark:bg-gray-100 " style={{
    maskImage: sourceUrl,
    maskRepeat: "no-repeat",
    maskPosition: "center center"
  }} />
                    </div>}
                <span className="inline-block align-middle font-semibold fill-gray-800 dark:fill-gray-100 text-gray-800 dark:text-gray-100 pl-1 pr-2">{text}</span>
                {iconLocation === 'after' && <div className="h-3.5 w-3.5 fill-gray-800 dark:fill-gray-100 text-gray-800 dark:text-gray-100 inline-block align-middle mr-2">
                        <svg className="w-4 h-4 bg-gray-800 dark:bg-gray-100 pr-3" style={{
    maskImage: sourceUrl,
    maskRepeat: "no-repeat",
    maskPosition: "center center"
  }} />
                    </div>}
            </div>
        </>;
};

export const Icon = ({name}) => {
  return <div className="h-4 w-4 fill-gray-800 dark:fill-gray-100 text-gray-800 dark:text-gray-100 inline-block align-middle">
            <svg className="w-4 h-4 bg-gray-800 dark:bg-gray-100" style={{
    maskImage: `url('https://mintlify.b-cdn.net/v6.5.1/solid/${name}.svg')`,
    maskRepeat: "no-repeat",
    maskPosition: "center center"
  }} />
        </div>;
};

## Overview

Destination Type: <IconText text="Client-side" name="browser" iconType="duotone" iconLocation="after" />

* Includes support for <OutboundLink linkText="Google Enhanced Conversions" linkTarget="https://support.google.com/google-ads/answer/9888656" />
* Includes support for <OutboundLink linkText="Consent Mode V2" linkTarget="https://developers.google.com/tag-platform/security/guides/consent?sjid=5329592855679349930-EU&consentmode=advanced#upgrade-consent-v2" />

***

## Installation instructions

<Note>
  This is a client-side destination, meaning that you must track all events client-side (including `Placed Order` and `Started Subscription`) for this destination to work properly.

  If you want to set up a Google Ads conversion for a server-side tracked event, use the [Google Ads - Server-side Conversion Tracking](/destinations/integrations/google-ads-conversions-server-side) destination instead.
</Note>

<Steps>
  <Step icon="list" title="Get Tag ID & Conversion Label(s)">
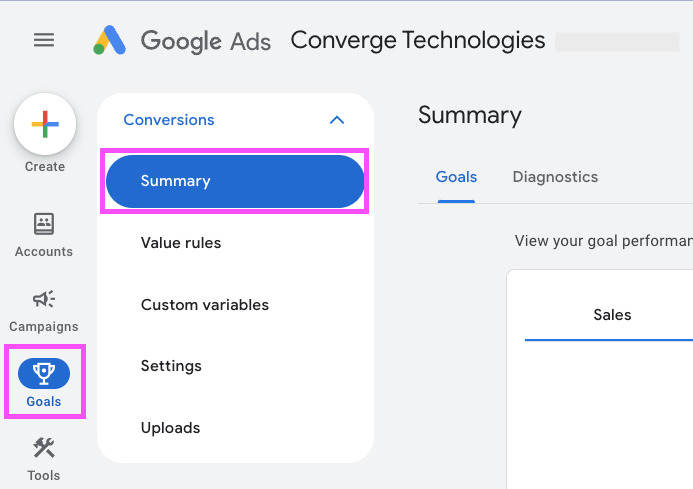
    1. Navigate to your Google Ads Dashboards and choose **Goals > Summary**.
           <Frame>
             <img src="https://mintcdn.com/converge/L45wyZk0Nu0wVlB6/images/destinations/google-ads/google-ads-destination-new-1.png?fit=max&auto=format&n=L45wyZk0Nu0wVlB6&q=85&s=2a949e088d7f25776639b854b1556434" alt="gads-1" width="693" height="489" data-path="images/destinations/google-ads/google-ads-destination-new-1.png" />
           </Frame>
        

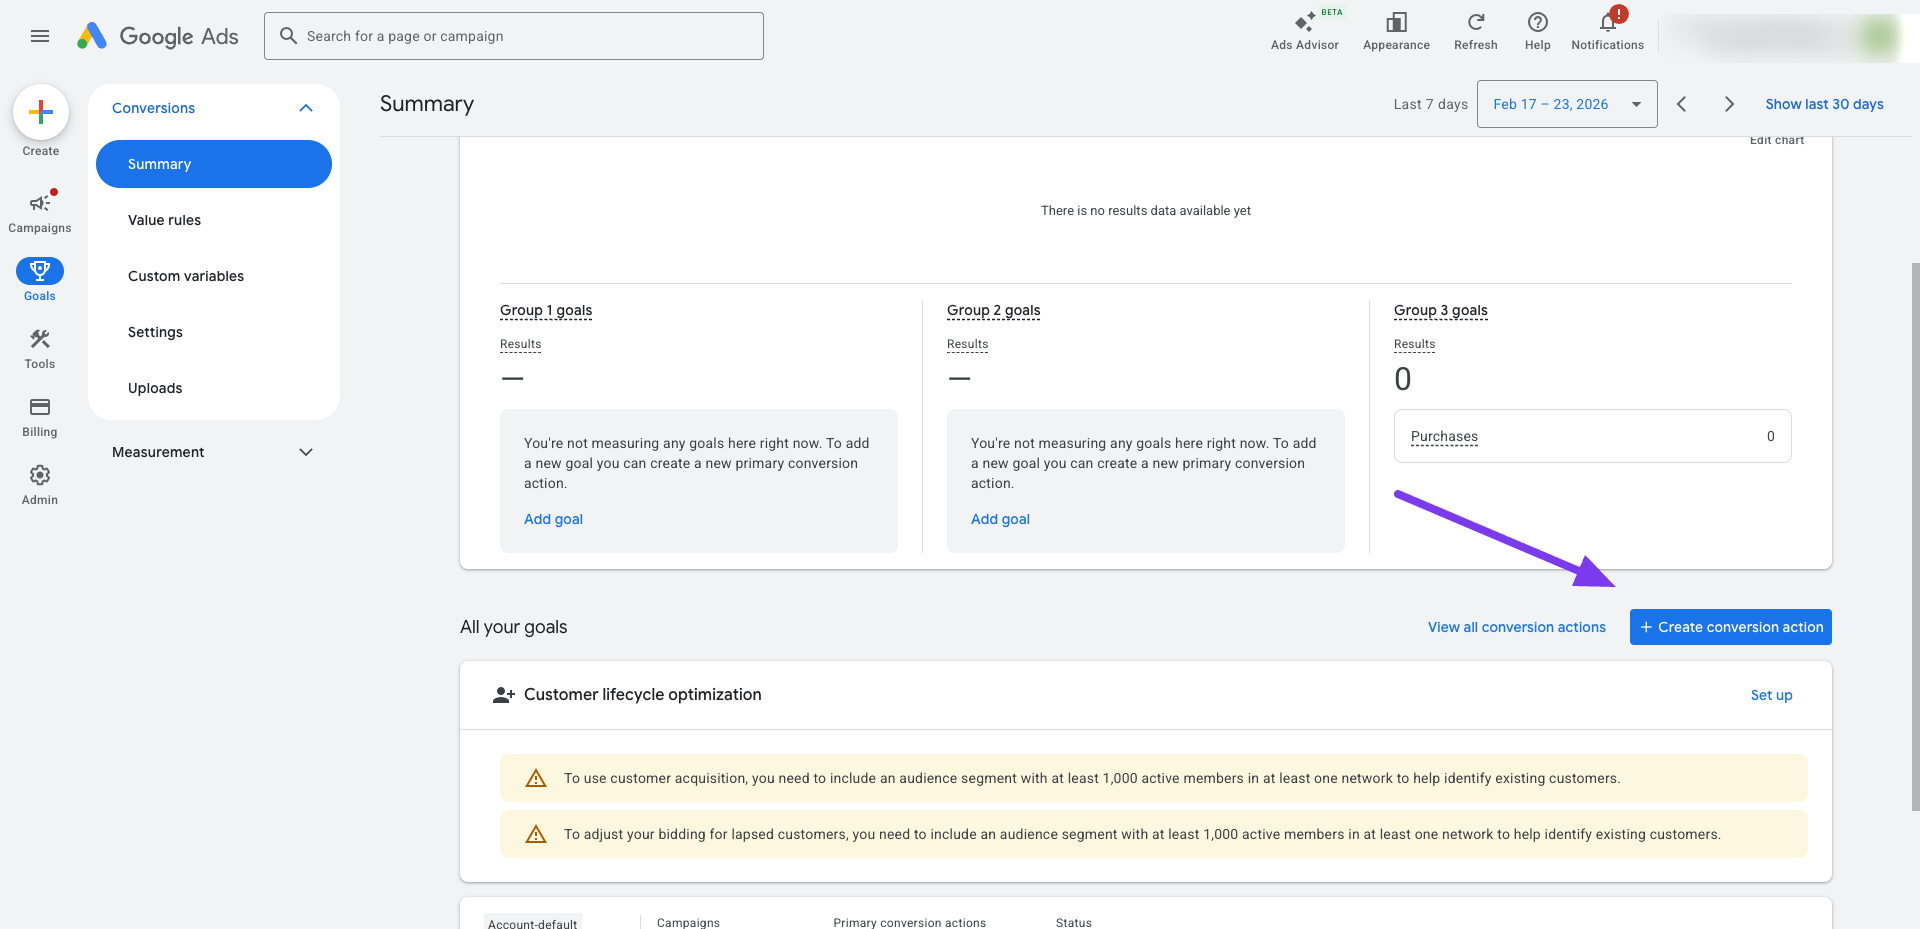
    2. Choose <IconText name="plus" text="Create conversion action" />
           <Frame>
             <img src="https://mintcdn.com/converge/B83QLetjEh5go507/images/destinations/google-ads/google_ads_create_conversion_action.png?fit=max&auto=format&n=B83QLetjEh5go507&q=85&s=4a3a7239a0599c089812582ff64a186c" alt="gads-2" width="1920" height="929" data-path="images/destinations/google-ads/google_ads_create_conversion_action.png" />
           </Frame>
        

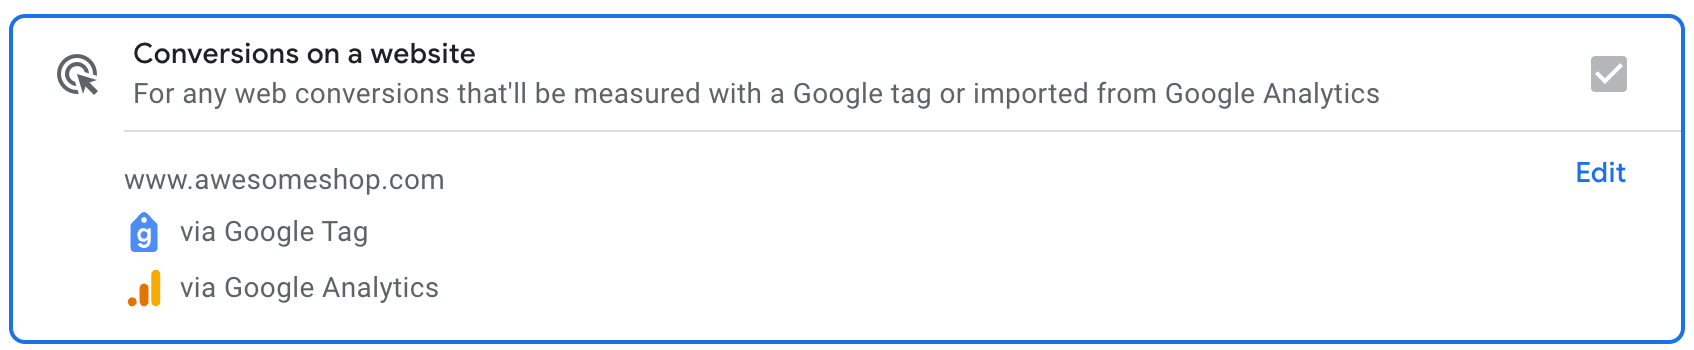
    3. Choose **Conversions on a website**.
           <Frame>
             <img src="https://mintcdn.com/converge/dh0K_Fgr0_qazJsh/images/destinations/google-ads/gads_conversion_on_a_website.png?fit=max&auto=format&n=dh0K_Fgr0_qazJsh&q=85&s=1b43718c2474406701b30b9abb72b356" alt="gads-3" width="1694" height="350" data-path="images/destinations/google-ads/gads_conversion_on_a_website.png" />
           </Frame>

           <Note>
             Google Ads sometimes skips this step and goes directly to step 2. In this case, click **Back** at the bottom of the page.

             <Frame>
               <img src="https://mintcdn.com/converge/lhx1moAURDDNfuH-/images/destinations/google-ads/google-ads-conversion-skipped.png?fit=max&auto=format&n=lhx1moAURDDNfuH-&q=85&s=baa3b1d8d3aa4bff039b4d033ee51e9e" alt="gads-warning" width="683" height="102" data-path="images/destinations/google-ads/google-ads-conversion-skipped.png" />
             </Frame>
           </Note>

           <Note>
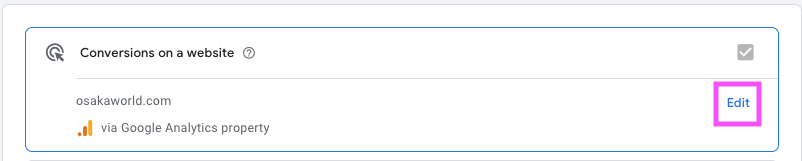
             Google Ads might propose a GA4 tag instead of a G-tag. Choose **Edit**, scan your website and select the Google Tag.

             <Frame>
               <img src="https://mintcdn.com/converge/L45wyZk0Nu0wVlB6/images/destinations/google-ads/google-ads-destination-new-ga4-warning.png?fit=max&auto=format&n=L45wyZk0Nu0wVlB6&q=85&s=15f97664d16ddcba11d36a0a8c182120" alt="gads-warning" width="802" height="161" data-path="images/destinations/google-ads/google-ads-destination-new-ga4-warning.png" />
             </Frame>
           </Note>


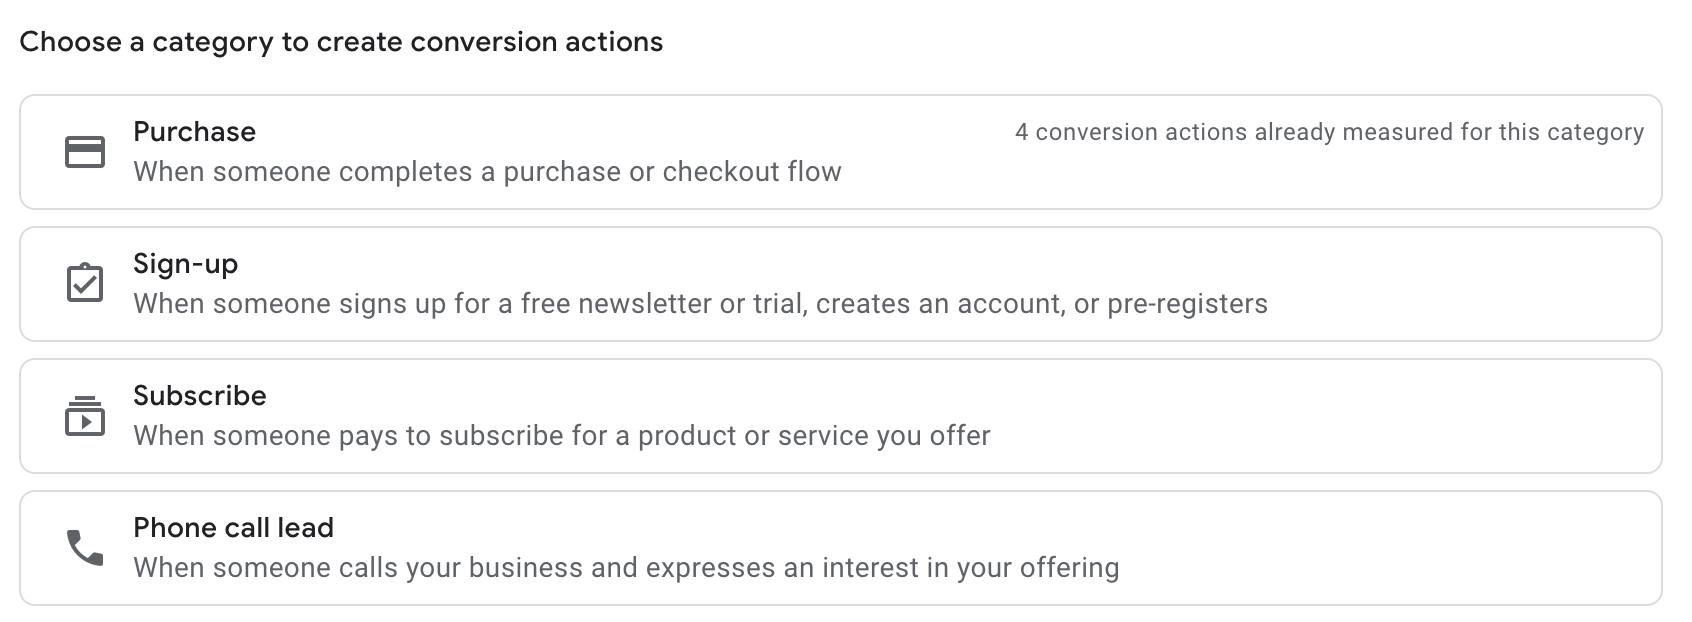
    4. Choose **Purchase** from the list of conversion actions.
           <Frame>
             <img src="https://mintcdn.com/converge/dh0K_Fgr0_qazJsh/images/destinations/google-ads/gads_conversion_category.png?fit=max&auto=format&n=dh0K_Fgr0_qazJsh&q=85&s=b9d34e504e5c5d94bffe134c7a518d88" alt="gads-5" width="1692" height="622" data-path="images/destinations/google-ads/gads_conversion_category.png" />
           </Frame>
        

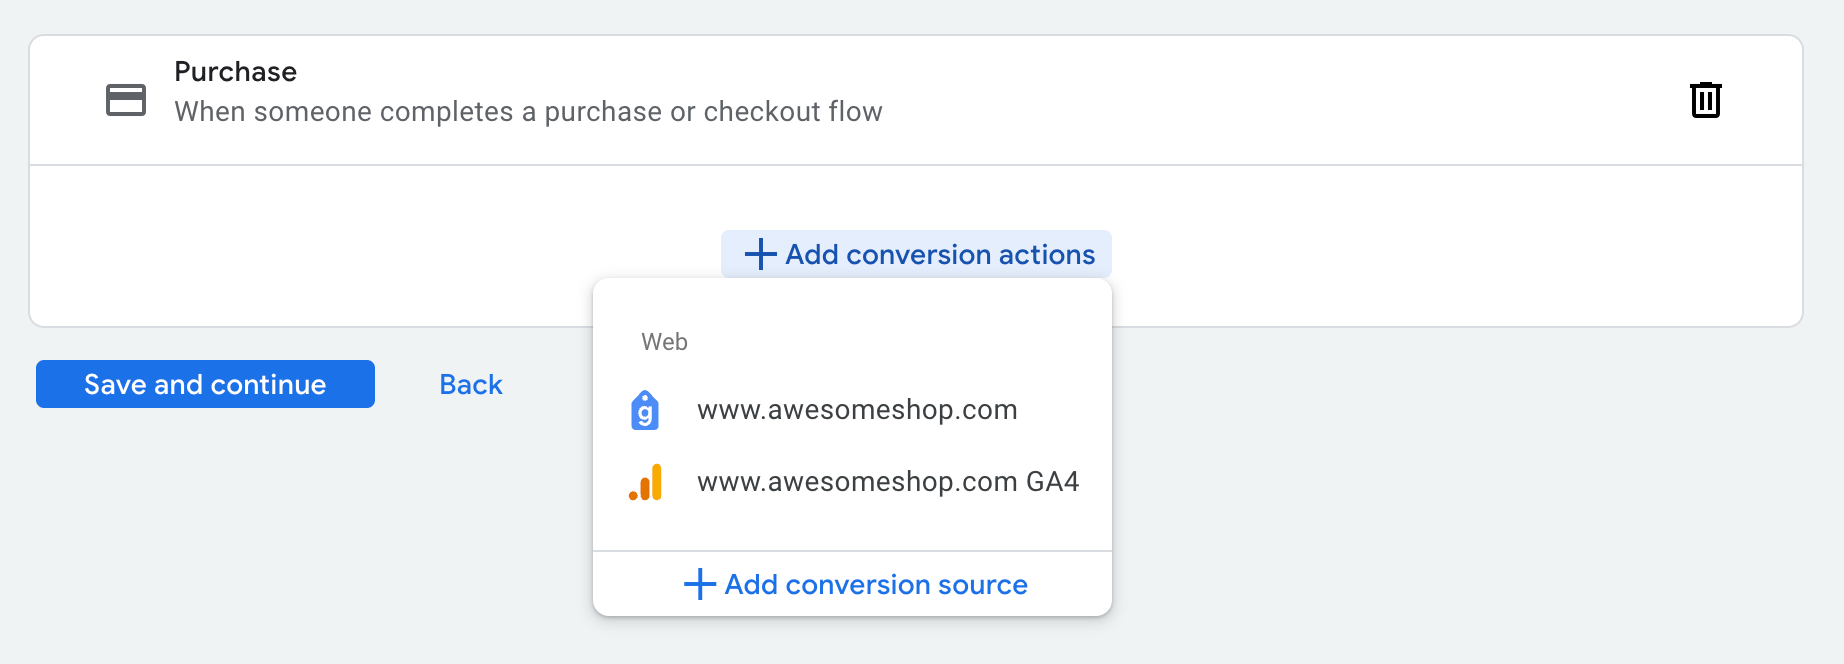
    5. Click on **Add conversion actions** and select your Google Tag.
           <Frame>
             <img src="https://mintcdn.com/converge/dh0K_Fgr0_qazJsh/images/destinations/google-ads/gads_add_conversion_action.png?fit=max&auto=format&n=dh0K_Fgr0_qazJsh&q=85&s=8d75a84890e2ae9e3921d69ec2ab6178" alt="gads-2" width="1844" height="664" data-path="images/destinations/google-ads/gads_add_conversion_action.png" />
           </Frame>
        

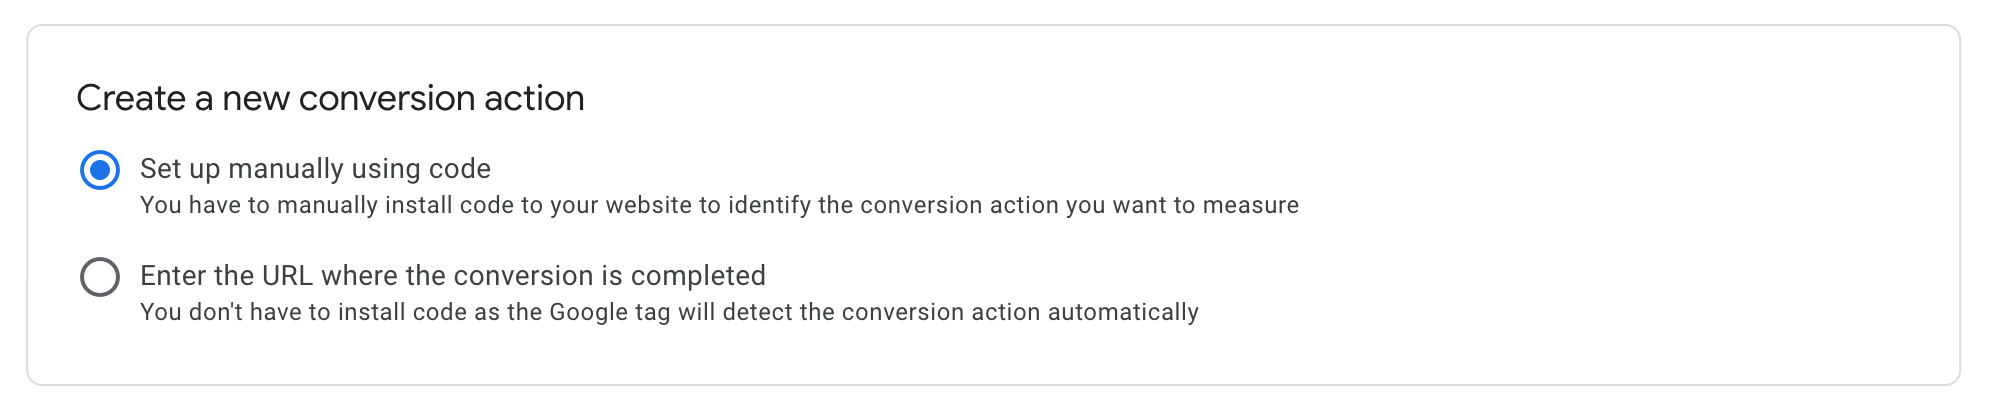
    6. Select **Set up manually using code**.
           <Frame>
             <img src="https://mintcdn.com/converge/dh0K_Fgr0_qazJsh/images/destinations/google-ads/gads_manually_using_code.png?fit=max&auto=format&n=dh0K_Fgr0_qazJsh&q=85&s=58b678dee762401718cddd5b444c4aca" alt="gads-2" width="1996" height="410" data-path="images/destinations/google-ads/gads_manually_using_code.png" />
           </Frame>
        

    7. Open the Conversion settings and pick a name for your conversion: e.g. `[Converge] Purchase`. Then click on **Done**.
           <Frame>
             <img src="https://mintcdn.com/converge/dh0K_Fgr0_qazJsh/images/destinations/google-ads/gads_conversion_name.png?fit=max&auto=format&n=dh0K_Fgr0_qazJsh&q=85&s=e950b6ea5055e55ba9221215eab5fd60" alt="gads-2" width="1736" height="328" data-path="images/destinations/google-ads/gads_conversion_name.png" />
           </Frame>
        

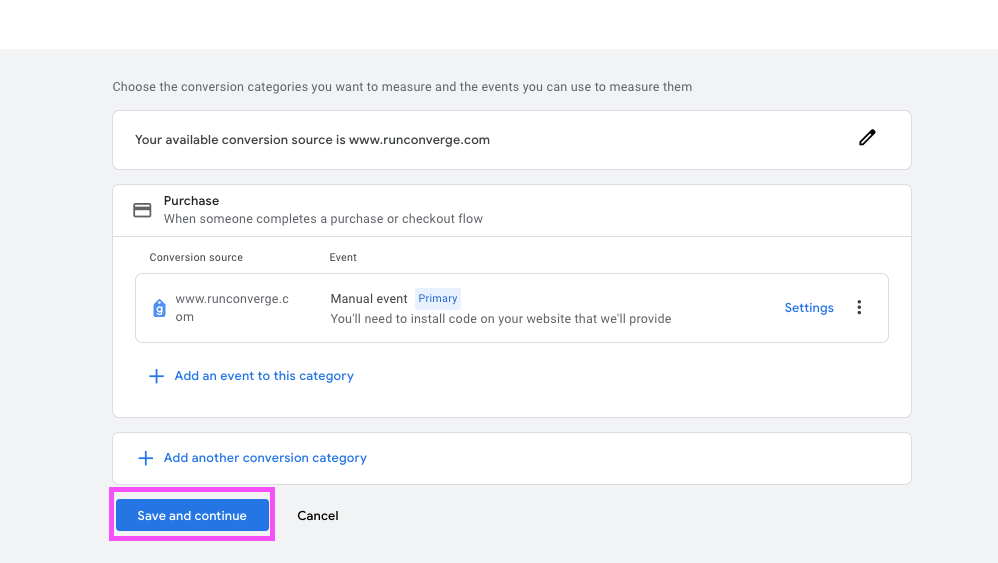
    8. Click **Save and continue**.
           <Frame>
             <img src="https://mintcdn.com/converge/L45wyZk0Nu0wVlB6/images/destinations/google-ads/google-ads-destination-new-9.png?fit=max&auto=format&n=L45wyZk0Nu0wVlB6&q=85&s=164a1334462a59f958c1dcd5f184d6a2" alt="gads-3" width="998" height="563" data-path="images/destinations/google-ads/google-ads-destination-new-9.png" />
           </Frame>

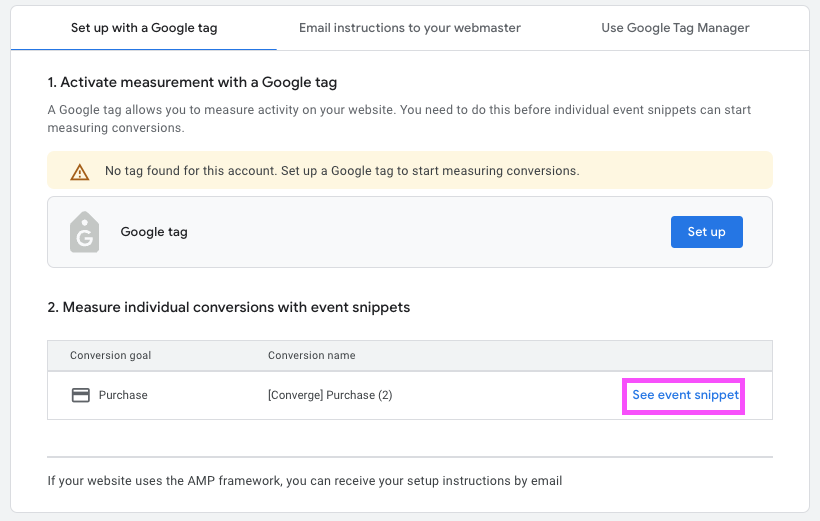
    9. Click on **See event snippet**.
           <Frame>
             <img src="https://mintcdn.com/converge/L45wyZk0Nu0wVlB6/images/destinations/google-ads/google-ads-destination-new-10.png?fit=max&auto=format&n=L45wyZk0Nu0wVlB6&q=85&s=b4276954645a63a4ee8e2cc569c7b41c" alt="gads-3" width="820" height="521" data-path="images/destinations/google-ads/google-ads-destination-new-10.png" />
           </Frame>

    [//]: # "cspell:disable-next-line"

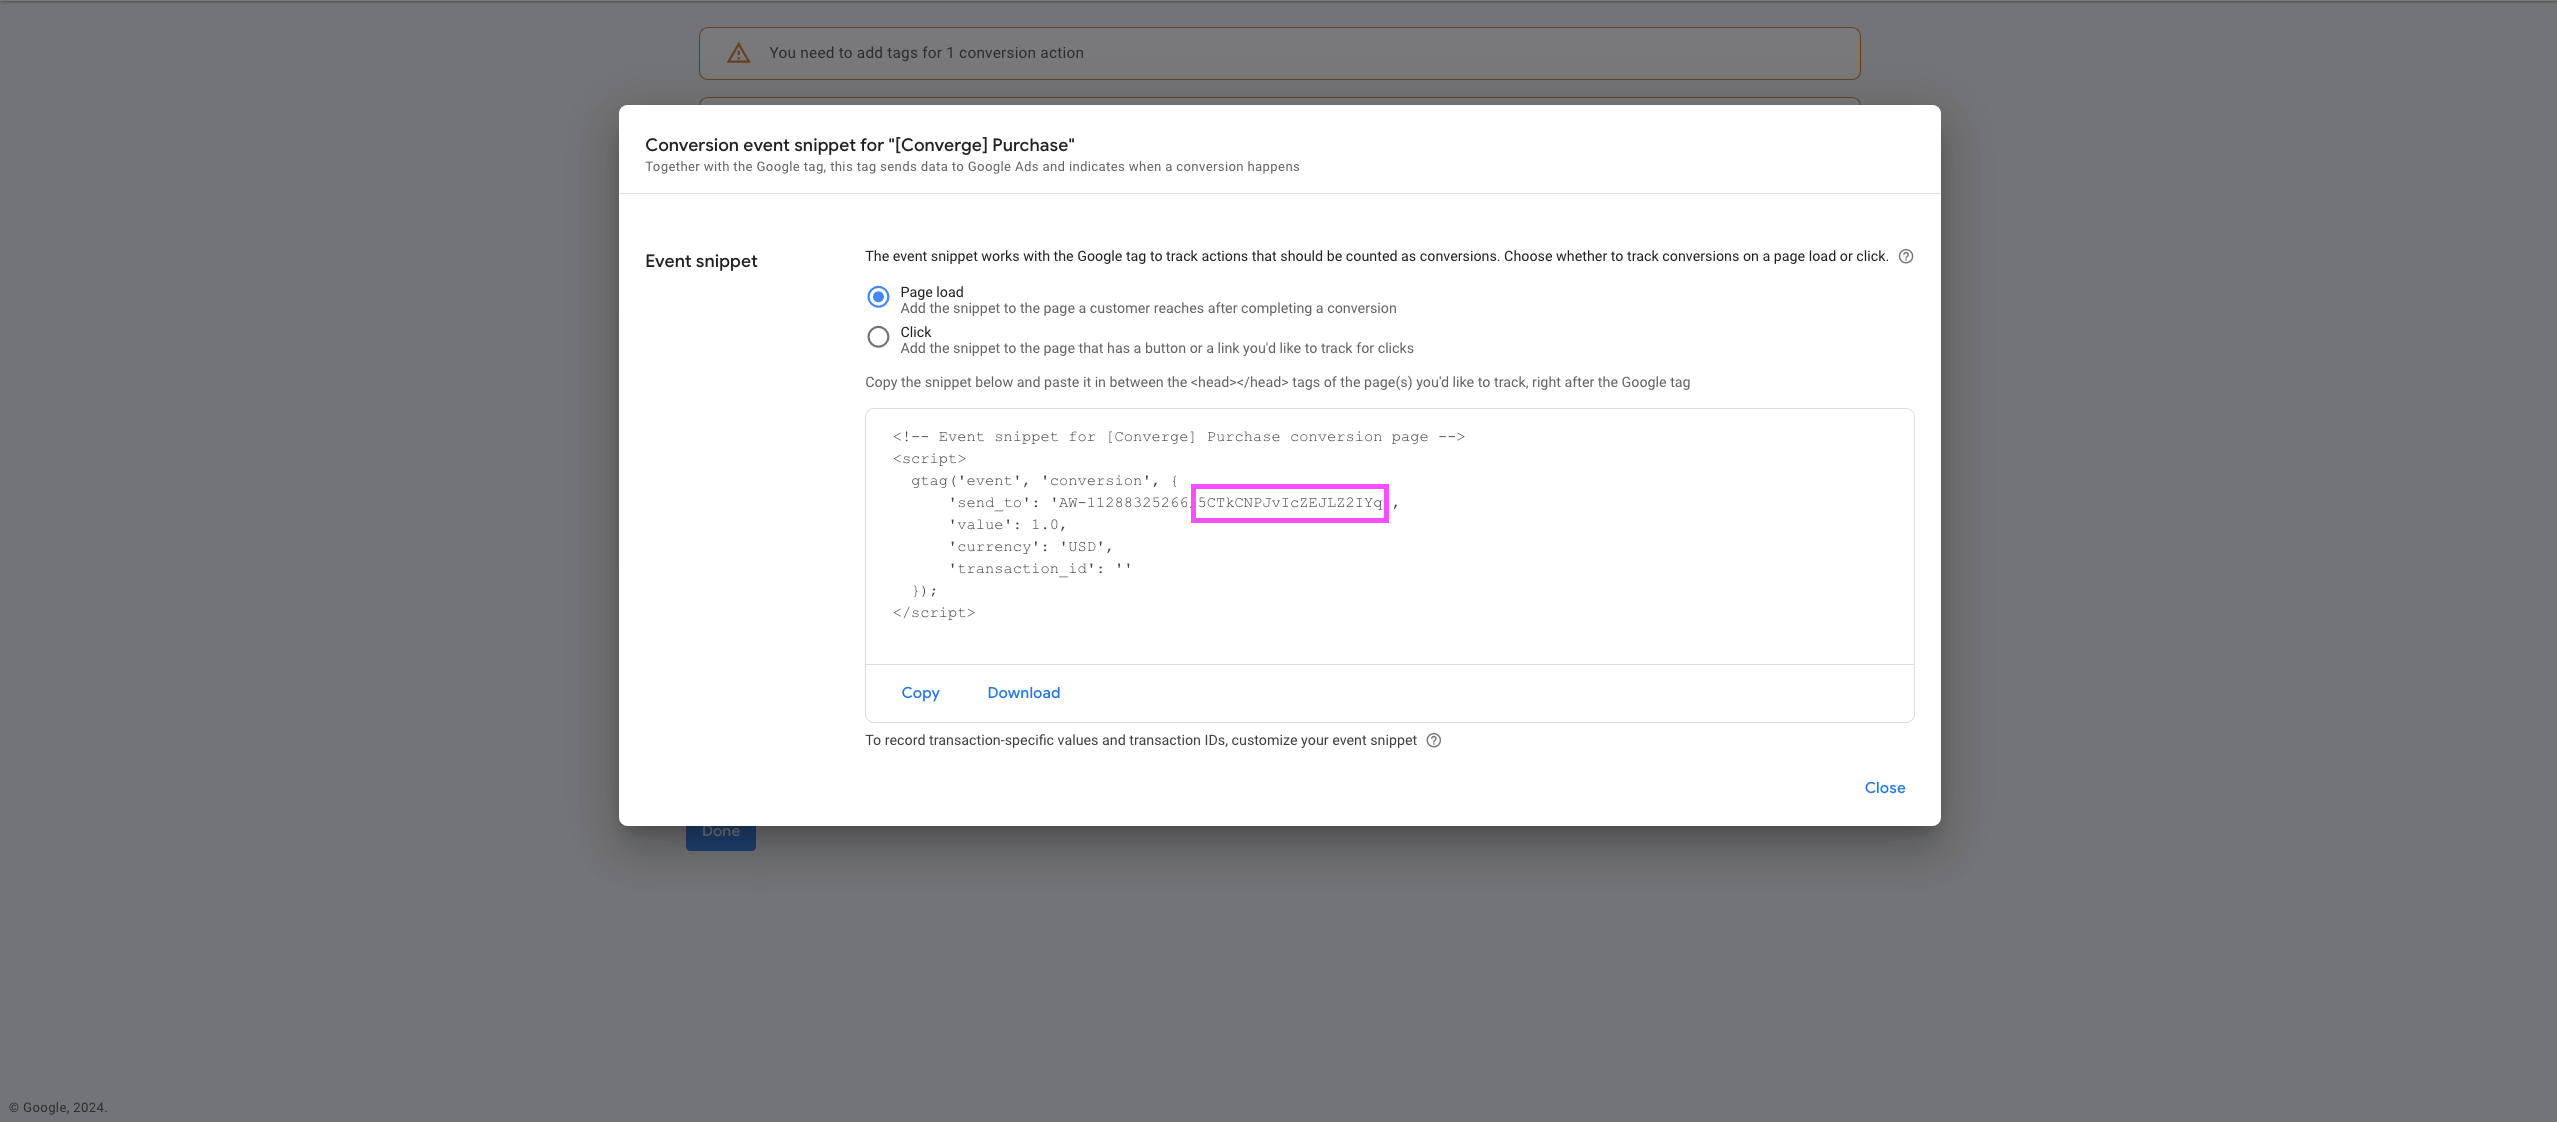
    10\. Copy the **Tag ID** and the **Conversion ID**, in this example the Tag ID is `AW-11288325266`; the Conversion ID is `5CTkCNPJvIcZEJLZ2IYq`. You will need both for the Converge destination.
     

    <Frame>
      <img src="https://mintcdn.com/converge/L45wyZk0Nu0wVlB6/images/destinations/google-ads/google-ads-destination-4.png?fit=max&auto=format&n=L45wyZk0Nu0wVlB6&q=85&s=91bfad703c6d792f01db80b3fe745d0c" alt="gads-4" width="2557" height="1122" data-path="images/destinations/google-ads/google-ads-destination-4.png" />
    </Frame>
  </Step>

  <Step icon="list" title="Set up the destination">
    10. In the Converge sidebar, click on <IconText name="arrow-right-from-line" text="Event streams" /> and then click **Create new Destination**.

    11. Select the **Google Ads - Conversion tracking** destination and click **Next**.

    12. Give your **destination** a name (e.g. Google Ads - Conversion Destination) and optional **description** and click **Next**.

    13. Copy the **Tag ID** you found earlier in the **Tag ID field** and click **Next**.

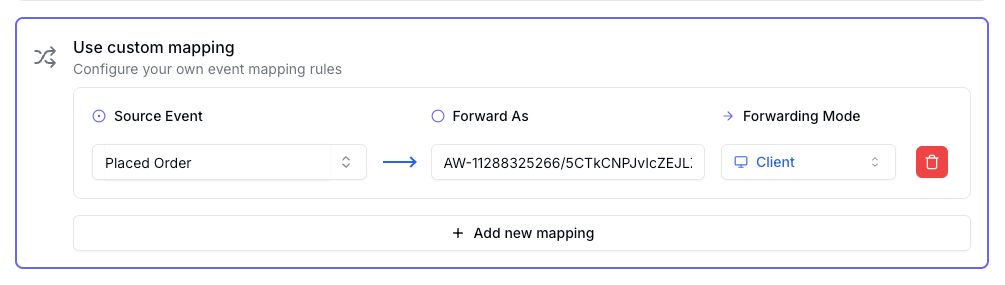
    14. Click on <IconText name="plus" text="Add new mapping" /> and select Placed Order as the source event.

    15. In the Forward As value copy the **Tag ID** and the **Conversion Label** separated by a `/`. From our example it would be `AW-11288325266/5CTkCNPJvIcZEJLZ2IYq`

    16. Select **Client** as the Forwarding Mode and click **Next**.

    <Frame>
      <img src="https://mintcdn.com/converge/dh0K_Fgr0_qazJsh/images/destinations/google-ads/gads-conversion-example.png?fit=max&auto=format&n=dh0K_Fgr0_qazJsh&q=85&s=9ed2998869354ecf59492dc6f58f56fb" alt="gads-4" width="1005" height="285" data-path="images/destinations/google-ads/gads-conversion-example.png" />
    </Frame>

    17. Select the sources you want to forward events from, then click **Next**.

    <Note>This is a client-side destination, meaning that only client-side sources can be used with this destination. You can still select server-side sources but the events will not be sent to Google Ads.</Note>

    18. Review if there are any issues found in your setup and click **Submit**.
  </Step>

  <Step title="Activate enhanced conversions" icon="sparkles">
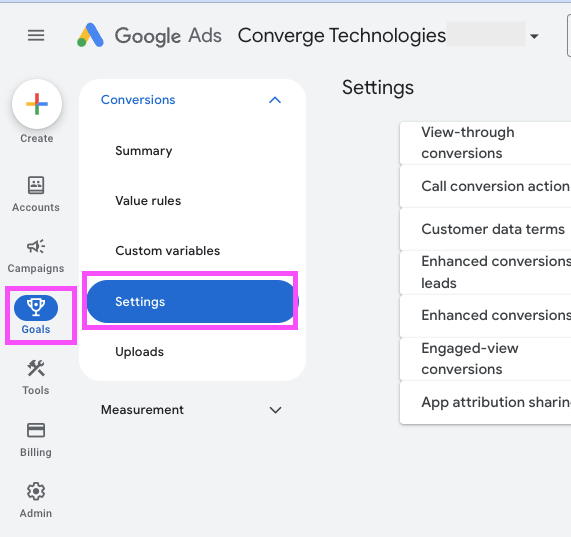
    11. In the sidebar, click on **Goals** > **Settings**.

    <Frame>
      <img src="https://mintcdn.com/converge/L45wyZk0Nu0wVlB6/images/destinations/google-ads/google-ads-destination-new-11.png?fit=max&auto=format&n=L45wyZk0Nu0wVlB6&q=85&s=0408efd404f584731d4bc6b48e8271e1" alt="gads-5" width="571" height="537" data-path="images/destinations/google-ads/google-ads-destination-new-11.png" />
    </Frame>

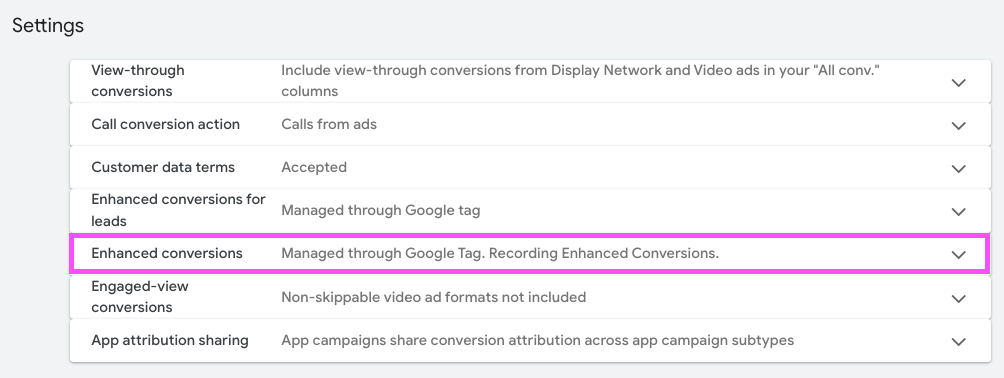
    12. Choose **Enhanced conversions** from the list of dropdowns.

    <Frame>
      <img src="https://mintcdn.com/converge/L45wyZk0Nu0wVlB6/images/destinations/google-ads/google-ads-destination-new-12.png?fit=max&auto=format&n=L45wyZk0Nu0wVlB6&q=85&s=fafc653e30d72e9ca49ee07c75b2137b" alt="gads-5" width="1004" height="378" data-path="images/destinations/google-ads/google-ads-destination-new-12.png" />
    </Frame>

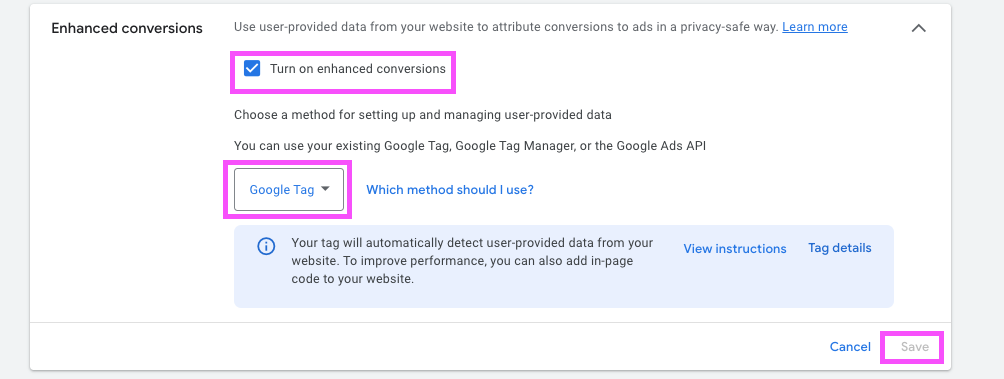
    13. Check the box next to **Turn on enhanced conversions** and pick **Google tag**, then click **Save**.

    <Frame>
      <img src="https://mintcdn.com/converge/L45wyZk0Nu0wVlB6/images/destinations/google-ads/google-ads-destination-new-13.png?fit=max&auto=format&n=L45wyZk0Nu0wVlB6&q=85&s=bd0a1984ae6b8949bc2d14be5f030026" alt="gads-5" width="1004" height="379" data-path="images/destinations/google-ads/google-ads-destination-new-13.png" />
    </Frame>
  </Step>
</Steps>

<Warning>
  Set this destination to **Deactivated** while you remove your existing Google Ads tracking setup. Running both in parallel leads to duplicate conversion data. Follow the **Turn off your old Google Ads tracking** instructions below, then set the destination to **Active** when you're ready.
</Warning>

<Warning> Converge automatically loads the AW tag on all pages. If you already have an AW tag with the same tag ID in GTM, pause or remove it to prevent tracking conflicts. </Warning>

***

## Turn off your old Google Ads tracking

### Turning off the Shopify Google Sales Channel data sharing

1. Navigate to your <OutboundLink linkText="Shopify Admin Dashboard" linkTarget="https://admin.shopify.com/" />.

2. Click on **Sales channels** and choose **Google & YouTube** from the *Installed sales channels* menu.

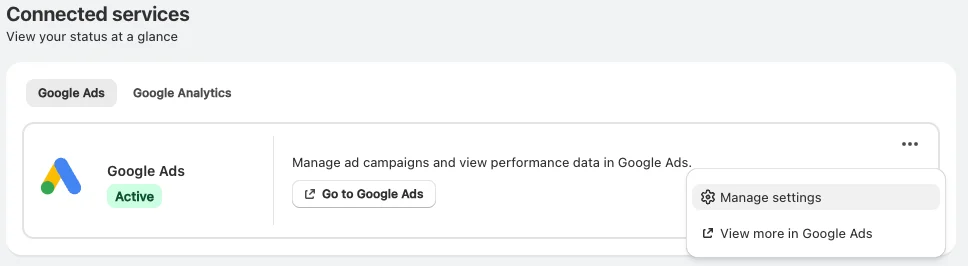
3. Click the **Google Ads** tab. Then click the **...** menu and select **Manage settings**.

   <Frame>
     <img src="https://mintcdn.com/converge/N3CX8aG3MgYzuML-/images/guides/turn-off-tracking/shopify-googleads-sales-channel/shopify-googleads-sales-channel-0-2026.png?fit=max&auto=format&n=N3CX8aG3MgYzuML-&q=85&s=fe40386c7e8db983370332b0f36a716b" alt="settings-googleads-0" width="968" height="266" data-path="images/guides/turn-off-tracking/shopify-googleads-sales-channel/shopify-googleads-sales-channel-0-2026.png" />
   </Frame>

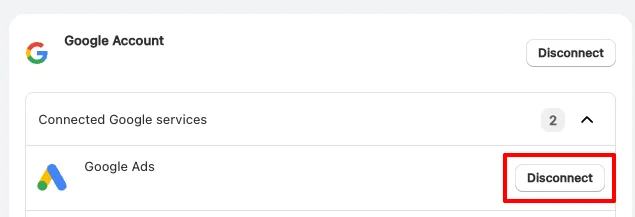
4. Click **Disconnect** next to **Google Ads**.

   <Frame>
     <img src="https://mintcdn.com/converge/N3CX8aG3MgYzuML-/images/guides/turn-off-tracking/shopify-googleads-sales-channel/shopify-googleads-sales-channel-1-2026.png?fit=max&auto=format&n=N3CX8aG3MgYzuML-&q=85&s=01fff290aabbfafbc40cd55da60c1e22" alt="settings-googleads-1" width="635" height="217" data-path="images/guides/turn-off-tracking/shopify-googleads-sales-channel/shopify-googleads-sales-channel-1-2026.png" />
   </Frame>

***

## Set up additional conversions

This section explains how to set up conversions for auxiliary events like **Added to Cart** and **Started Checkout**.

<Warning>
  Before setting up additional conversions, make sure you have the **Converge Google Ads - Conversion tracking destination** and the **Converge Purchase conversion** configured. If not, follow the [Installation instructions](#installation-instructions) first.
</Warning>

1. Open your **Google Ads Dashboard** and go to **Goals > Summary**.

   <Frame>
     <img src="https://mintcdn.com/converge/L45wyZk0Nu0wVlB6/images/destinations/google-ads/google-ads-destination-new-1.png?fit=max&auto=format&n=L45wyZk0Nu0wVlB6&q=85&s=2a949e088d7f25776639b854b1556434" alt="gads-1" width="693" height="489" data-path="images/destinations/google-ads/google-ads-destination-new-1.png" />
   </Frame>

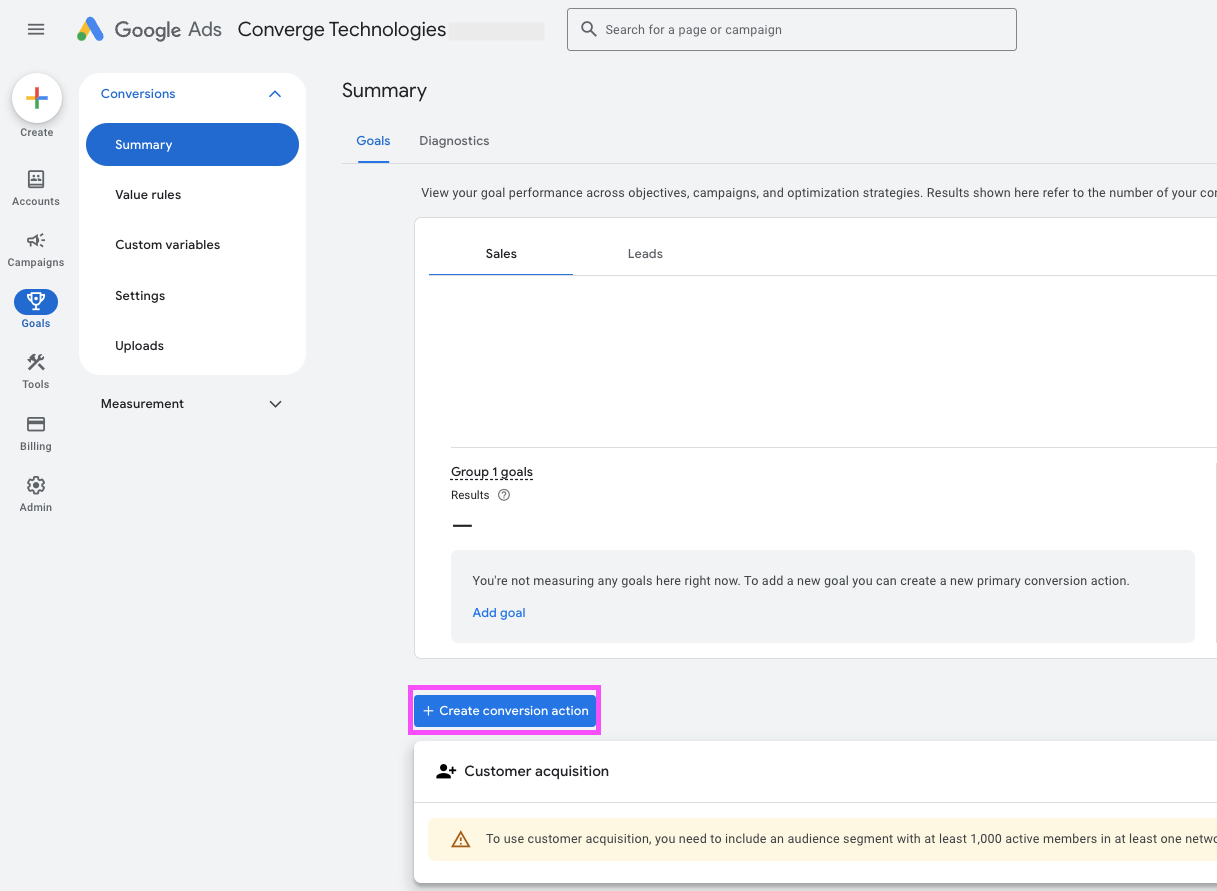
2. Click <IconText name="plus" text="Create conversion action" />.

   <Frame>
     <img src="https://mintcdn.com/converge/L45wyZk0Nu0wVlB6/images/destinations/google-ads/google-ads-destination-new-2.png?fit=max&auto=format&n=L45wyZk0Nu0wVlB6&q=85&s=e680b375d947e0fb8fa5a73cb0d8f442" alt="gads-2" width="1217" height="891" data-path="images/destinations/google-ads/google-ads-destination-new-2.png" />
   </Frame>

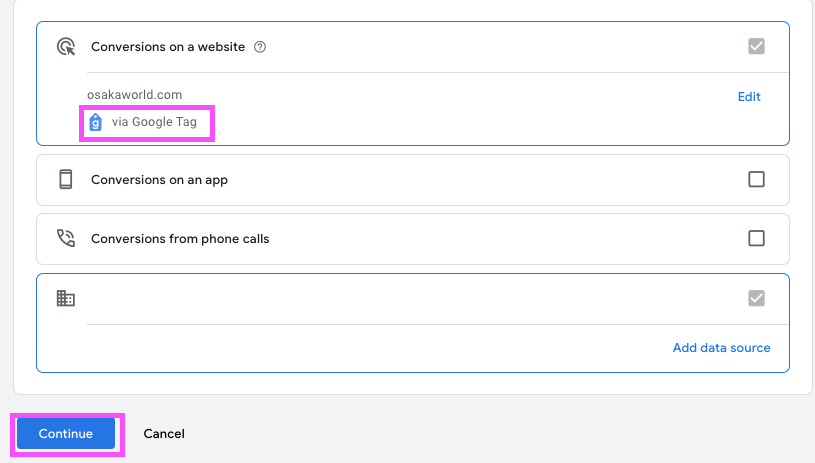
3. Select **Conversions on a website**, confirm a **Google Tag** is already connected, and click **Continue**.

   <Frame>
     <img src="https://mintcdn.com/converge/dh0K_Fgr0_qazJsh/images/destinations/google-ads/google-ads-additional-conversions-1.png?fit=max&auto=format&n=dh0K_Fgr0_qazJsh&q=85&s=31f37d30260b5bf64a73781afbd051d3" alt="gads-3" width="815" height="463" data-path="images/destinations/google-ads/google-ads-additional-conversions-1.png" />
   </Frame>

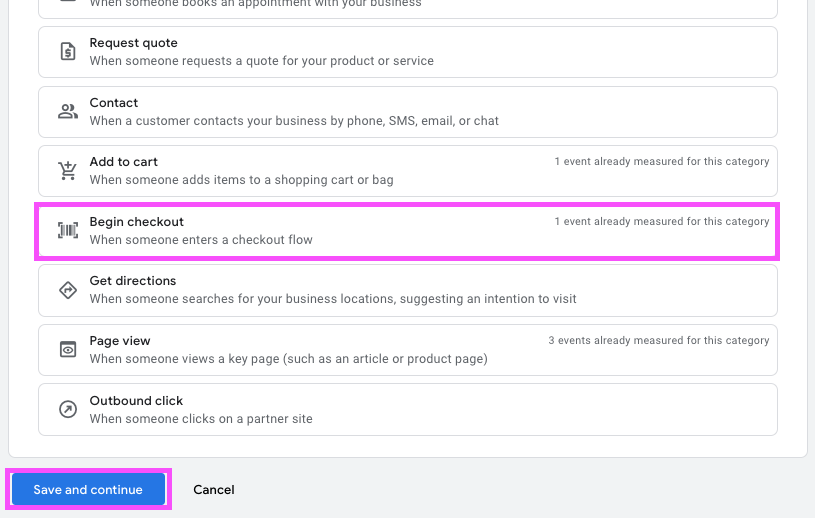
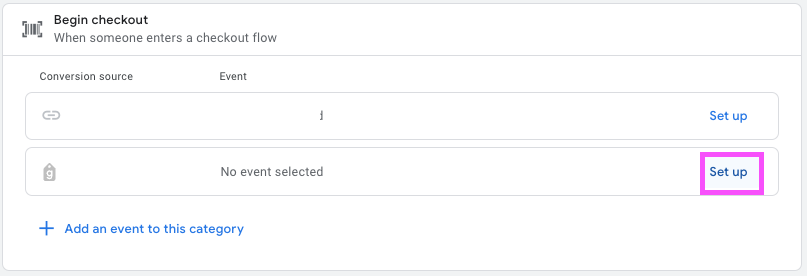
4. Choose the conversion type that best matches your event.\
   *Example: Select **Begin checkout** for a **Started Checkout** conversion.*

   <Frame>
     <img src="https://mintcdn.com/converge/dh0K_Fgr0_qazJsh/images/destinations/google-ads/google-ads-additional-conversions-2.png?fit=max&auto=format&n=dh0K_Fgr0_qazJsh&q=85&s=480139f89acfff1a9686fb7dabd92411" alt="gads-4" width="815" height="518" data-path="images/destinations/google-ads/google-ads-additional-conversions-2.png" />
   </Frame>

5. Click **Set up** next to your **Google Tag**.

   <Frame>
     <img src="https://mintcdn.com/converge/dh0K_Fgr0_qazJsh/images/destinations/google-ads/google-ads-additional-conversions-3.png?fit=max&auto=format&n=dh0K_Fgr0_qazJsh&q=85&s=78a2480e4b356846658ccfe53b31a64a" alt="gads-5" width="807" height="276" data-path="images/destinations/google-ads/google-ads-additional-conversions-3.png" />
   </Frame>

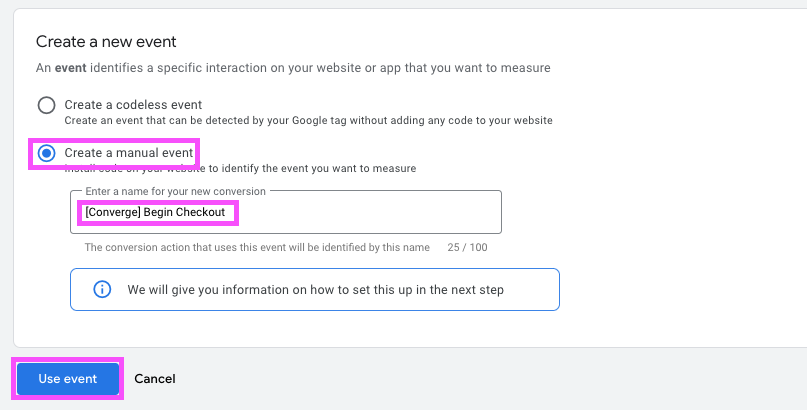
6. Click **Create a manual event**, name your conversion (e.g., `[Converge] Begin Checkout`), and click **Use event**.

   <Frame>
     <img src="https://mintcdn.com/converge/dh0K_Fgr0_qazJsh/images/destinations/google-ads/google-ads-additional-conversions-4.png?fit=max&auto=format&n=dh0K_Fgr0_qazJsh&q=85&s=da932c2ab1ad7f530200258dbdc08b02" alt="gads-2" width="807" height="410" data-path="images/destinations/google-ads/google-ads-additional-conversions-4.png" />
   </Frame>

7. Click **Save and continue**.

   <Frame>
     <img src="https://mintcdn.com/converge/L45wyZk0Nu0wVlB6/images/destinations/google-ads/google-ads-destination-new-9.png?fit=max&auto=format&n=L45wyZk0Nu0wVlB6&q=85&s=164a1334462a59f958c1dcd5f184d6a2" alt="gads-3" width="998" height="563" data-path="images/destinations/google-ads/google-ads-destination-new-9.png" />
   </Frame>

8. Click **See event snippet**.

   <Frame>
     <img src="https://mintcdn.com/converge/L45wyZk0Nu0wVlB6/images/destinations/google-ads/google-ads-destination-new-10.png?fit=max&auto=format&n=L45wyZk0Nu0wVlB6&q=85&s=b4276954645a63a4ee8e2cc569c7b41c" alt="gads-3" width="820" height="521" data-path="images/destinations/google-ads/google-ads-destination-new-10.png" />
   </Frame>

9. Copy the **Conversion ID** (e.g., `5CTkCNPJvIcZEJLZ2IYq`).

   <Frame>
     <img src="https://mintcdn.com/converge/L45wyZk0Nu0wVlB6/images/destinations/google-ads/google-ads-destination-4.png?fit=max&auto=format&n=L45wyZk0Nu0wVlB6&q=85&s=91bfad703c6d792f01db80b3fe745d0c" alt="gads-4" width="2557" height="1122" data-path="images/destinations/google-ads/google-ads-destination-4.png" />
   </Frame>

10. In your Converge dashboard, under Destinations, click on **Configuration** > **Event mapping** > **Add new mapping**.

11. Click on <IconText name="plus" text="Add new mapping" /> and select the event you want as the source event.

12. In the Forward As value, copy the **Tag ID** and the **Conversion Label** separated by a `/`. From our example it would be `AW-11288325266/5CTkCNPJvIcZEJLZ2IYq`

13. Select **Client** as the Forwarding Mode.

14. Click **Save**.

## Converge functionality

This integration supports the following Converge destination functionality.

| Converge Feature                                     |       Supported       |
| ---------------------------------------------------- | :-------------------: |
| Custom Events                                        | <Icon name="check" /> |
| Filters                                              | <Icon name="xmark" /> |
| Server-side Conversions                              | <Icon name="xmark" /> |
| [Conversion amount](/destinations/conversion-amount) | <Icon name="check" /> |

***

## Import server-side conversions in Google Ads through GA4

<Note>
  Looking for native server-side conversion tracking? Check out the [Google Ads - Server-side Conversion Tracking](/destinations/integrations/google-ads-conversions-server-side) destination.
</Note>

You can also get a Converge server-side event in Google Ads through the **GA4 import** functionality.

<Steps>
  <Step title="Make sure your conversion arrives in GA4">
    If your conversion event already exists in GA4 (e.g. when you want to import a `purchase` or `add_to_cart` -conversion), then you can move straight onto *Step 2*.

    If you are looking to set up a custom event as a conversion in Google (e.g. a `new_customer_purchase` -event), you should first make sure that your event is configured as a <OutboundLink linkText="Custom Event" linkTarget="/destinations/custom-events" /> in the GA4 Destination.
  </Step>

  <Step title="Import your GA4 event in Google Ads as a conversion">
    <Info> The steps below demonstrate importing the `new_customer_purchase` event. But you should import the event/conversion that applies to your use case. </Info>

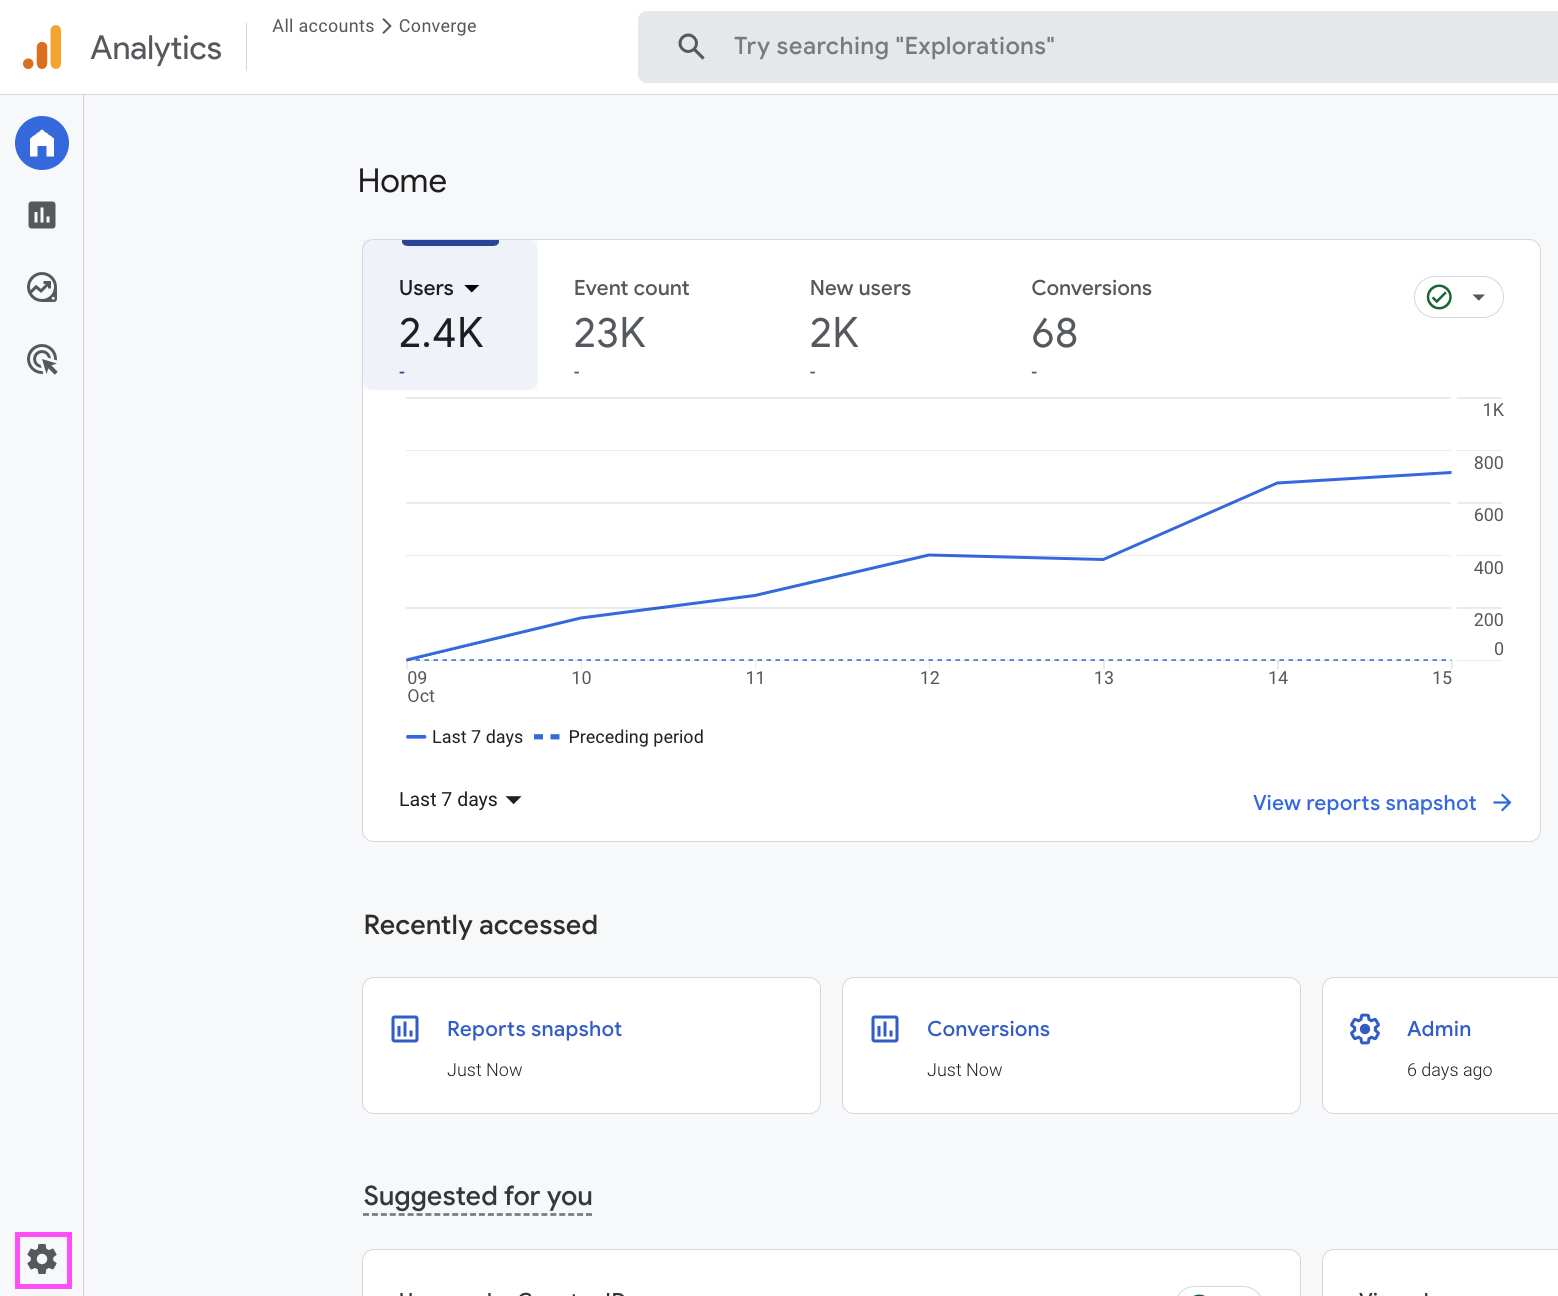
    1. Navigate to your GA4 dashboard and click on the settings icon in the bottom left corner.
           <Frame>
             <img src="https://mintcdn.com/converge/L45wyZk0Nu0wVlB6/images/destinations/google-ads/google-nc-purchase-1.png?fit=max&auto=format&n=L45wyZk0Nu0wVlB6&q=85&s=90dd88843e526e28fee4e35204399b04" alt="ga-2" width="1558" height="1296" data-path="images/destinations/google-ads/google-nc-purchase-1.png" />
           </Frame>

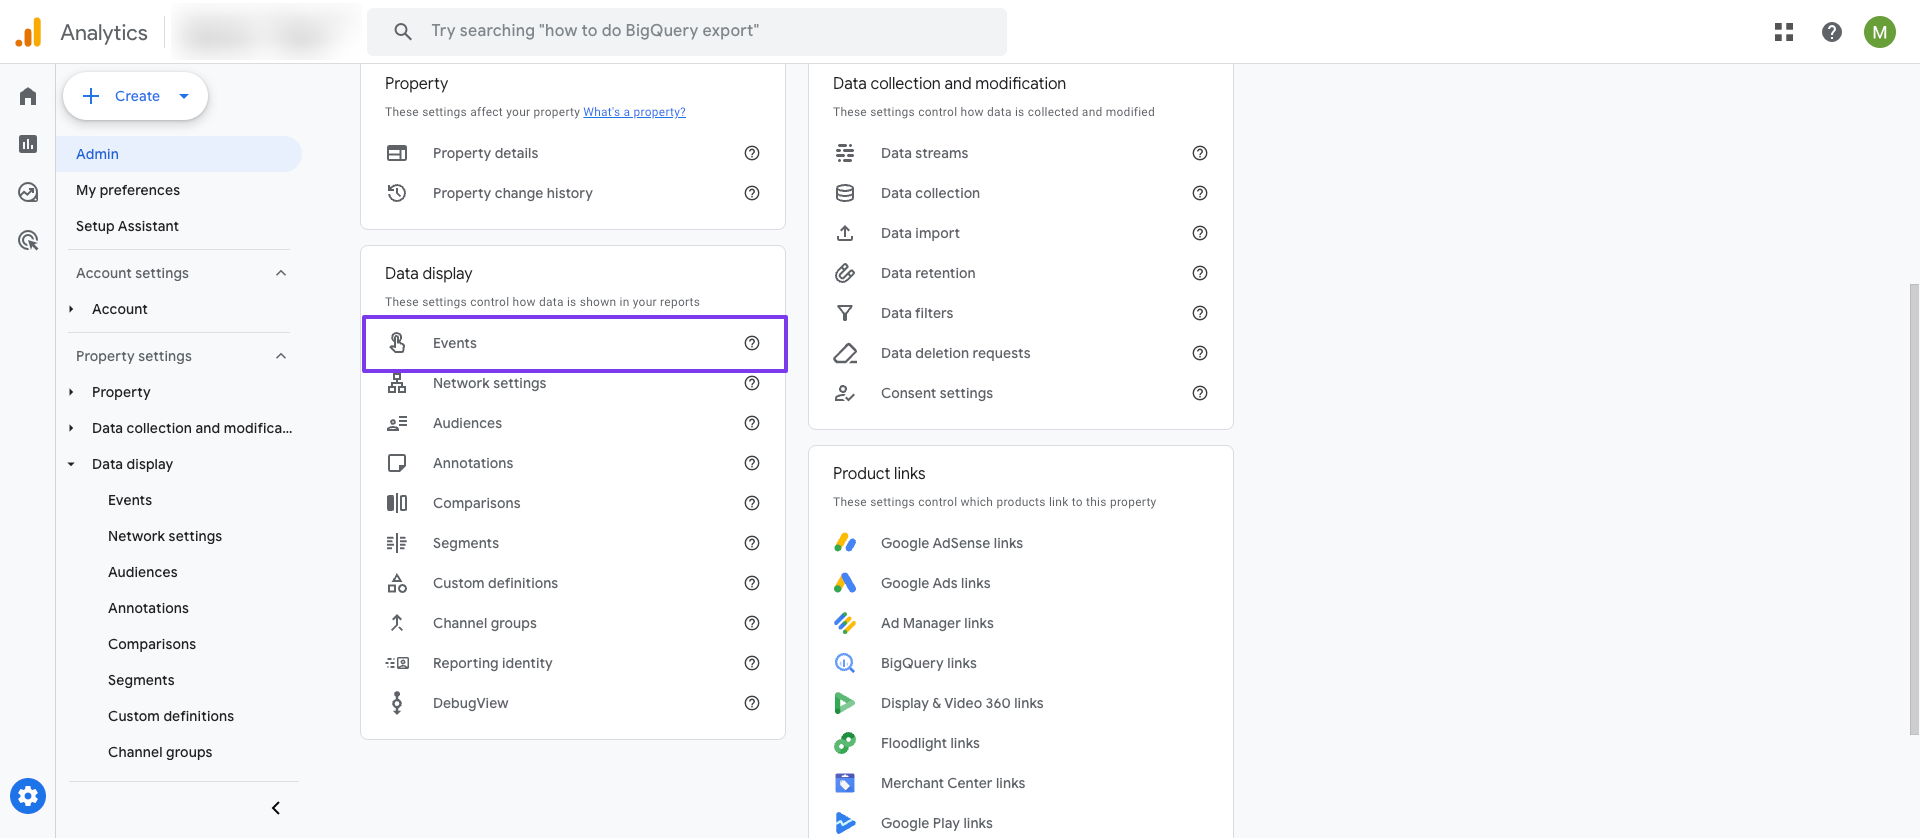
    2. In the submenu, navigate to **Events**.
           <Frame>
             <img src="https://mintcdn.com/converge/uJ9ST9XpkLxvUq8w/images/destinations/google-ads/google-nc-purchase-2.png?fit=max&auto=format&n=uJ9ST9XpkLxvUq8w&q=85&s=ef923ead72a9191e3c18ff437b93887b" alt="ga-3" width="1920" height="838" data-path="images/destinations/google-ads/google-nc-purchase-2.png" />
           </Frame>

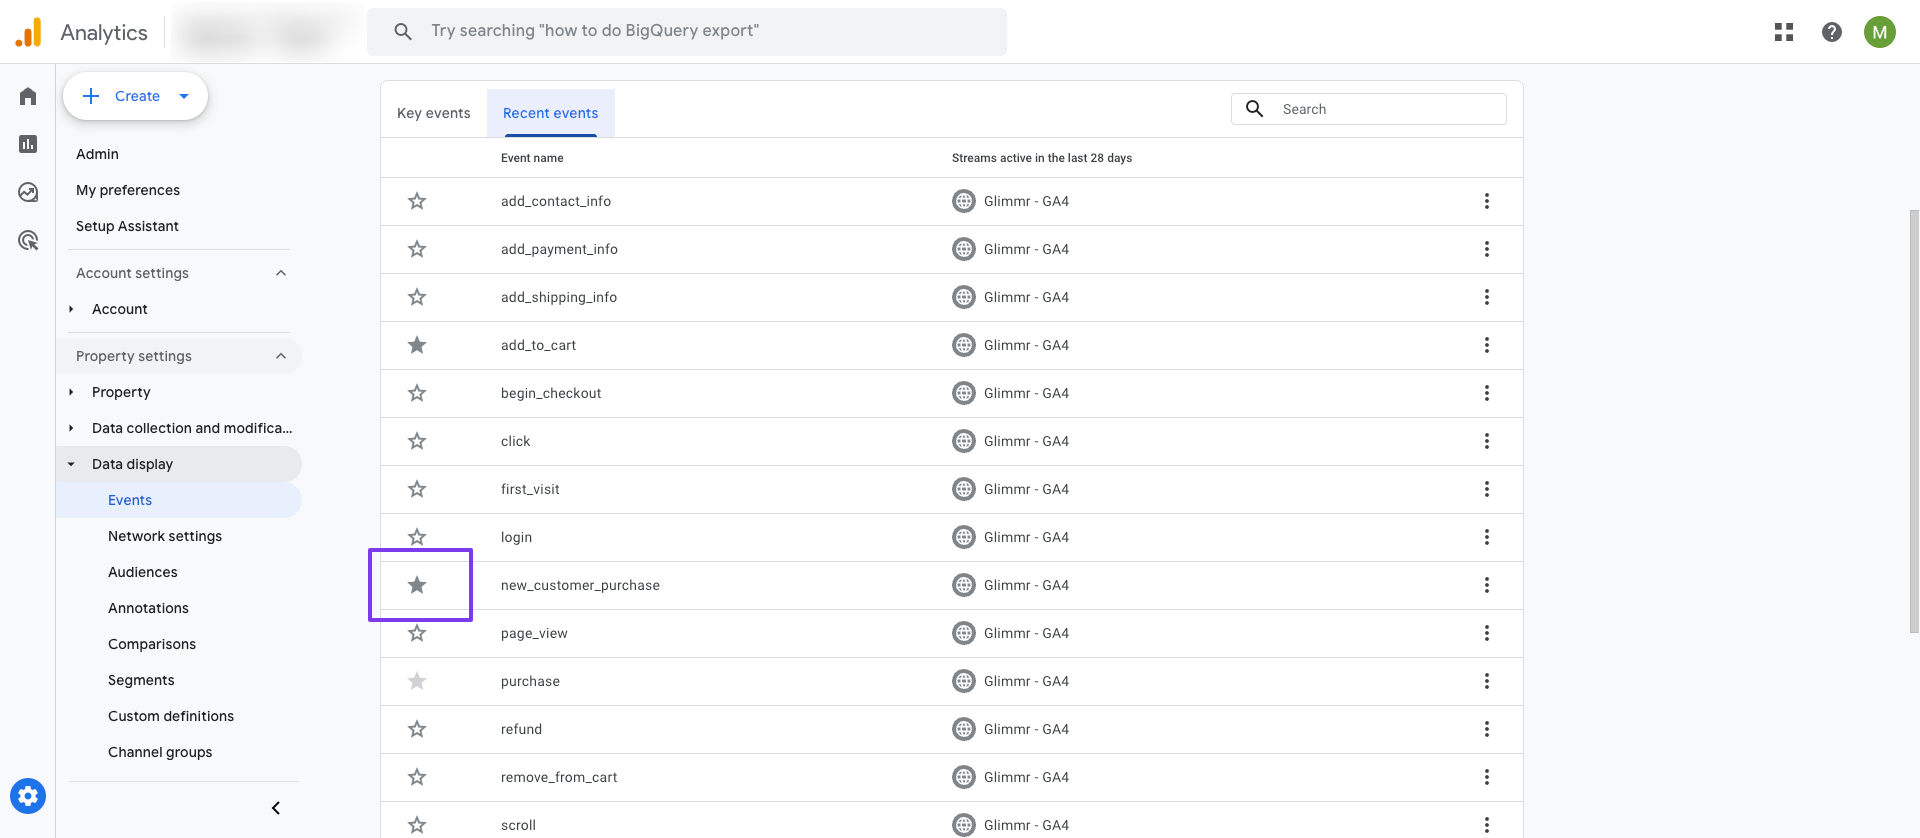
    3. Under the Events submenu, go to **Recent events** and mark `new_customer_purchase` as a conversion, if you'd like to import any other conversions, then mark these too.
           <Frame>
             <img src="https://mintcdn.com/converge/uJ9ST9XpkLxvUq8w/images/destinations/google-ads/google-nc-purchase-3.png?fit=max&auto=format&n=uJ9ST9XpkLxvUq8w&q=85&s=271c5075d0e3610dee523f4edd956b6c" alt="ga-4" width="1920" height="838" data-path="images/destinations/google-ads/google-nc-purchase-3.png" />
           </Frame>

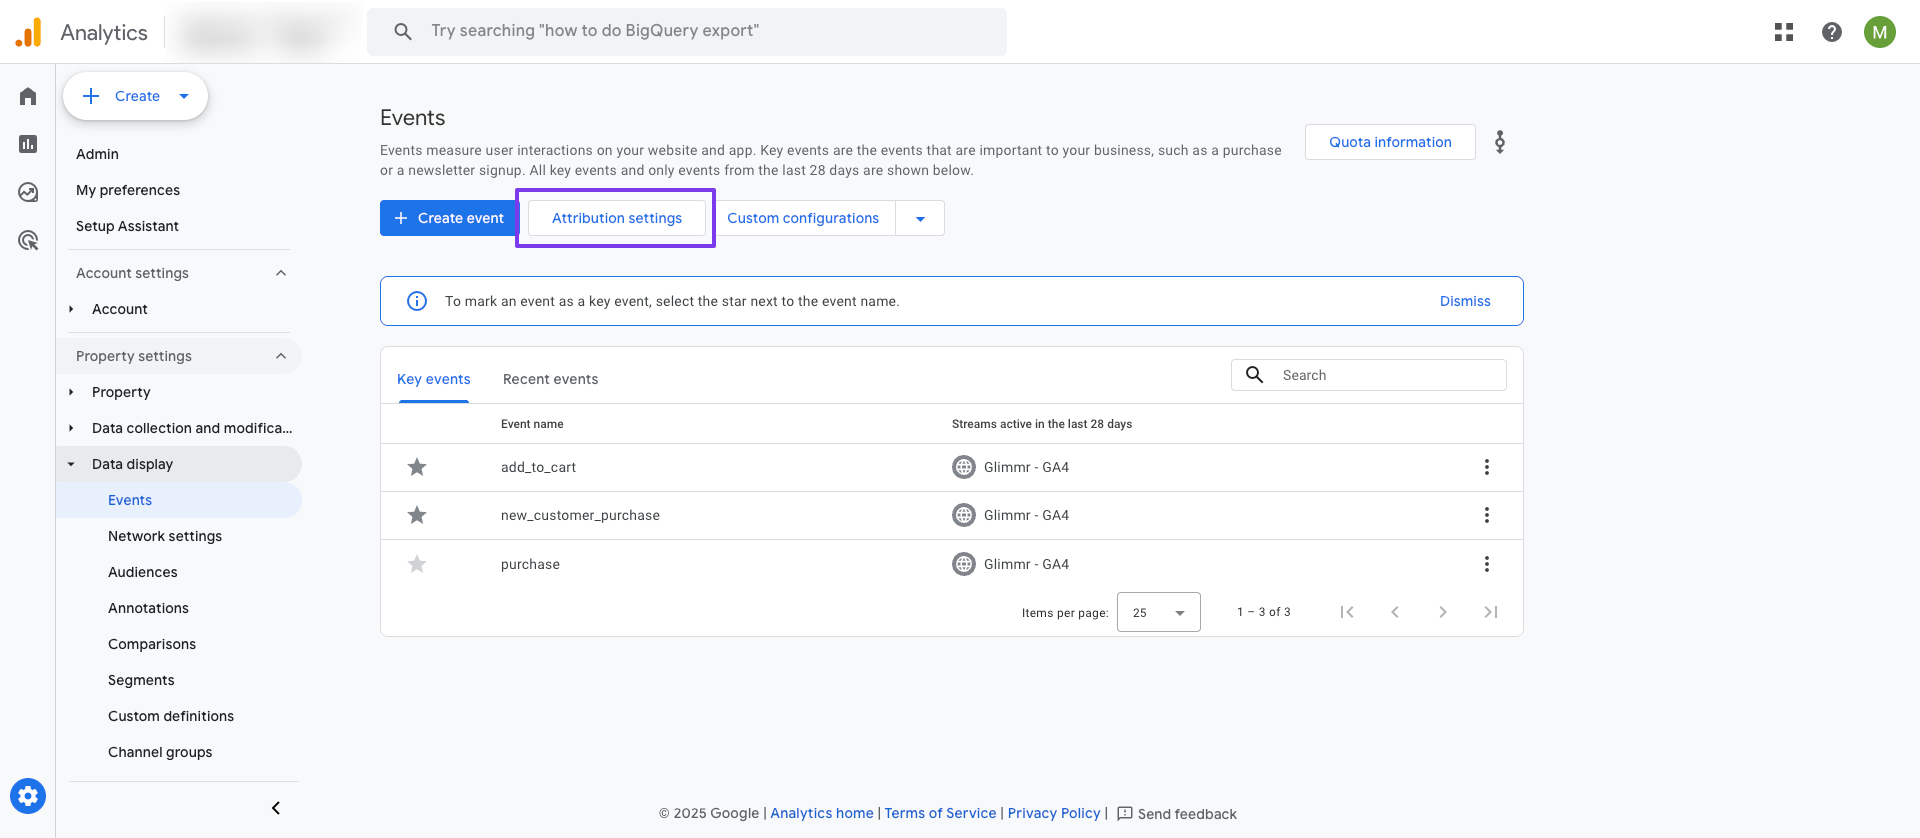
    4. Go to **Attribution settings** on top of the Events page.
           <Frame>
             <img src="https://mintcdn.com/converge/IDREMTtr-R-Bh1Qm/images/destinations/google-ads/ga4_attribution_settings.png?fit=max&auto=format&n=IDREMTtr-R-Bh1Qm&q=85&s=3702948e3204838d1100a99bc8db78a3" alt="ga-2" width="1920" height="838" data-path="images/destinations/google-ads/ga4_attribution_settings.png" />
           </Frame>

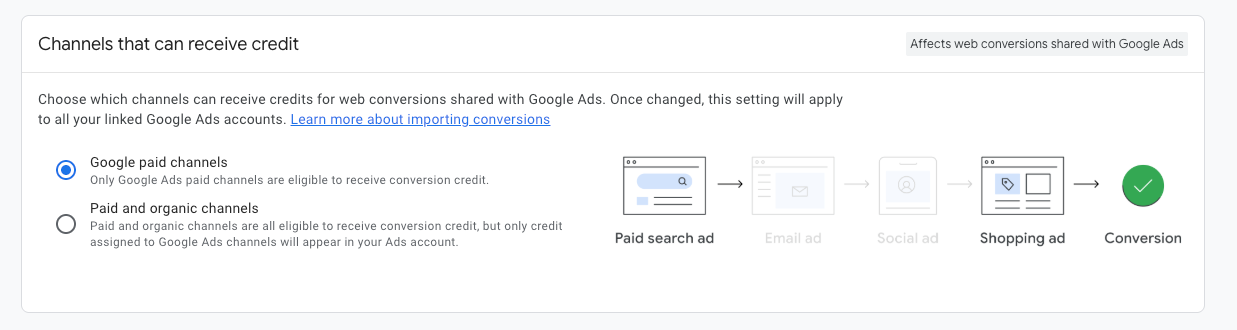
    5. Under **Channels that can receive credit**, select **Google paid channels**
           <Frame>
             <img src="https://mintcdn.com/converge/dh0K_Fgr0_qazJsh/images/destinations/google-ads/ga4_attribution_channels.png?fit=max&auto=format&n=dh0K_Fgr0_qazJsh&q=85&s=0b6917caa31801cfc4faa9d61fbc2a8a" alt="ga-2" width="1237" height="330" data-path="images/destinations/google-ads/ga4_attribution_channels.png" />
           </Frame>

    6. The custom conversion is now created in GA4, time to import it into Google Ads. Navigate to your Google Ads Dashboards and choose **Goals > Summary**.
           <Frame>
             <img src="https://mintcdn.com/converge/L45wyZk0Nu0wVlB6/images/destinations/google-ads/google-ads-destination-new-1.png?fit=max&auto=format&n=L45wyZk0Nu0wVlB6&q=85&s=2a949e088d7f25776639b854b1556434" alt="gads-1" width="693" height="489" data-path="images/destinations/google-ads/google-ads-destination-new-1.png" />
           </Frame>
        

    7. Choose <IconText name="plus" text="Create conversion action" />
           <Frame>
             <img src="https://mintcdn.com/converge/L45wyZk0Nu0wVlB6/images/destinations/google-ads/google-ads-destination-new-2.png?fit=max&auto=format&n=L45wyZk0Nu0wVlB6&q=85&s=e680b375d947e0fb8fa5a73cb0d8f442" alt="gads-2" width="1217" height="891" data-path="images/destinations/google-ads/google-ads-destination-new-2.png" />
           </Frame>
        

    8. Choose **Conversions on a website**.

           <Frame>
             <img src="https://mintcdn.com/converge/dh0K_Fgr0_qazJsh/images/destinations/google-ads/gads_conversion_on_a_website.png?fit=max&auto=format&n=dh0K_Fgr0_qazJsh&q=85&s=1b43718c2474406701b30b9abb72b356" alt="gads-3" width="1694" height="350" data-path="images/destinations/google-ads/gads_conversion_on_a_website.png" />
           </Frame>

           <Note>
             Google Ads sometimes skips this step and goes directly to step 2. In this case, click **Back** on the bottom of the page.

             <Frame>
               <img src="https://mintcdn.com/converge/lhx1moAURDDNfuH-/images/destinations/google-ads/google-ads-conversion-skipped.png?fit=max&auto=format&n=lhx1moAURDDNfuH-&q=85&s=baa3b1d8d3aa4bff039b4d033ee51e9e" alt="gads-warning" width="683" height="102" data-path="images/destinations/google-ads/google-ads-conversion-skipped.png" />
             </Frame>
           </Note>

           <Note>
             Google Ads might not show **via Google Analytics** as an option. Choose **Edit**, scan your website and select or link your GA4 property.

             <Frame>
               <img src="https://mintcdn.com/converge/l52pMH13u2t70ou2/images/destinations/google-ads/google-nc-purchase-google-tag.png?fit=max&auto=format&n=l52pMH13u2t70ou2&q=85&s=2663156dd5a13a836880cd8d185a3f46" alt="gads-warning" width="860" height="167" data-path="images/destinations/google-ads/google-nc-purchase-google-tag.png" />
             </Frame>
           </Note>


    9. Choose **Purchase** from the list of conversion actions.
           <Frame>
             <img src="https://mintcdn.com/converge/dh0K_Fgr0_qazJsh/images/destinations/google-ads/gads_conversion_category.png?fit=max&auto=format&n=dh0K_Fgr0_qazJsh&q=85&s=b9d34e504e5c5d94bffe134c7a518d88" alt="gads-5" width="1692" height="622" data-path="images/destinations/google-ads/gads_conversion_category.png" />
           </Frame>
        

    10. Click on **Add conversion actions** and select your GA4 property.
            <Frame>
              <img src="https://mintcdn.com/converge/dh0K_Fgr0_qazJsh/images/destinations/google-ads/gads_add_conversion_action.png?fit=max&auto=format&n=dh0K_Fgr0_qazJsh&q=85&s=8d75a84890e2ae9e3921d69ec2ab6178" alt="gads-2" width="1844" height="664" data-path="images/destinations/google-ads/gads_add_conversion_action.png" />
            </Frame>
         

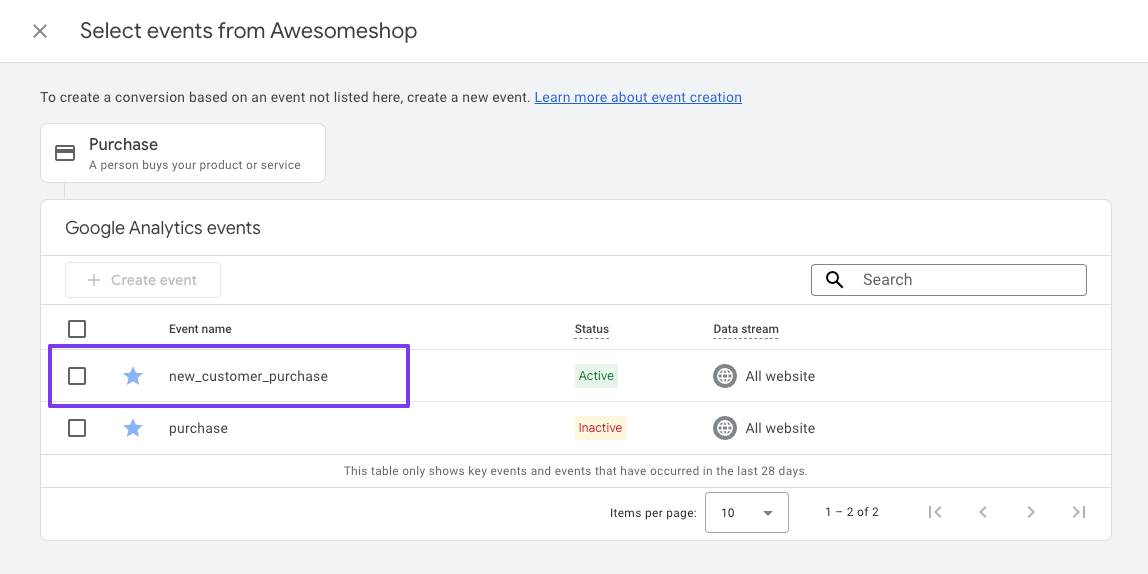
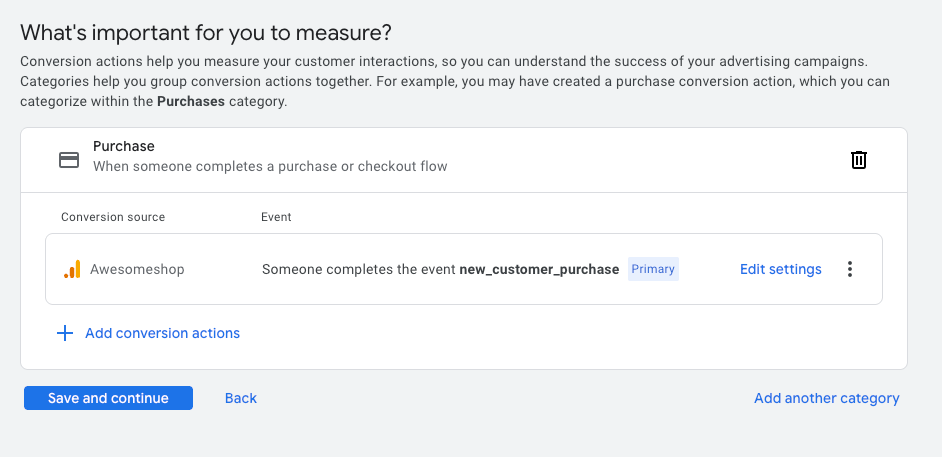
    11. Select **new\_customer\_purchase** event and click **Select events**.
            <Frame>
              <img src="https://mintcdn.com/converge/uJ9ST9XpkLxvUq8w/images/destinations/google-ads/google-nc-purchase-event.png?fit=max&auto=format&n=uJ9ST9XpkLxvUq8w&q=85&s=6ff019294d4c3440fdeae856f1fc35ed" alt="gads-warning" width="1148" height="574" data-path="images/destinations/google-ads/google-nc-purchase-event.png" />
            </Frame>
         

    12. Click **Save and continue**.
            <Frame>
              <img src="https://mintcdn.com/converge/l52pMH13u2t70ou2/images/destinations/google-ads/google-nc-purchase-save.png?fit=max&auto=format&n=l52pMH13u2t70ou2&q=85&s=f568e9b9e6609bae7b55cee7639c08a4" alt="gads-warning" width="942" height="457" data-path="images/destinations/google-ads/google-nc-purchase-save.png" />
            </Frame>
  </Step>
</Steps>

## Cross-Domain tracking

If you need to track conversions across multiple domains you will need to set up cross-domain tracking in your Google Ads account.

1. Go to your **Google Ads account**.
2. Go to **Tools** -> **Data manager**.
3. Find your Google tag and click **Manage**.
4. Under Settings click **Configure your domains**.
5. Add the different domains the user will interact with.
6. Click **Save**

Google Ads will automatically add cross-domain tracking parameters to every link going from domain A to domain B.

<Note>If you also want cross-domain tracking in Converge. You can follow these [instructions](/sources/website-integrations/converge-pixel#cross-domain-tracking).</Note>

***

## FAQ

<AccordionGroup>
  <Accordion title="Why are one or more of my campaigns not receiving conversion data since Converge?">
    If none of your campaigns are receiving any conversions, you likely did not configure your conversions correctly and should revise the [Installation instructions](#installation-instructions).

    If only some of your campaigns are not receiving conversions, then check the following:

    1. Make sure that the campaigns are still active and have significant ad spend
    2. Verify that you have set the **Goals** of all campaigns to **"Using Account settings"** in their respective campaign settings.
  </Accordion>

  <Accordion title="Can I have an existing (different) Google Ads Tag running side-by-side Converge?">
    In general, you should be OK running a separate Google Ads Tag and the Converge Google Ads Destination side-by-side.

    However, in rare cases, your existing Google Ads tag and the Converge Google Ads Destination can interfere with each other, especially when the *Deploy a separate data layer for Converge*-option is enabled.

    If you notice under-reporting of your conversions set up through the Converge Google Ads Destination and you have an existing Google Ads Tag installed on the website, turn this functionality off under **Advanced > Edit Configuration**.

    <Frame>
      <img src="https://mintcdn.com/converge/L45wyZk0Nu0wVlB6/images/destinations/google-ads/google-ads-destination-separate-datalayer.png?fit=max&auto=format&n=L45wyZk0Nu0wVlB6&q=85&s=ec77d336cf1d7b972aec2e8d28614a83" alt="img" width="2380" height="284" data-path="images/destinations/google-ads/google-ads-destination-separate-datalayer.png" />
    </Frame>
  </Accordion>
</AccordionGroup>