> ## Documentation Index
> Fetch the complete documentation index at: https://docs.runconverge.com/llms.txt
> Use this file to discover all available pages before exploring further.

# Outbrain Ads

> An introduction to the Outbrain Ads Destination

export const OutboundLink = ({linkText, linkTarget}) => {
  return <a target="_blank" href={linkTarget}> {linkText} 
    <div className="inline h-3 w-3 fill-gray-500 dark:fill-gray-100 text-gray-500 dark:text-gray-300 ml-1 mr-1">
      <svg className="inline w-2.5 h-2.5 bg-gray-500 dark:bg-gray-300" style={{
    maskImage: `url('https://mintlify.b-cdn.net/v6.5.1/solid/up-right-from-square.svg')`,
    maskRepeat: "no-repeat",
    maskPosition: "center center"
  }}></svg> 
    </div>
    </a>;
};

export const IconText = ({name, text, iconSource = "mintlify", iconLocation = "before", iconType = "solid"}) => {
  const sourceUrl = iconSource === 'local' ? `url('/images/icons/${name}.svg')` : `url('https://mintlify.b-cdn.net/v6.5.1/${iconType}/${name}.svg')`;
  return <>
            <div className="inline-block pl-2">
                {iconLocation === 'before' && <div className="h-3.5 w-3.5 fill-gray-800 dark:fill-gray-100 text-gray-800 dark:text-gray-100 inline-block align-middle mr-2">
                        <svg className="w-4 h-4 bg-gray-800 dark:bg-gray-100 " style={{
    maskImage: sourceUrl,
    maskRepeat: "no-repeat",
    maskPosition: "center center"
  }} />
                    </div>}
                <span className="inline-block align-middle font-semibold fill-gray-800 dark:fill-gray-100 text-gray-800 dark:text-gray-100 pl-1 pr-2">{text}</span>
                {iconLocation === 'after' && <div className="h-3.5 w-3.5 fill-gray-800 dark:fill-gray-100 text-gray-800 dark:text-gray-100 inline-block align-middle mr-2">
                        <svg className="w-4 h-4 bg-gray-800 dark:bg-gray-100 pr-3" style={{
    maskImage: sourceUrl,
    maskRepeat: "no-repeat",
    maskPosition: "center center"
  }} />
                    </div>}
            </div>
        </>;
};

export const Icon = ({name}) => {
  return <div className="h-4 w-4 fill-gray-800 dark:fill-gray-100 text-gray-800 dark:text-gray-100 inline-block align-middle">
            <svg className="w-4 h-4 bg-gray-800 dark:bg-gray-100" style={{
    maskImage: `url('https://mintlify.b-cdn.net/v6.5.1/solid/${name}.svg')`,
    maskRepeat: "no-repeat",
    maskPosition: "center center"
  }} />
        </div>;
};

## Overview

Destination Type: <IconText text="Server-side" name="server" iconType="duotone" iconLocation="after" />

***

## Installation instructions

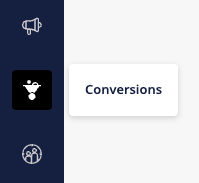
1. Navigate to your <OutboundLink linkTarget="https://my.outbrain.com/amplify/site/marketers/" linkText="Outbrain Ads Manager" /> and choose **Conversions** from the side-bar.
   <Frame>
     <img src="https://mintcdn.com/converge/L45wyZk0Nu0wVlB6/images/destinations/outbrain/outbrain-1.png?fit=max&auto=format&n=L45wyZk0Nu0wVlB6&q=85&s=ccd10bddcc6489861d278b774157e57c" alt="outbrain-sidebar" width="199" height="183" data-path="images/destinations/outbrain/outbrain-1.png" />
   </Frame>

2. Click on **Create Conversion** in the top right corner.

3. Choose **Server-to-Server Conversions** as a Data source.

4. Under Conversion Type, choose your Event Category, most likely **Purchase** and give your conversion a name, e.g. `[Converge] Purchase`.

5. Click on **Create Conversion**.

6. In the Converge sidebar, click on <IconText name="arrow-right-from-line" text="Event streams" /> and then click **Create new Destination**.
7. Select the **Outbrain** destination and click **Next**.

8. Give your destination a **name** (e.g. Outbrain Destination) and click **Next**.

9. Keep the defaults on the Configuration page and click **Next**.

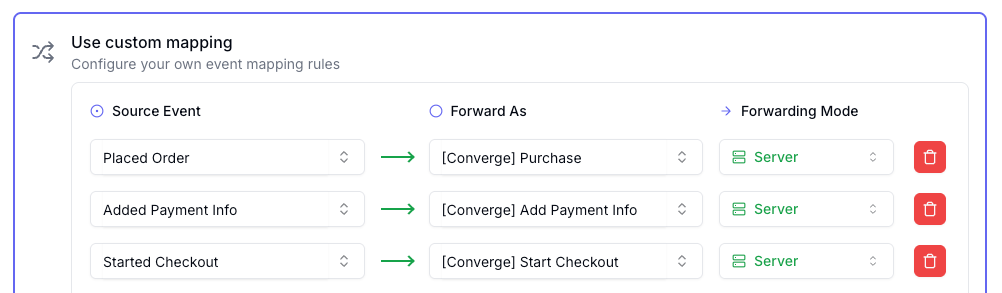
10. Click on <IconText name="plus" text="Add new mapping" /> and select Placed Order as the source event.

11. In the Forward As value enter `[Converge] Purchase`.

12. Select **Server** as the Forwarding Mode and click **Next**.

13. Add other conversion events in Outbrain following steps 2-5 above and map them in your destination by following steps 10-12. Then click **Next**.

<Frame>
  <img src="https://mintcdn.com/converge/L45wyZk0Nu0wVlB6/images/destinations/outbrain/outbrain-custom-mapping-example.png?fit=max&auto=format&n=L45wyZk0Nu0wVlB6&q=85&s=202d87e73247e86566af33c5dabe9ee5" alt="outbrain-4" width="1002" height="293" data-path="images/destinations/outbrain/outbrain-custom-mapping-example.png" />
</Frame>

14. Select the sources you want to forward events from, then click **Next**.

<Note>This is a server-side destination, meaning that only server-side sources can be used with this destination. You can still select client-side sources but the events will not be sent to Outbrain.</Note>

15. Review any issues and click **Submit**.

<Warning> For this destination to work, you will need to change the URL of **all** of your campaigns following steps 13-16 below. **You should add these parameters for every new campaign as well**. </Warning>

16. Navigate to the Campaigns overview.
    <Frame>
      <img src="https://mintcdn.com/converge/L45wyZk0Nu0wVlB6/images/destinations/outbrain/outbrain-3.png?fit=max&auto=format&n=L45wyZk0Nu0wVlB6&q=85&s=43a3be471df7b0a98b201fa9aeb5edce" alt="outbrain-campaign" width="175" height="63" data-path="images/destinations/outbrain/outbrain-3.png" />
    </Frame>

17. Click on the <Icon name="pencil" />-icon next to the campaign for which you want to modify the tracking parameters to open the campaign settings.

18. Add the following in the **Tracking**-section

```
utm_source=outbrain&utm_medium=discovery&utm_campaign={{campaign_name}}&utm_content={{ad_title}}&utm_term={{publisher_name}}_{{section_name}}&cvg_source=outbrain&cvg_adid={{ad_id}}&cvg_cid={{campaign_id}}&outbraincid={{ob_click_id}}
```

19. Save your modification by clicking the Submit button.

***

## Converge functionality

This integration supports the following Converge destination functionality.

| Converge Feature                                     |       Supported       |
| ---------------------------------------------------- | :-------------------: |
| Custom Events                                        | <Icon name="xmark" /> |
| Filters                                              | <Icon name="check" /> |
| Server-side Conversions                              | <Icon name="check" /> |
| [Conversion amount](/destinations/conversion-amount) | <Icon name="check" /> |

***

## FAQ

<AccordionGroup>
  <Accordion title="Why do I need to change my tracking parameters for the Outbrain Destination and in-platform attribution to work?">
    Outbrain's in-platform attribution works based on Outbrain Click IDs. If a purchase gets sent to Outbrain without a Click ID, it won't get attributed.

    Unfortunately, Outbrain doesn't add the Click ID automatically to the landing page URL (as opposed to other ad platforms such as Google Ads or Facebook Ads). You need to manually make sure that all links include a click ID by modifying the tracking parameters for **every** ad you run.
  </Accordion>
</AccordionGroup>

***

## Event mapping

Events are not automatically mapped, you need to configure the mapping of the [Converge event spec](/sources/converge-spec) to your Outbrain conversions manually.
We recommend the following mapping to the Event Type:

| Converge Event Name                                             | Outbrain Event Type            |
| --------------------------------------------------------------- | ------------------------------ |
| [Added To Cart](/sources/converge-spec#added-to-cart)           | `[Converge] Add To Cart`       |
| [Started Checkout](/sources/converge-spec#started-checkout)     | `[Converge] Initiate Checkout` |
| [Added Payment Info](/sources/converge-spec#added-payment-info) | `[Converge] Add Payment Info`  |
| [Placed Order](/sources/converge-spec#placed-order)             | `[Converge] Purchase`          |
