Overview
Destination Type:- Includes support for passing
- Includes support for
Installation instructions
This is a client-side-only destination, meaning that you will need to be tracking all events client-side (including
Placed Order) for this destination to work properly. Set up tracking in Twitter Ads
- Navigate to your X Ads account and choose Tools > Events Manager.
-
Copy your X Pixel ID
- If you already have an events source, at the top of the page, find the ‘X pixel’ section and copy the ID. (e.g.
obarl) - If not, you will be prompted to create a new event source, follow the instructions and copy the Pixel ID when you are done.
- If you already have an events source, at the top of the page, find the ‘X pixel’ section and copy the ID. (e.g.
- Go to X Ads > Tools > Events Manager and click on the Create Event button.
- Give your event a name, e.g. ‘Placed Order’ when you are setting up a purchase conversion.
- Pick a X event type, e.g. ‘Purchase’. You can find a suggested mapping of Converge to X Ads event types below.
- Configure your attribution settings and click on Next.
- Choose the ‘Define event with code’ setup method and click on Next.
- Click ‘Save’ to finish the setup.
-
You can now find the event in the Events table in the X Ads Events manager.
Under the event, the ID is composed as
tw-{pixelID}-{eventID}. Copy theeventIDsave it for the Converge destination configuration.
Repeat the steps 3-9 above for all the conversions you want to track in X Ads.
2. Set up your destination
- In the Converge sidebar, click on and then click Create new Destination.
- Select the X Ads (Twitter Ads) destination and click Next.
- Give your destination a name (e.g. X Ads Destination) and click Next.
- Fill in the Pixel ID you copied from X Ads and click Next.
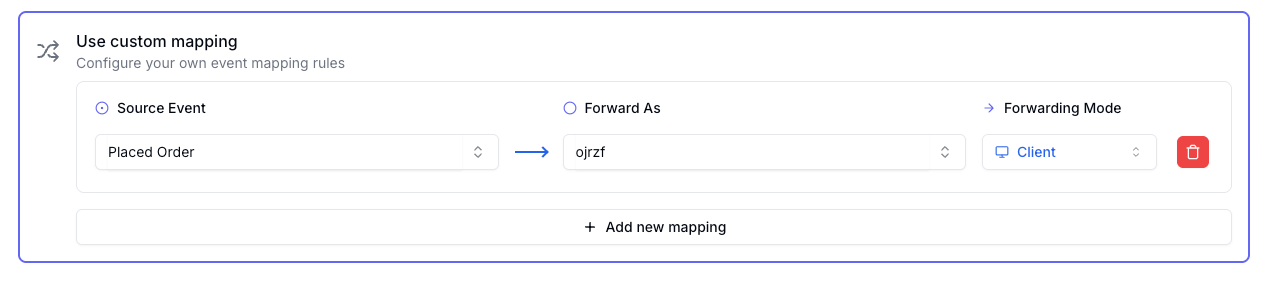
- Click on and select Placed Order as the source event.
- In the Forward As value enter eventID you saved for the purchase conversion in X Ads.
- Select Client as the Forwarding Mode and click Next.
Repeat the steps 14-16 above for all the conversions you track in X Ads
- Select the sources you want to forward events from, then click Next.
This is a client-side destination, meaning that only client-side sources can be used with this destination. You can still select server-side sources but the events will not be sent to X.
- Review any issues and click Submit.
Modify your Content ID
The Converge X Ads Destination will use the Product ID by default. However, you can configure the destination to use explicitly the Variant ID or SKU instead.- Navigate to your X Ads Destination, click on Configuration.
- Click on the Configuration-subtab
- Open the Advanced configuration (optional) section
- Pick your desired Content ID, and click on Save