Overview
Destination Type: and- Includes support for the
Installation instructions
- Navigate to your Facebook Events Manager.
- From your Events Manager, click on the Facebook Pixel you would like to connect.
- In the Facebook Pixel menu, choose the Settings subtab.
- From this subtab, you can find your Pixel ID, and copy it — you will need it in a later step.
- Scroll down in the Settings subtab until you find Generate access token, and click on it. Copy this token as well.
- In the Converge sidebar, click on and then click Create new Destination.
- Select the Meta Ads (Facebook Ads) destination and click Next.
- Give your destination a name (e.g. Meta Ads Destination) and click Next.
- Fill in the Pixel ID and Access Token you copied from Facebook and click Next.
-
Fill in your homepage domain name in the Your Domain name field, it does not need to include
https://. Click Next. - Select Use default mapping and click Next.
- Select the sources you want to forward events from, then click Next.
- Review any issues and click Submit.
Turn off your old Facebook tracking
Turning off the Shopify Facebook Sales Channel data sharing
- Navigate to your .
- Click on Sales channels and choose Facebook & Instagram from the Installed sales channels menu.
-
Click on Settings.
-
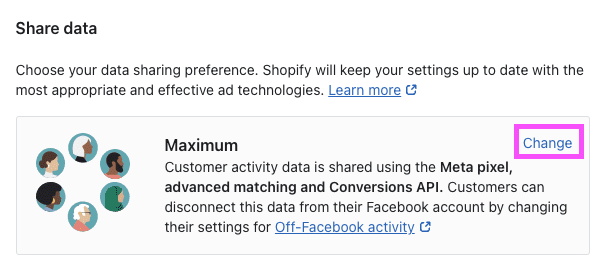
Click on Change in the Share data submenu.
-
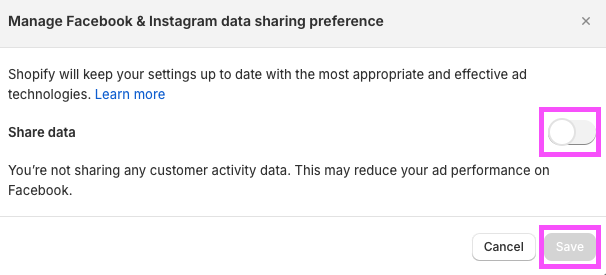
Turn the Share data switch off (it should be gray) and press Save.
Modify your Content ID
The Converge Meta Ads Destination will use the Default content mode to define the Content ID forwarded by default. However, you can configure the destination to use explicitly the Product ID, the Variant ID or SKU instead.- Navigate to your Meta Ads Destination, click on Configuration.
- Click on the Configuration-subtab
- Open the Advanced configuration (optional) section
- Pick your desired Content ID, and click on Save
Converge functionality
This integration supports the following Converge destination functionality.FAQ
Why do I see a Duplicate Pixel ID warning in my console?
Why do I see a Duplicate Pixel ID warning in my console?
If you are a Shopify store, Converge needs to load both a
theme.liquid pixel and a Shopify Custom Pixel to track reliably.
See the FAQ in the Shopify Integration for more detailed information.Converge makes sure that no duplicate events get sent, even though the Facebook Pixel needs to be loaded in two separate places for complete event coverage. If you are not using the Shopify Web integration, you might have an old pixel installed using a different tracking method, and you should turn this one off.
Why do I see "increase coverage"-warnings in my Events Manager?
Why do I see "increase coverage"-warnings in my Events Manager?

email).
Ideally, Facebook would have an email for every Added To Cart that ever happens on your website so they can easily attribute it.However, many people on the website are anonymous (they have never given their email to your store and thus Converge cannot track it). If the user never gives their email or address, then we can never send that email back.Converge sends as many of these parameters as there are available.The only events where you’d expect a very high email match rate are events where the user always has to give an email (e.g., purchase).For all events where certain parameters are not always available (e.g., you don’t expect all AddToCart or an InitiateCheckout to have an email), you can safely ignore this warning.Why is my Click ID (fbc) percentage low?
Why is my Click ID (fbc) percentage low?

Click ID (fbc) parameter. In most cases, this is an expected value given how the fbc parameter works.The Click ID (fbc) is a parameter generated by Meta that’s added to the URLs of your ads and used by Meta to track and identify events and conversions. See for additional information.In an extreme scenario where all of your visitors arrive from a Meta ad, the Click ID (fbc) parameter would be present in 100% of your events.Not all your traffic will originate from Meta, though. Users can reach your store through, for example, search engines, other ad platforms, or even directly. This traffic won’t contain the fbc parameter in the URL, as it’s exclusive to Meta ads.Given that, consider another extreme scenario where none of your traffic originates from Meta ads—it’s expected that Click ID (fbc) would be zero.Overall, you should expect the percentage of Click ID (fbc) to be directly related to the percentage of traffic your store receives that originates from Meta ads.In summary, if your store uses multiple marketing channels with no particular focus on Meta, it’s expected to see low percentages for the Click ID (fbc) parameter. On the other hand, if your store relies heavily on Meta with a majority of your traffic coming through it, you should expect higher percentages.How do I use the NewCustomerPurchase event?
How do I use the NewCustomerPurchase event?
Converge automatically sends the
NewCustomerPurchase event to Facebook. To start using it for reporting and optimization, you need to create a custom conversion in Facebook Events Manager.We have a guide on setting up this custom event in the Meta Ads Manager here.Why do I see "update recommended" warnings about IPv6 addresses in the Events Manager?
Why do I see "update recommended" warnings about IPv6 addresses in the Events Manager?

The Facebook Ads manager is over-reporting conversions and/or the conversion value is wrong.
The Facebook Ads manager is over-reporting conversions and/or the conversion value is wrong.
Confirm the following steps to troubleshoot:
- The Facebook pixel is correctly configured. When the Facebook Automatic Events are enabled, Facebook tracks purchases automatically across your website—typically with a wrong AOV. This is a common source of over-reporting. You can turn this off in the Facebook Events Manager under Settings > Event setup > Track events automatically without code.
- Converge is the only active Facebook integration. In the Converge destination logs, you can recognize it as External pixel events. Make sure all other Facebook tracking integrations other than Converge are turned off. See here.
- Converge tracks the correct number of
Placed Orderevents. Compare the Attribution > Orders numbers with your backend. - The correct dataset is linked to your Facebook ads. The dataset ID should match your Converge destination configuration.
Event mapping
Converge automatically maps the following events from the Converge event spec to the Meta spec.
This integration also auto-tracks some additional events that are not part of the Meta Base Spec but are so heavily requested that we automatically forward them.